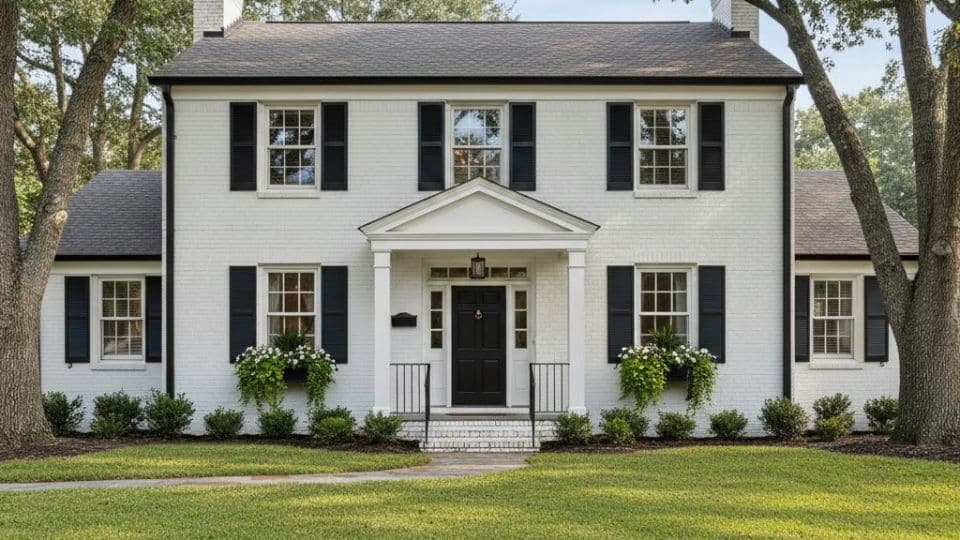
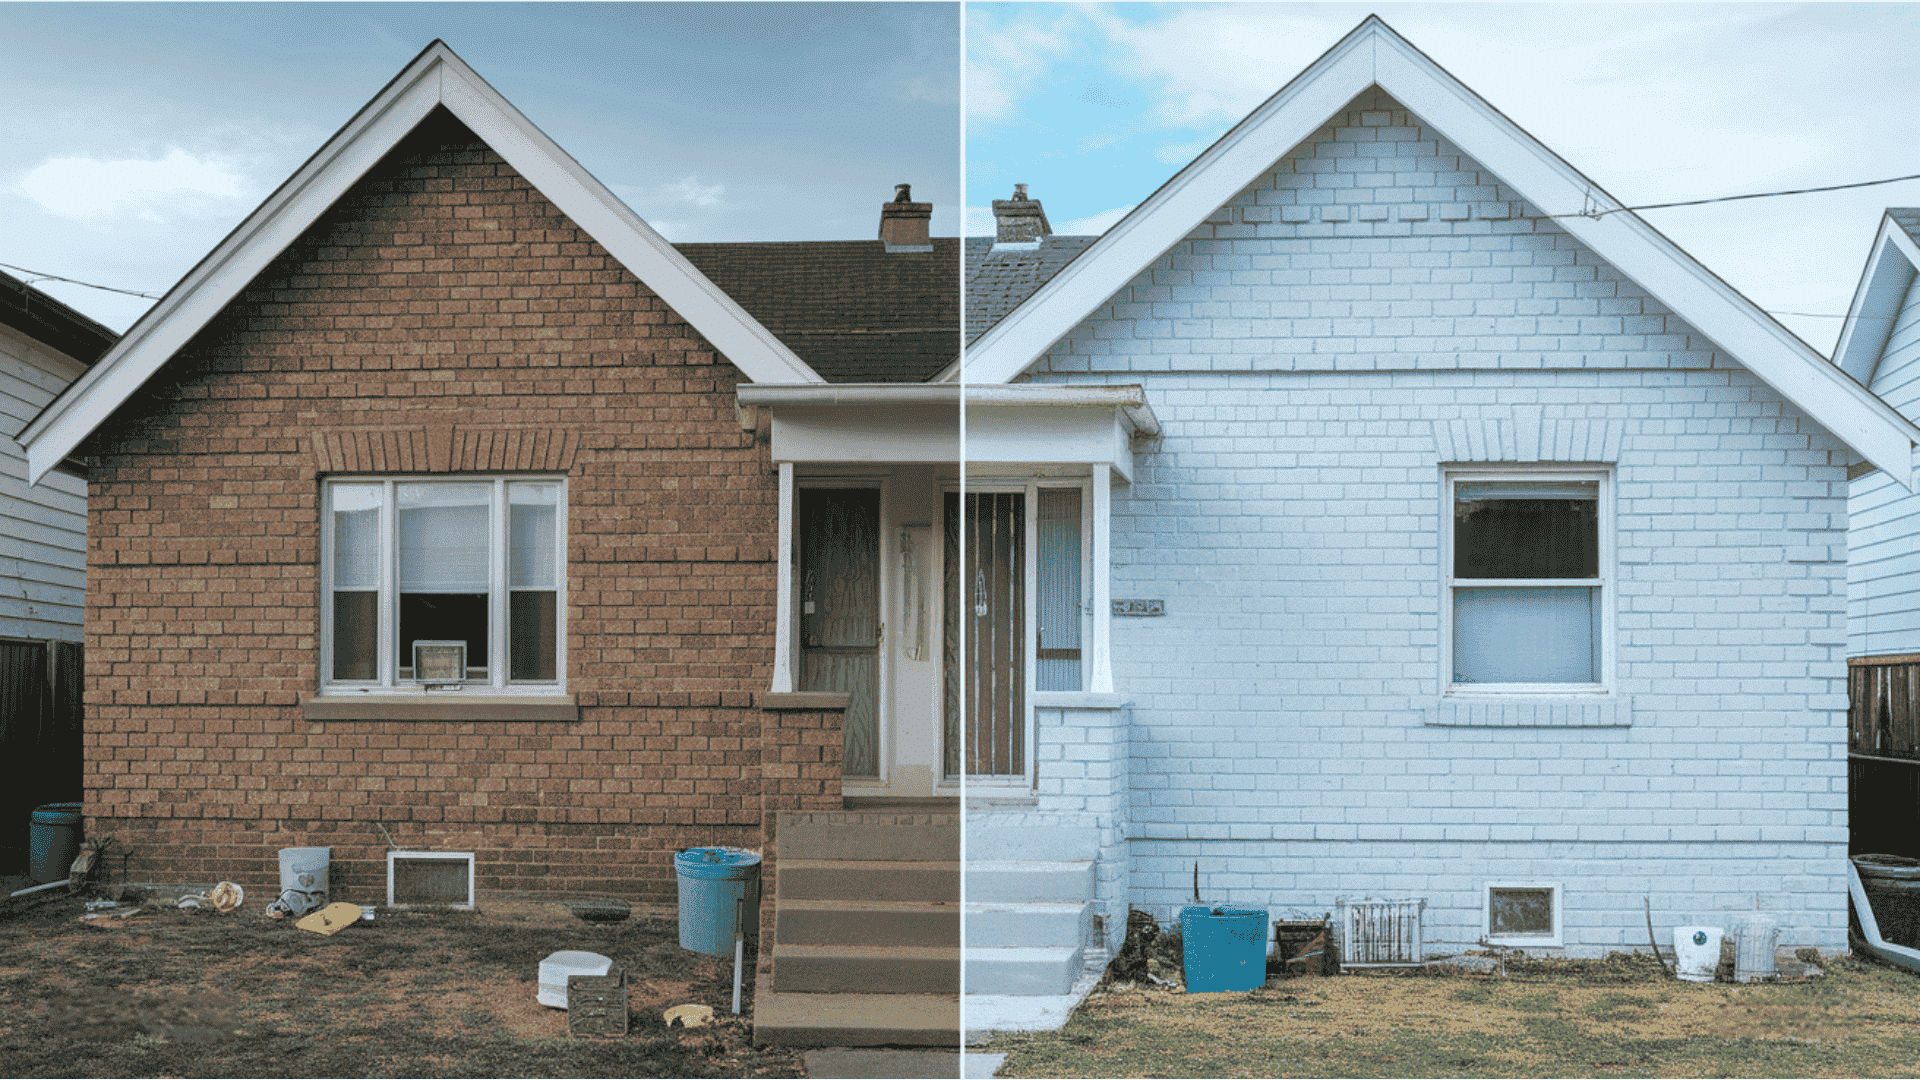
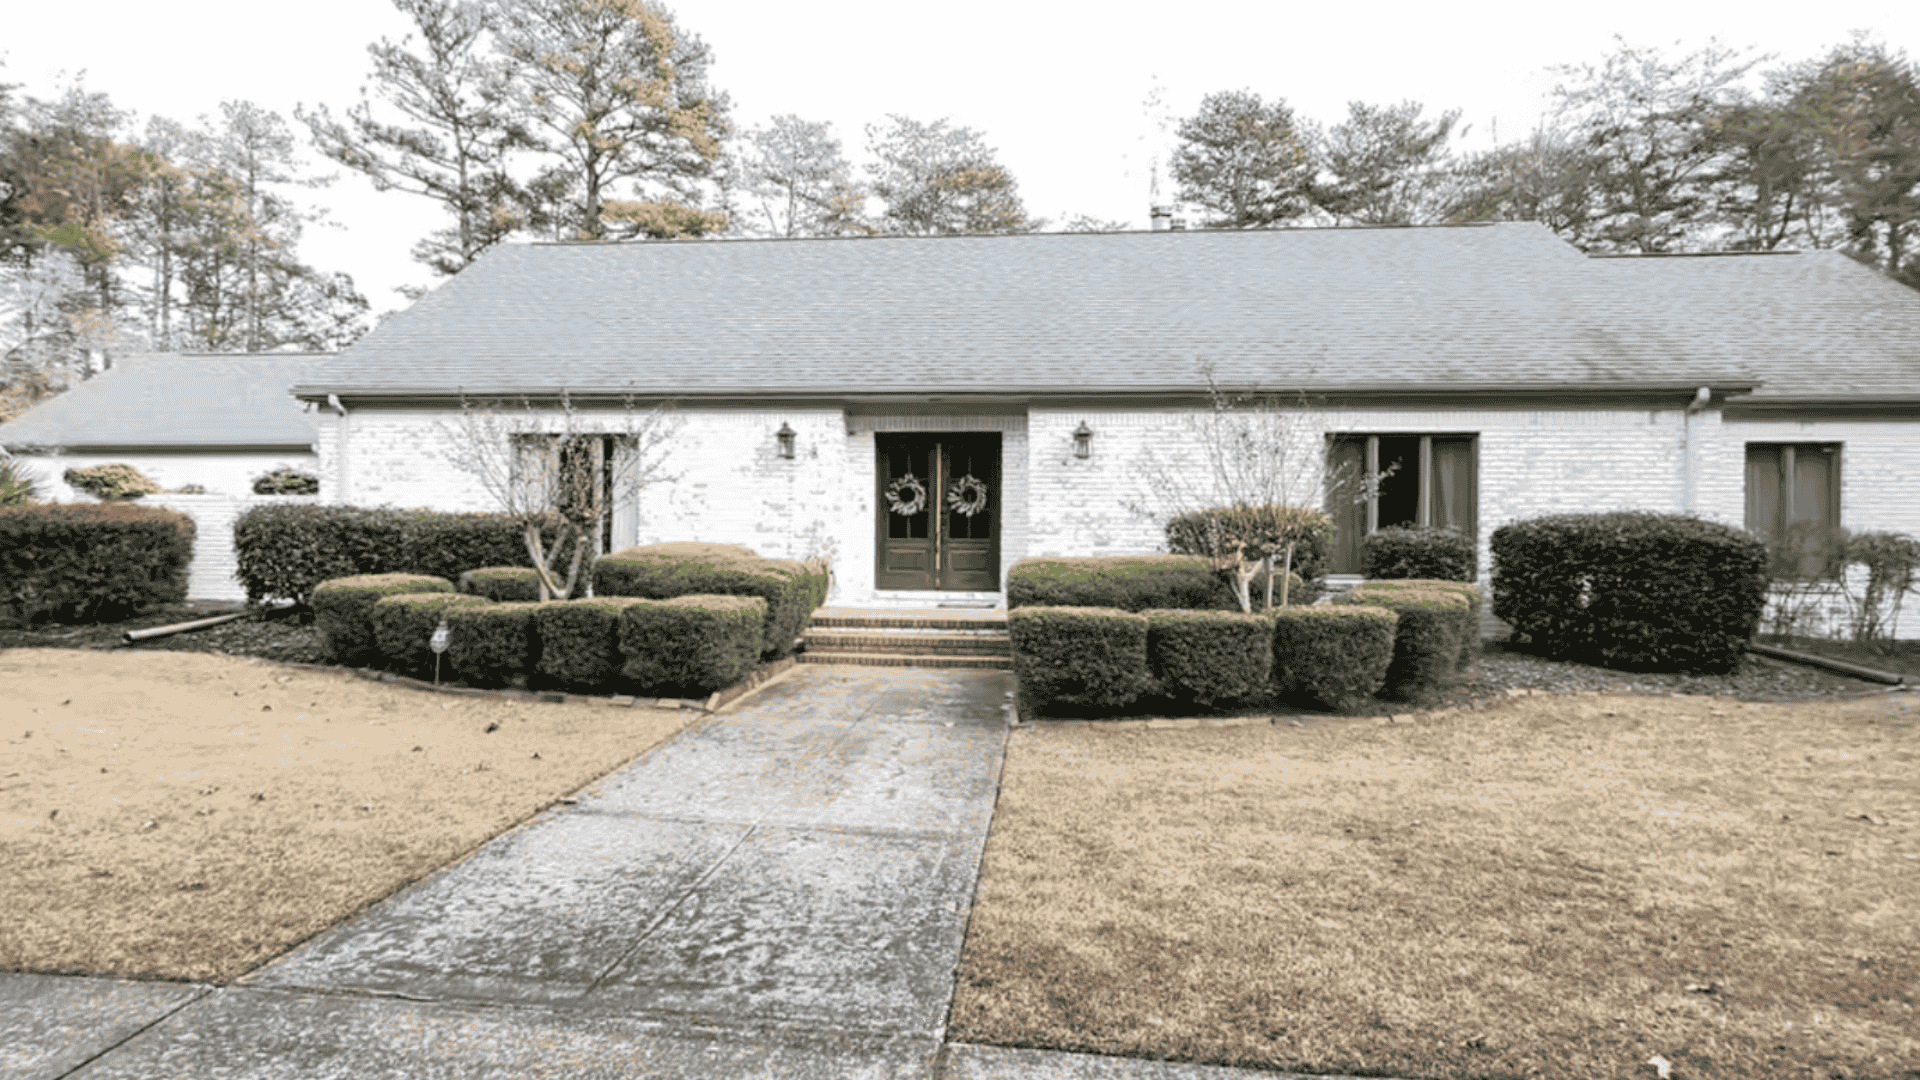
Ever feel like your brick exterior is dragging down your home’s curb appeal? Limewashed brick might be the breath of fresh air your walls have been waiting for.
This timeless finish changesdull, dated brick into something soft, chalky, and full of character without sacrificing the charm that makes your home unique.
Made from crushed limestone and water, limewash creates a breathable layer that ages gracefully instead of peeling or trapping moisture like regular paint.
It’s the perfect blend of old-world beauty and modern durability. In this blog, I’ll walk you through what limewashing is, how to apply it, the pros and cons, and maintenance tips to keep your brick looking fresh for years.
What is Limewashing and Why It Works on Brick
Limewashing brick is all about giving your exterior a fresh, breathable finish that enhances its natural texture.
Made from crushed limestone mixed with water, it’s a mineral-based coating, not a paint, that seeps into the brick rather than sitting on top. The result is a soft, matte look that feels organic and timeless.
Here’s why limewashing brick stands out:
- Breathable protection: Unlike paint, limewash allows moisture to escape, preventing trapped water, peeling, and cracking.
- Built for U.S. climates: It holds up beautifully through humidity, rain, and temperature swings because the brick can dry naturally.
- Natural aging: Instead of fading or chipping, the finish develops a gentle patina that grows richer over time.
- Eco-friendly formula: Made from natural minerals and low in VOCs, it’s safe for you and the environment.
- Mold-resistant: Its high alkalinity discourages mold and mildew growth, keeping your exterior cleaner for longer.
- Easily reversible: Don’t love the look? Pressure washing restores your brick to its original state.
With limewashing, your brick stays protected while maintaining its authenticity and texture. It’s a simple, sustainable way to elevate your home’s exterior without hiding what makes it special.
Step-by-Step Instructions for How to Limewash Bricks
Applying limewash to brick is all about preparation and patience. Each step builds on the last, ensuring a smooth, even finish that lasts beautifully.
Materials & Tools for Limewash Your Brick Wall
| Materials | Tools |
|---|---|
| Hydrated lime or pre-made mineral limewash concentrate | Large masonry brush or thick nap roller (1¼ inch minimum) |
| Water for dilution and dampening | Five-gallon buckets for mixing |
| Natural pigments or tints for custom colors | Drill with paint paddle attachment |
| Drop cloths and plastic sheeting | Garden hose with spray nozzle |
| Mild detergent for pre-cleaning the brick | Protective gear: rubber gloves, goggles, work clothes |
| Rags or sponges for cleanup | Pressure washer for surface prep |
| Sample container for test mix | A broom for clearing spider webs and debris |
Using quality supplies saves time, reduces waste, and helps limewash adhere properly. Prepare ahead of time, and your exterior brick will get a clean, consistent finish.
Step 1: Clean and Prepare Your Surface
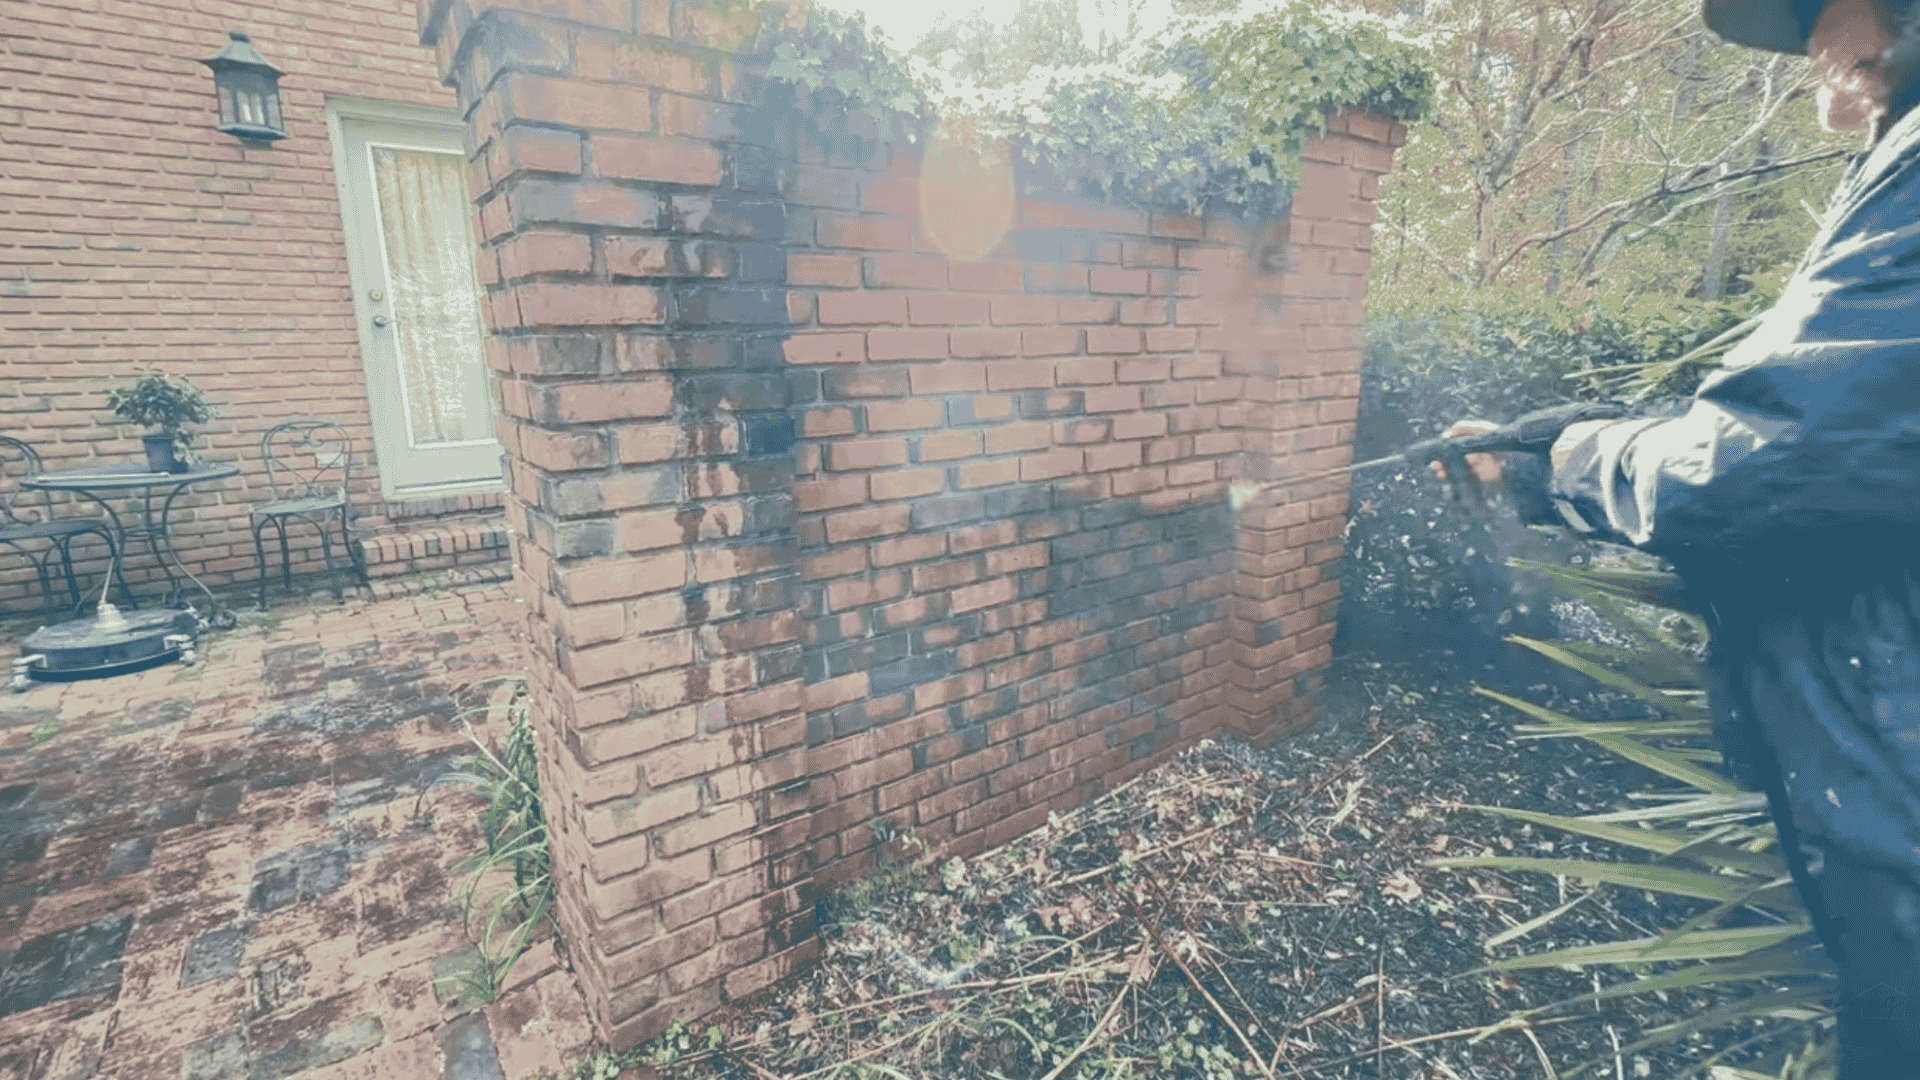
Begin by removing dirt, debris, and cobwebs using a stiff broom. Power wash thoroughly, covering every inch, including mortar joints and shaded areas, to remove mildew.
After cleaning, allow the brick to dry completely or dampen slightly before applying. Protect plants, windows, and trim with drop cloths to prevent stubborn limewash splatter.
Step 2: Mix Your Limewash Solution
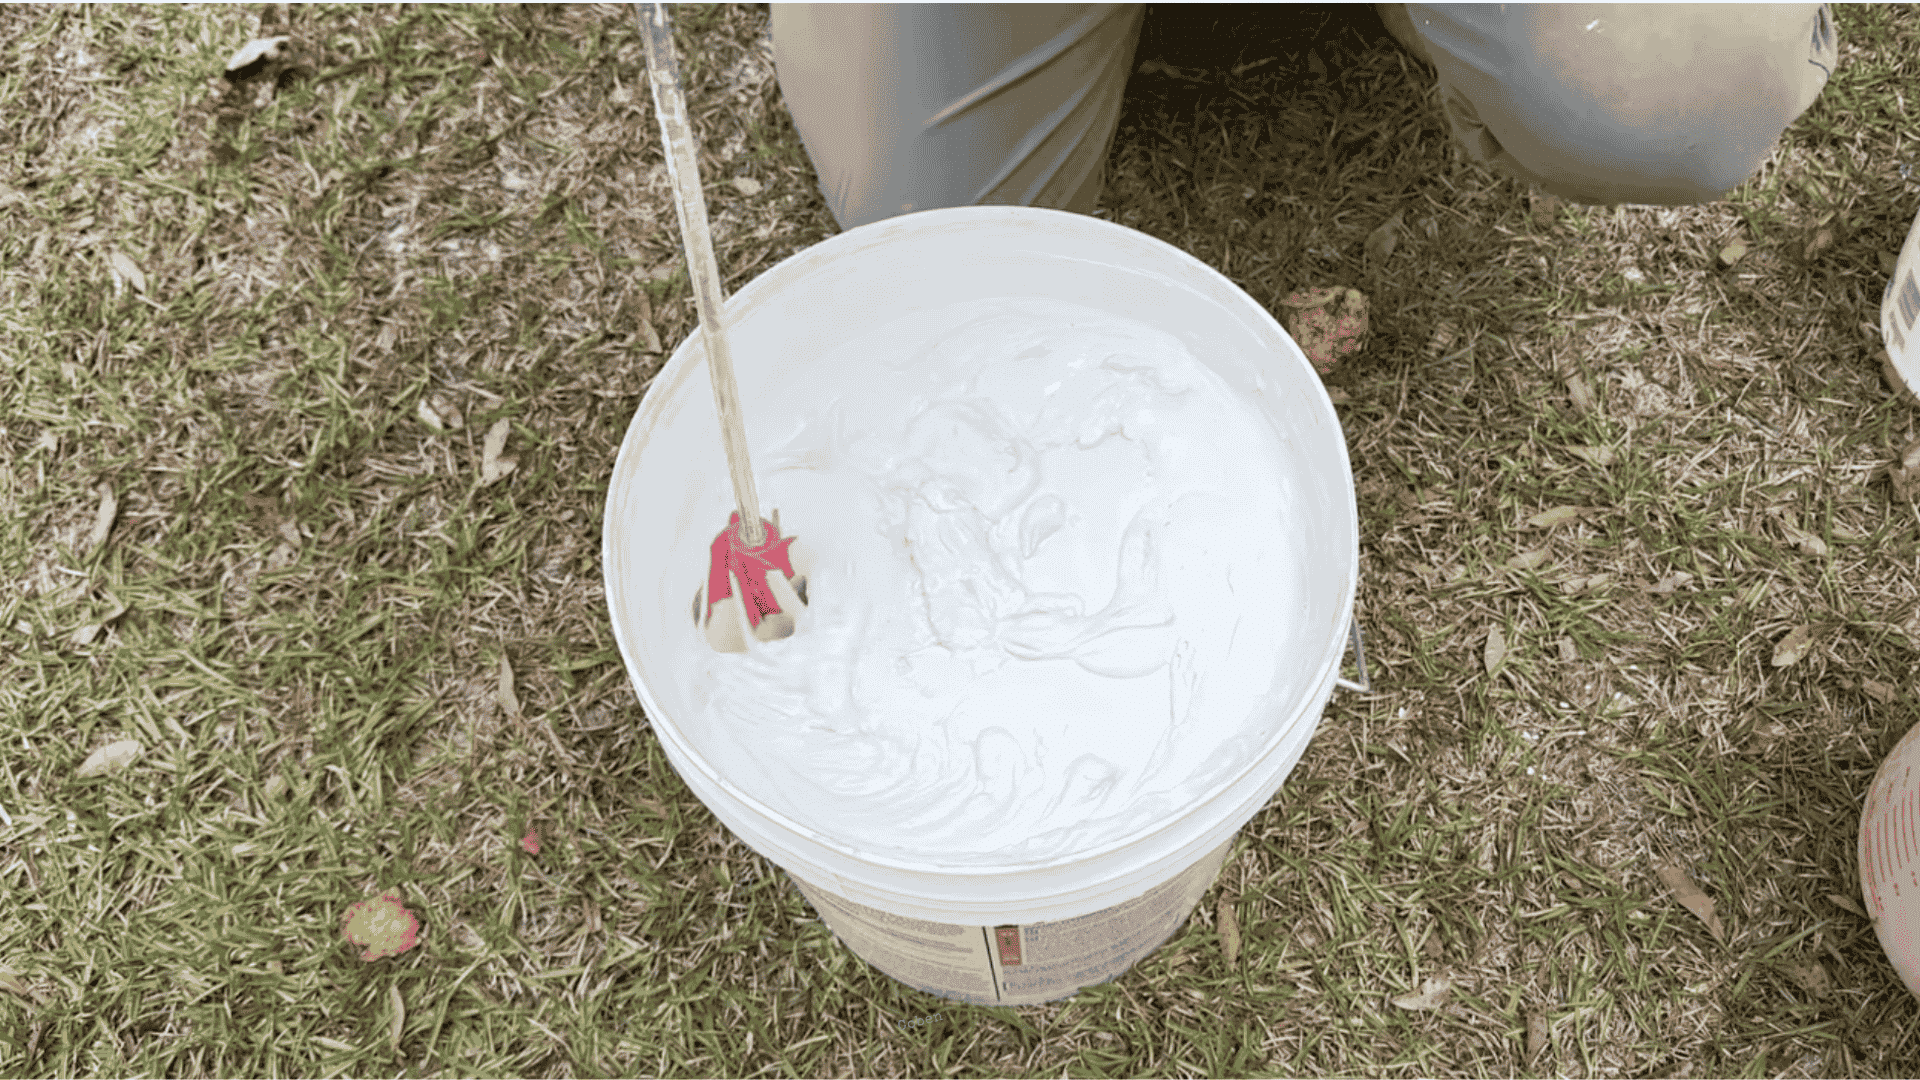
Pour the limewash concentrate into a bucket and gradually add water until the consistency resembles slightly foamy milk. Use a drill paddle for smooth mixing.
For full coverage, use a one-to-one ratio. For a thinner, aged finish, dilute more. Strain the mixture and mix enough at once to achieve color consistency.
Step 3: Dampen Your Brick Surface
Lightly mist your brick with water before applying limewash. The surface should be damp, not dripping, to help the mixture absorb evenly and avoid streaks.
Work in small sections, keeping each area moist as you go. Overcast or cool days are best; re-dampen any section that dries too quickly as you apply.
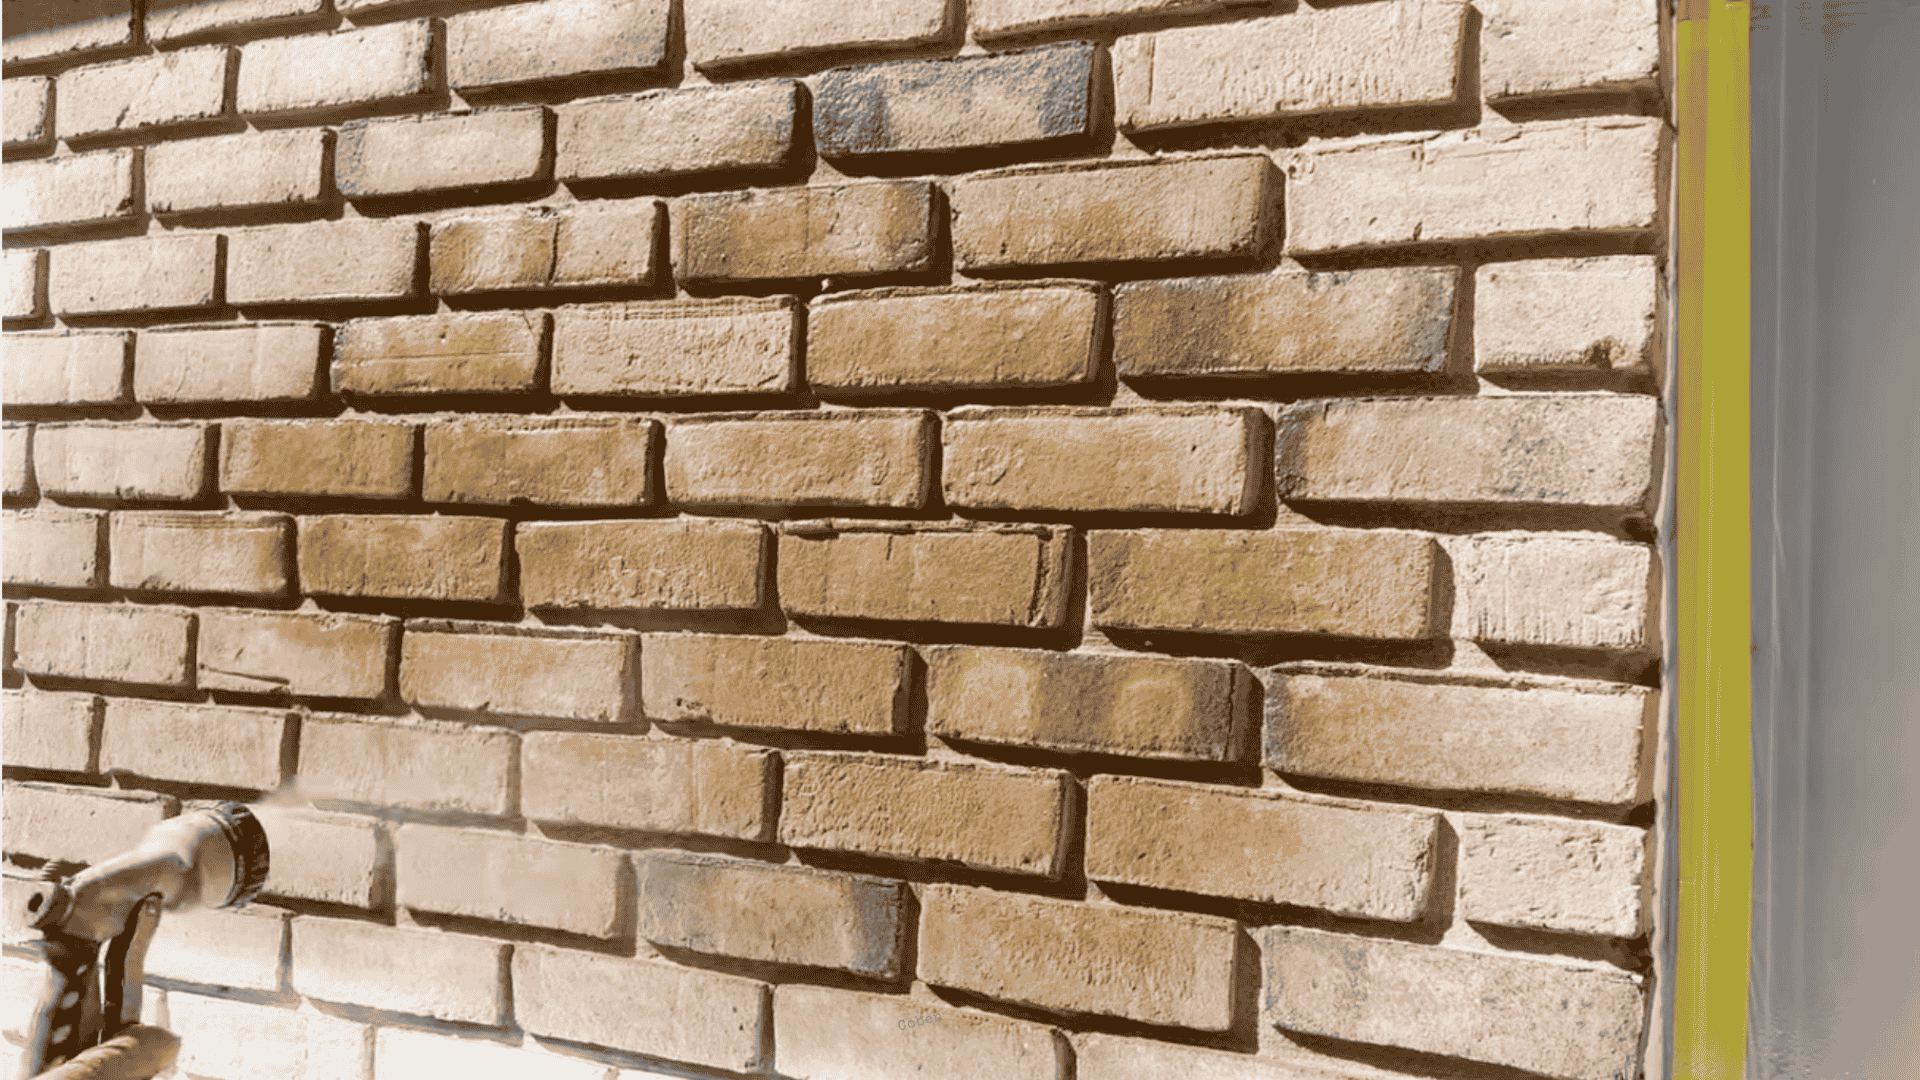
Step 4: Apply Your Limewash
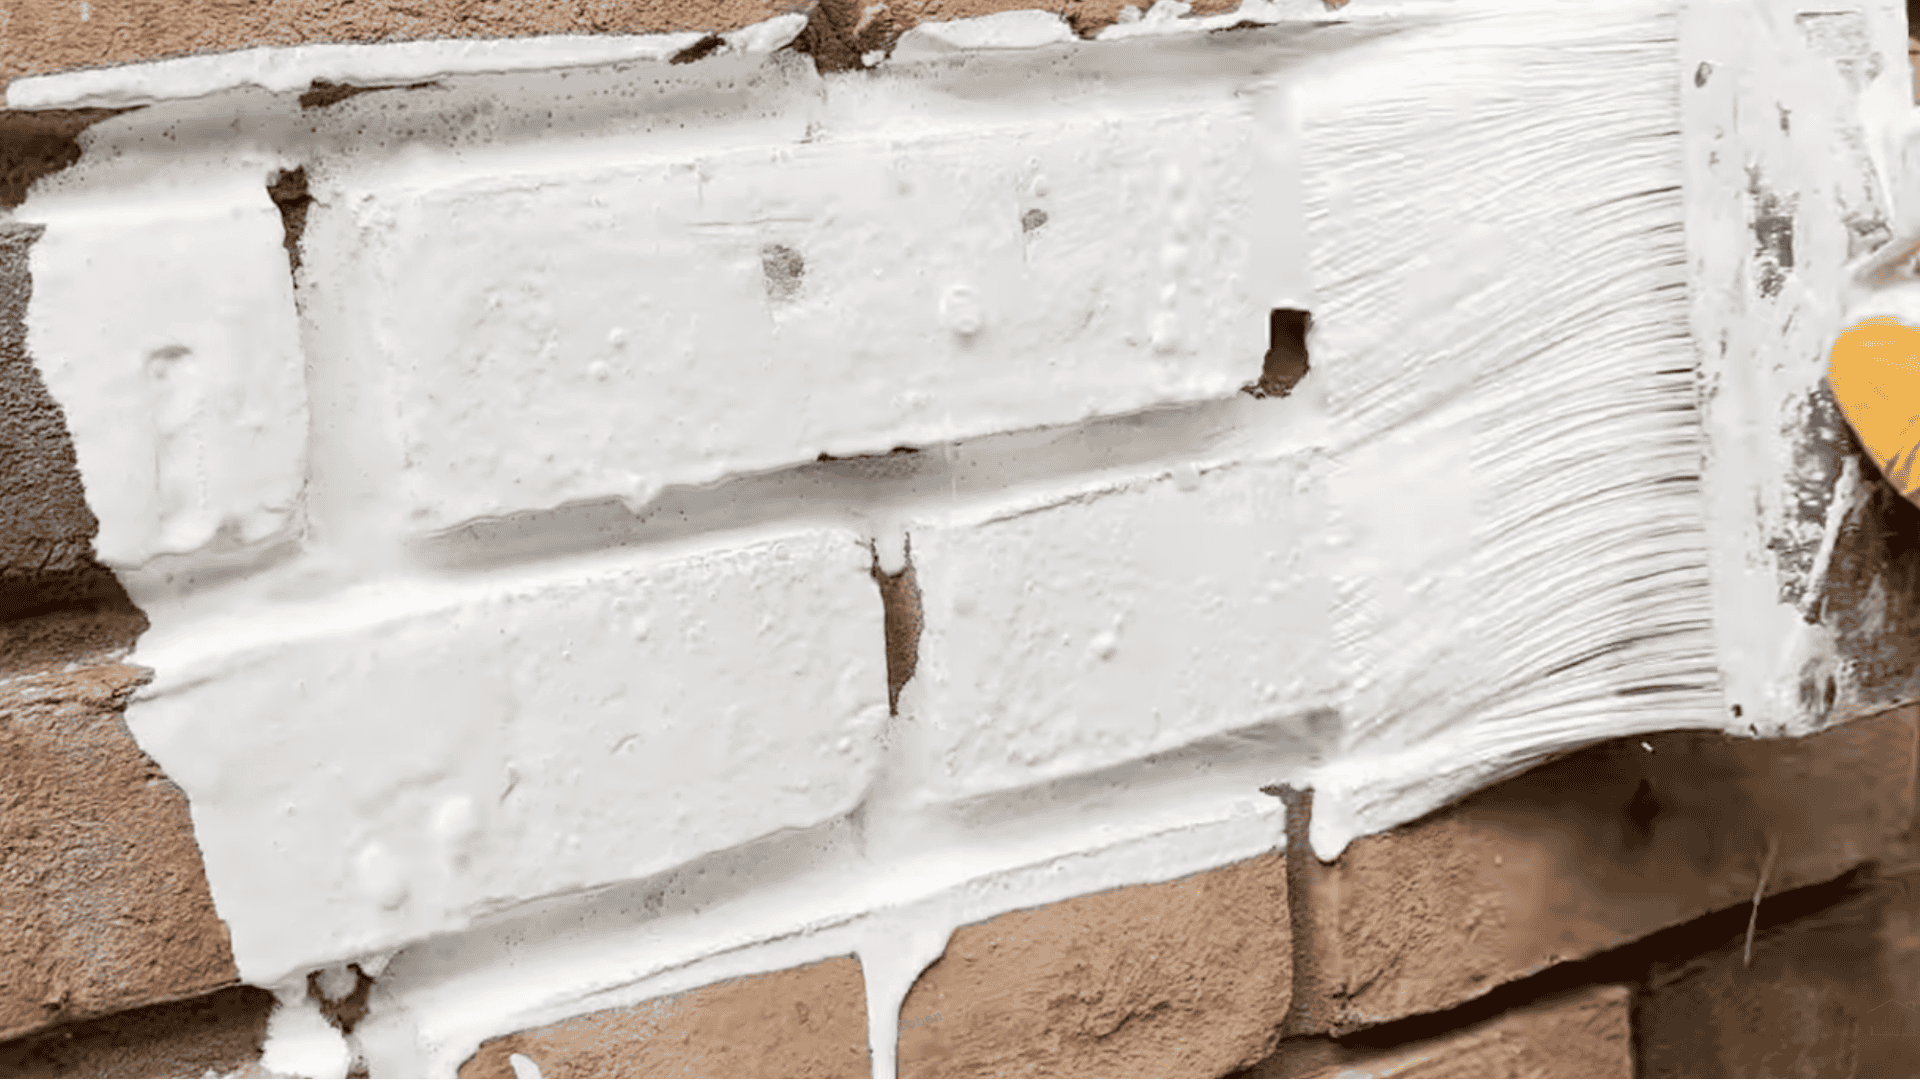
Dip your masonry brush or roller into the mixture and apply with smooth, even strokes across the damp brick, reaching all joints and corners.
Start thin for the first coat, allowing it to dry for a day before adding another. For a vintage look, gently wipe areas to expose the brick.
Step 5: Allow Curing and Apply Additional Coats
Let the first coat dry for at least a full day before reapplying. Limewash cures over several days, deepening color and improving durability.
Most exteriors need two to three coats for a rich, even finish. Patience pays off; the longer the cure time, the longer-lasting and more beautifully aged the surface.
Taking your time with each step ensures your limewashed brick looks authentic, natural, and built to last, proof that craftsmanship always pays off in the end.
Video Tutorial
I’d like to give credit to Your Home, Renewed, for their informative video, which served as a reference for this guide.
Design & Colour Considerations for Limewashed Brick
The look of limewashed brick depends on the coat thickness and dilution; thin layers let brick tones peek through, while thicker coats offer a solid, matte finish.
Choose colors that suit your home’s style:
- Traditional homes: Creams or soft whites complement Colonial and farmhouse designs.
- Modern exteriors: Warm whites, taupes, and subtle grays feel clean and refined.
You can add natural pigments for custom tones, iron oxide for warm hues, and charcoal for cool grays. Always test a small area first and allow it to cure for several days.
Mistakes While Limewashing Bricks And How To Avoid
Even a simple limewashing project can go wrong with small oversights. Knowing what to avoid saves time, effort, and frustration during your application.
| Mistake | How to Avoid |
|---|---|
| Painted or sealed brick | Remove paint or choose a different finish. |
| Direct sunlight | Apply in overcast or cooler times (morning/late afternoon). |
| Too thick a mixture | Dilute properly; start with a thin coat. |
| Skipping test areas | Test in hidden spots; wait 5-7 days before proceeding. |
| Not protecting nearby surfaces | Cover windows, doors, and landscaping. |
| Hot brick | Wait for it to cool or spray with water. |
| Low-quality tools | Use quality masonry brushes/rollers. |
Avoiding these mistakes keeps your limewashed brick looking natural, even, and long-lasting proof that careful preparation makes all the difference in your final result.
Maintenance Of Limewashed Bricks and Ensuring Its Longevity
When applied correctly, limewash can last five to seven years in most U.S. climates. Unlike regular paint, it doesn’t peel or chip; it fades gently, creating a soft, weathered patina that only adds charm over time.
This natural aging process gives limewashed brick its signature character and appeal. Because limewash is made from crushed limestone and water, it forms a breathable, mineral-rich coating that lets moisture escape.
Maintenance is simple:
- Clean gently with a soft brush or light water spray. Avoid harsh chemicals or high pressure.
- Inspect yearly for fading or uneven wear, especially in sunny or rainy areas.
- Touch up easily with another thin coat, no stripping or priming needed.
If you ever want a new look, limewash is fully removable with a pressure washer. It’s a durable, low-maintenance finish that grows more beautiful with age while protecting your home’s natural brickwork.
Final Thoughts
Limewashing brick is more than a cosmetic upgrade; it’s a way to honor your home’s character while giving it new life and personality.
With the right prep, materials, and care, your exterior can achieve that effortlessly aged, timeless look that paint can’t replicate or maintain.
Take your time with each step, and enjoy watching your brick changeinto something uniquely yours. Whether you’re refreshing a single wall or your entire home, limewash delivers lasting beauty, durability, and protection against the elements.
Ready to start your limewashing project? Gather your supplies, pick a color that complements your home’s style, and turn your brick exterior into a stunning, enduring focal point that stands the test of time.