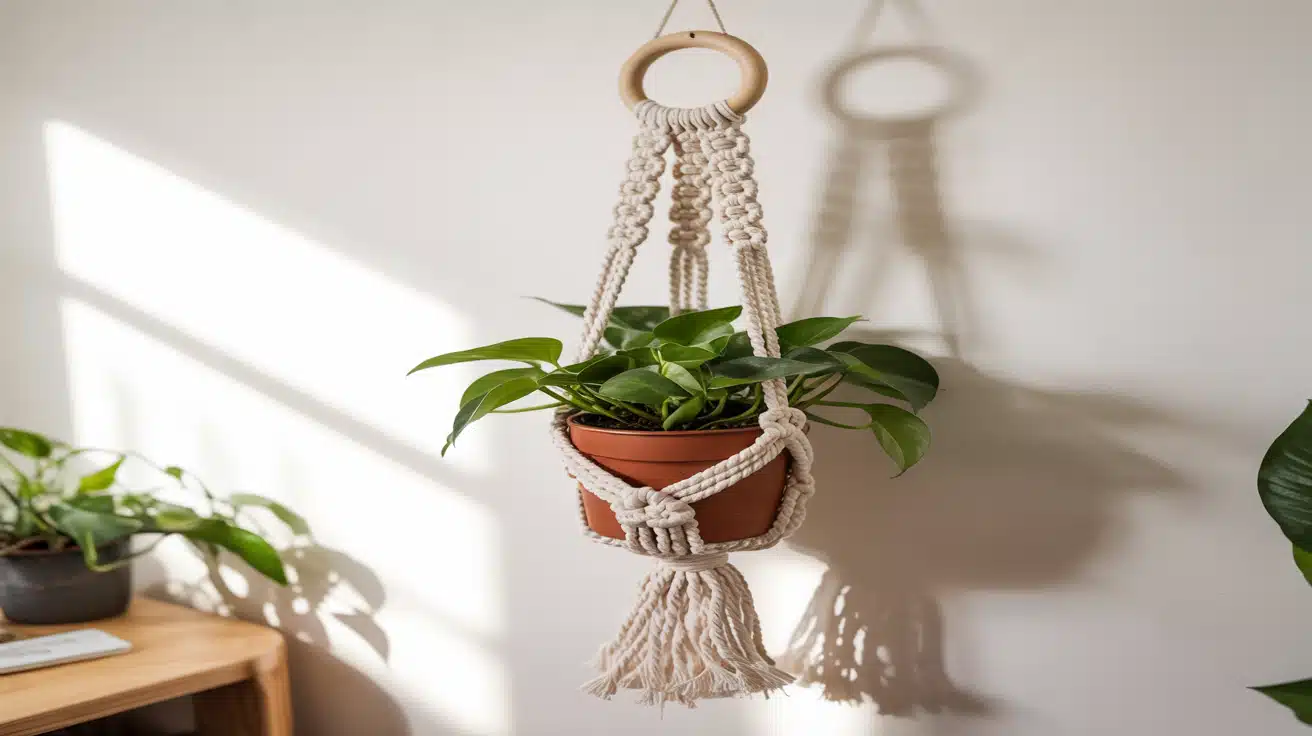
Ever looked at those gorgeous macrame plant hangers and thought they’re too complicated to make? Most people pay $30 to $50 for a single hanger, even though the supplies cost under $10.
Learning macrame isn’t about mastering dozens of fancy knots. You only need three simple knots to create a stunning plant hanger in less than an hour. No previous crafting experience required.
In this tutorial, you’ll learn what macrame is and why it works perfectly for plant hangers.
We’ll cover the exact materials you need, step-by-step instructions for each knot, and how to avoid common beginner mistakes. Plus, you’ll get ideas for easy variations once you’ve mastered the basics.
Why Macramé Is the Best Choice for Plant Hangers
Macramé is an ancient craft that uses knotted cords to create patterns and designs. It started centuries ago with sailors who tied knots during long voyages.
Today, macramé is popular for plant hangers because it holds weight well and looks beautiful. You can adjust the size, choose any cord color, and make it for just a few dollars.
Best of all, beginners can learn it quickly using three basic knots: the spiral half knot, square knot, and wrapping knot. These simple techniques let you create a strong, stylish hanger in under an hour.
5 Steps to Make a Beautiful Macrame Plant Hanger
Time to turn theory into practice. Work through each step at your own pace, checking your knots as you go to ensure everything looks even.
Tools and Materials You’ll Need
| Item | Description | Why You Need It |
|---|---|---|
| Macramé Cord | 4 cords + two 24″ cords | Main structure + wrapping knots |
| Wooden Ring | 1 piece | Top support for hanging |
| Scissors | Sharp | Cutting cords cleanly |
| Measuring Tape | Standard | Accurate spacing for knots |
| Pot | 5″–6″ recommended | Ensures proper basket fit |
Step 1: Attach the Cords to the Wooden Ring
This first step sets up your entire plant hanger. You need to secure all cords evenly to the ring. Getting this right makes the rest of your project much easier.
Materials Needed:
- 4 macramé cords (cut to required length)
- 1 wooden ring
- Flat surface to work on
Instructions:
- Fold each cord in half to find the center point.
- Thread the folded end through the wooden ring from back to front.
- Pull the loose ends through the loop you just created.
- Position the two longest cords on the outer edges.
- Arrange all cords so they hang evenly and straight.
- Tighten each cord so it sits flat against the ring.
Step 2: Create Your Spiral Section (25 Half Knots)
The spiral section adds visual interest to your hanger. This twisting pattern forms naturally as you repeat the same knot. Keep your tension consistent for the best results.
Materials Needed:
- The cords are already attached to your ring
- Your hands (no extra tools needed)
Instructions:
- Separate your cords into two working cords and two filler cords.
- Take the left working cord over the filler cords.
- Bring the right working cord over the left cord.
- Pass the right cord under the filler cords and through the left loop.
- Pull tight to complete one half knot.
- Repeat this exact motion 24 more times on the same side.
- Watch as the spiral naturally forms with each knot.
Step 3: Add the First Wrapping Knot
The wrapping knot creates a clean band around all your cords. This decorative element also adds strength to your design. Take your time with the wrapping for a polished look.
Materials Needed:
- 1 separate cord (24 inches long)
- Scissors
Instructions:
- Gather all hanging cords together in one bundle.
- Take your 24-inch cord and fold it into a U shape.
- Place the U shape against the bundle with the loop pointing down.
- Start wrapping the long end tightly around the bundle.
- Wrap 6 times upward, keeping each wrap snug and neat.
- Thread the working end through the bottom loop.
- Pull the top tail until the loop disappears inside the wraps.
- Trim both ends close to the wrapping.
- Tuck any loose ends under the wrapped section.
Step 4: Form the Basket With Square Knots
This step creates the actual basket that will hold your pot. The square knots form a strong base for your plant. Spacing is important here to fit your pot size correctly.
Materials Needed:
- Measuring tape or ruler
- The cords from your hanger
Instructions:
- Measure 12 inches down from your wrapping knot.
- Divide your 8 cords into 4 groups of 2 cords each.
- Tie one square knot with each group (4 knots total in a row).
- Measure 3 inches below the first row of knots.
- Take 2 cords from one group and 2 from the next group.
- Tie square knots with these alternating groups.
- Continue around until you have 4 more knots.
- This creates the basket shape that cradles your pot.
Step 5: Finish With a Final Wrapping Knot and Fringe
The final wrapping knot completes your design and gathers all cords. The fringe at the bottom adds a boho style touch. You can customize the fringe length to match your space.
Materials Needed:
- 1 separate cord (24 inches long)
- Scissors
- Measuring tape
Instructions:
- Measure 3 inches below your last row of square knots.
- Gather all 8 cords together at this point.
- Create another wrapping knot using the same technique from Step 3.
- Wrap 6 times, pull tight, and secure the ends.
- Measure 5 to 6 inches below the wrapping knot.
- Cut all cords to this length for your fringe.
- Optional: Unravel the cord ends for a fuller, textured look.
- Trim any uneven pieces to level the fringe.
Video Tutorial
Special thanks to Marching North for providing valuable insights in their video, which I referenced while creating this guide.
4 Ways to Customize Your Macrame Plant Hanger
Once you’ve made your first basic hanger, you’ll probably want to try something different. These four simple variations let you add your own personal style without learning new knots.
1. Beads
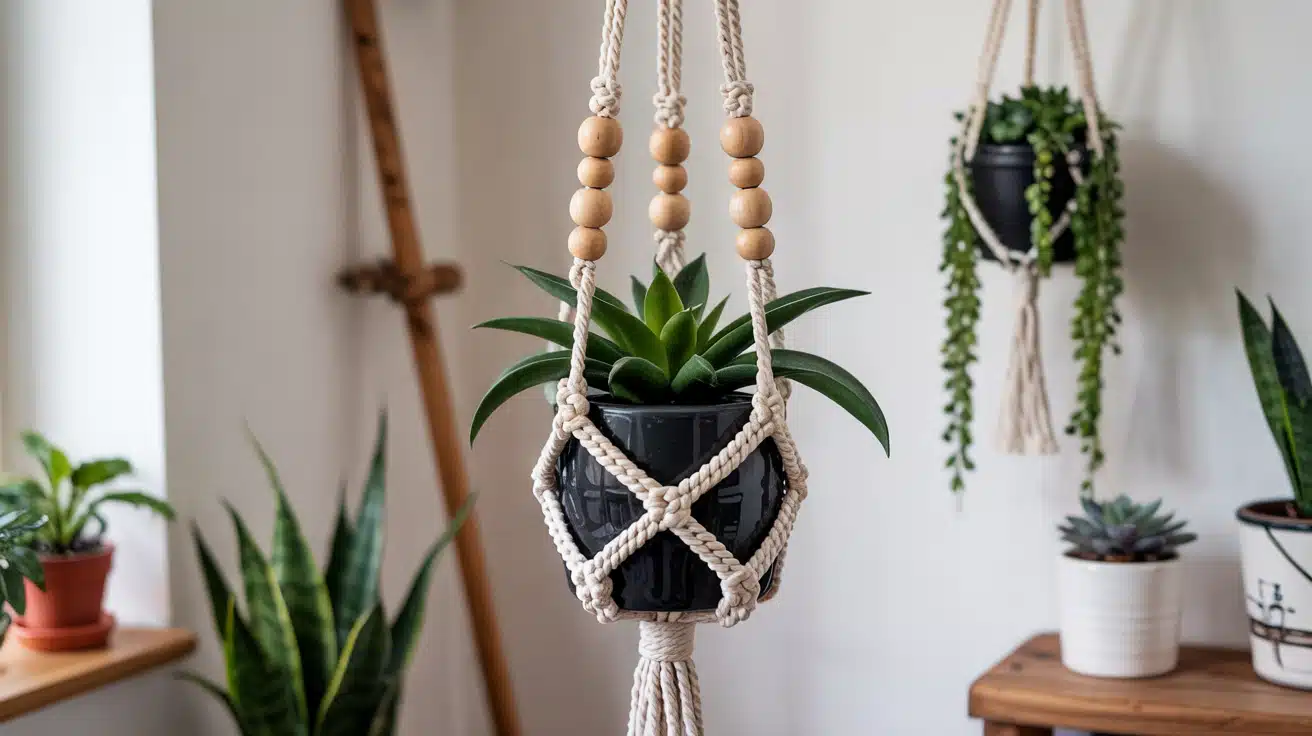
Adding beads to your macramé plant hanger creates instant visual interest. Thread wooden or ceramic beads onto your cords before tying knots.
You can place them in the spiral section, between square knots, or on the fringe. Choose beads with holes large enough for your cord to slide through easily. Natural wood beads work best for a bohemian look.
2. Colored Cords

Switching to colored cords completely changes the style of your hanger. Try bright colors for a modern feel or pastels for a soft, gentle look. You can use a single solid color or mix two colors.
Cotton cord takes dye well if you want to create custom shades. Ombre effects work beautifully when you fade from dark to light.
3. Double Basket Hangers

A double basket hanger holds two pots at different heights. You create the first basket using the same technique, then continue knotting below it.
Measure down 8 to 10 inches and form a second basket with square knots. This design works great for trailing plants or herb gardens. Make sure your top ring is strong enough to hold the extra weight.
4. Extra Spirals or Decorative Knots

Adding more spirals throughout your hanger gives it texture and movement. Try a spiral section at the top, middle, and bottom, rather than just one.
You can also learn new knots like the half hitch or berry knot. Mix different knot patterns in each section for a unique design. The more you practice, the more creative you can get with patterns.
Macrame Plant Hanger Mistakes to Avoid
Even with clear instructions, beginners often run into the same few problems. Learning what to avoid now will save you time, frustration, and wasted materials.
| Mistake | The Problem | Quick Fix |
|---|---|---|
| Uneven knot spacing | Lopsided hanger, tilted pot | Use a measuring tape between rows |
| Crooked square knots | Gaps form, pot slips through | Lay the work flat, check the alignment first |
| Cutting the fringe too short | Looks cheap and unfinished | Cut longer, trim later if needed |
| Thin cords | Breaks under pot weight | Use 4mm or thicker cord only |
Choosing the Right Pot for Your Macrame Plant Hanger
The best pot size for this pattern is 5 to 6 inches in diameter. Choose a pot that’s about the same height as its width for good balance.
If you have a larger pot, measure 15 inches between your knot rows instead of 12 inches. Smaller pots need closer spacing, so try 10 inches between rows.
For heavy ceramic pots, use a thicker cord (at least 5mm) and double-check your knots are tight. Plastic pots work best for beginners because they’re lighter and safer to hang.
Always test your hanger with the pot before adding soil and plants to make sure it fits snugly.
Final Thoughts
Making your first macrame plant hanger is easier than you think. With just a few basic knots and some cord, you can create a beautiful home for your plants.
This project costs less than buying one from a store and lets you customize every detail. Start with this simple pattern, then try different colors, beads, or knot styles as you gain confidence.
Each hanger you make will turn out better than the last. Your plants deserve a stylish display, and you deserve the satisfaction of making it yourself.
Ready to get started? Grab your supplies and tie your first knot today. Share a photo of your finished hanger in the comments below!