Tiled stairs are one of those choices that look stunning in every photo and quietly haunt many homeowners six months after installation.
Cracked grout, slippery surfaces, uneven edges none of it shows up in the inspiration pictures, but all of it shows up in real homes where the wrong tile was picked, the substrate was ignored, or the safety side of things was skipped entirely.
I have seen it enough times to know that the gap between a beautiful staircase and a regrettable one comes down to a handful of decisions most people do not even know they need to make.
This post walks through all of them. Whether you are still deciding which surface to tile, trying to figure out what tile actually holds up under daily foot traffic, or wondering what the building code says about riser height, it is all here, in one place, in plain language.
Tile Treads, Tile Risers, or Both?
Before you pick a single tile, you need to answer one question: which part of the stairs are you actually tiling?
Most people skip straight to Pinterest and come back with a basket of ideas, but no answer to this.
It matters more than the tile itself, because each option comes with a different set of requirements, a different level of difficulty, and a very different result when it goes wrong.
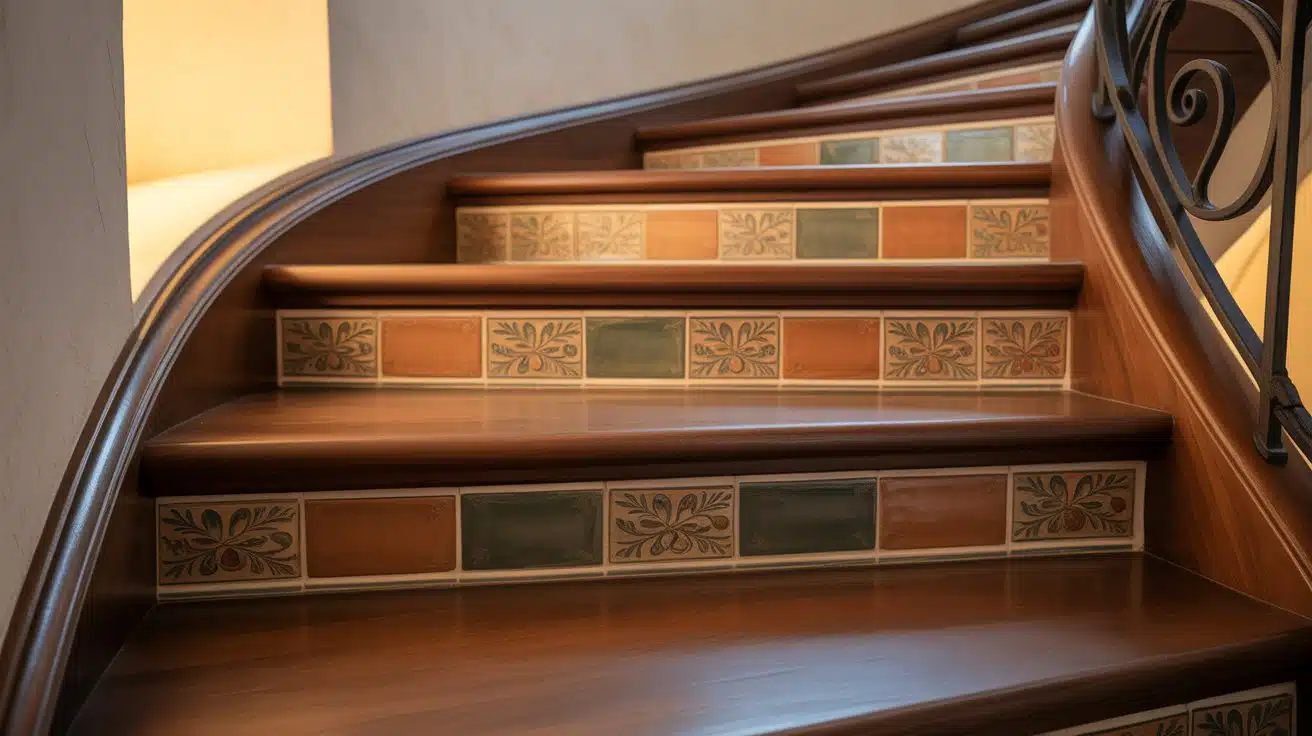
1. Tile Risers Only
This is the most popular choice, and for good reason. The riser is the vertical face of each step, the part you see when you look at a staircase straight on.
Tiling only the risers means your treads (the part you actually walk on) stay as they are, whether that is hardwood, stone, or carpet. You get the visual impact without touching the walking surface.
For homes with existing hardwood stairs, this is almost always the right call. The wood treads stay warm, practical, and safe. The tiled risers add pattern, color, or texture without creating any slip risk on the surface people are stepping on. It is also the easiest installation, with no edge profiles to manage and no slip ratings to worry about on the tile itself.
2. Tile Treads
Tiling treads, the horizontal surfaces people walk on, is challenging and carries safety concerns. The tile must be slip-rated, not just visually appealing, since polished or high-gloss tiles on treads can be hazardous.
There’s also a building code consideration: under the IRC, riser heights must not vary by more than 3/8 inch.
Adding tile thickness can cause unevenness, creating a trip hazard and potential code violation, making professional installation crucial.
Tiled treads are ideal for high-traffic commercial spaces, concrete stairs needing a durable surface, or exterior stairs where weather resistance is a priority. In these cases, slip-rated porcelain or textured stone with proper edge profiles works best.
3. Full Tile Treads and Risers Together
This high-commitment option involves covering both treads and risers with tile. When done correctly, it creates a striking look, but poor execution can lead to expensive repairs.
Full tile works best on concrete or masonry stairs, where stability is guaranteed. On wood stairs, an uncoupling membrane is necessary to prevent cracked tiles and popped grout due to movement.
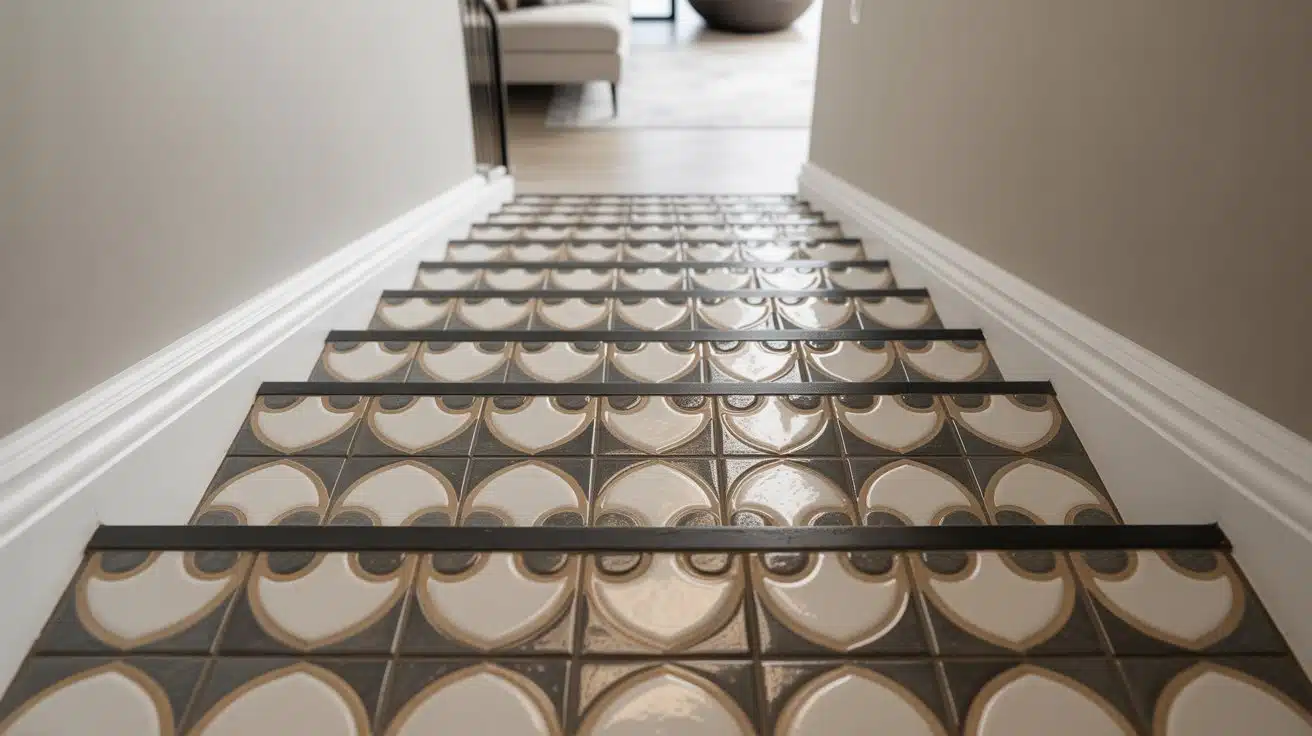
Every tread edge needs proper finishing, either with a bullnose tile (rounded edge) or a metal edge profile (like Schluter).
Sharp, unfinished edges are a safety risk and indicate poor artistry.
For a softer, more livable result, consider a mixed-material approach: tile the risers and use wood nosing on the tread edges.
This provides the clean look of a fully tiled staircase with a warmer, more comfortable walking surface, ideal for open-plan homes.
Quick decision guide:
| Your situation | Risers only? |
|---|---|
| Existing hardwood treads you want to keep | Yes |
| Want pattern or color without a full renovation | Yes |
| Renting or on a tighter budget | Yes |
| Concerned about slip safety on tile treads | Yes |
| Starting from scratch with concrete stairs | Consider full tile |
| High-traffic commercial space | Consider tiled treads with slip-rated tile |
Tile on Stairs: Pros and Cons
Tiling a staircase is one of those projects that looks effortless in design magazines and reveals its complexity the moment installation begins.
Before committing to any material or layout, check the pros and cons of tiling your stairs.
Pros
- Durability: A well-installed tile staircase, particularly, holds up under decades of daily foot traffic without the dents and scratches.
- Design Standpoint: Tile offers options that no other stair material matches. Patterned risers with zellige or encaustic cement tile can define the entire character of a room.
- Maintenance: A tiled staircase wipes clean. There’s no refinishing schedule, no moisture tracking from outside, and no fading from sunlight.
Cons
- Slip Risk: Polished and high-gloss tiles on treads, the ones that photograph best, can become genuinely hazardous when wet.
- Hardness Underfoot: Tile is unforgiving, not just in the sense that dropped items shatter, but in the physical fatigue of walking up and down a hard surface repeatedly.
- Installation: Installation is more demanding than it looks. Stairs are not flat floors.
- Grout Maintenance: Grout joints on stairs, which take more abuse than any other part of a home. Standard cement grout degrades under that kind of repeated impact
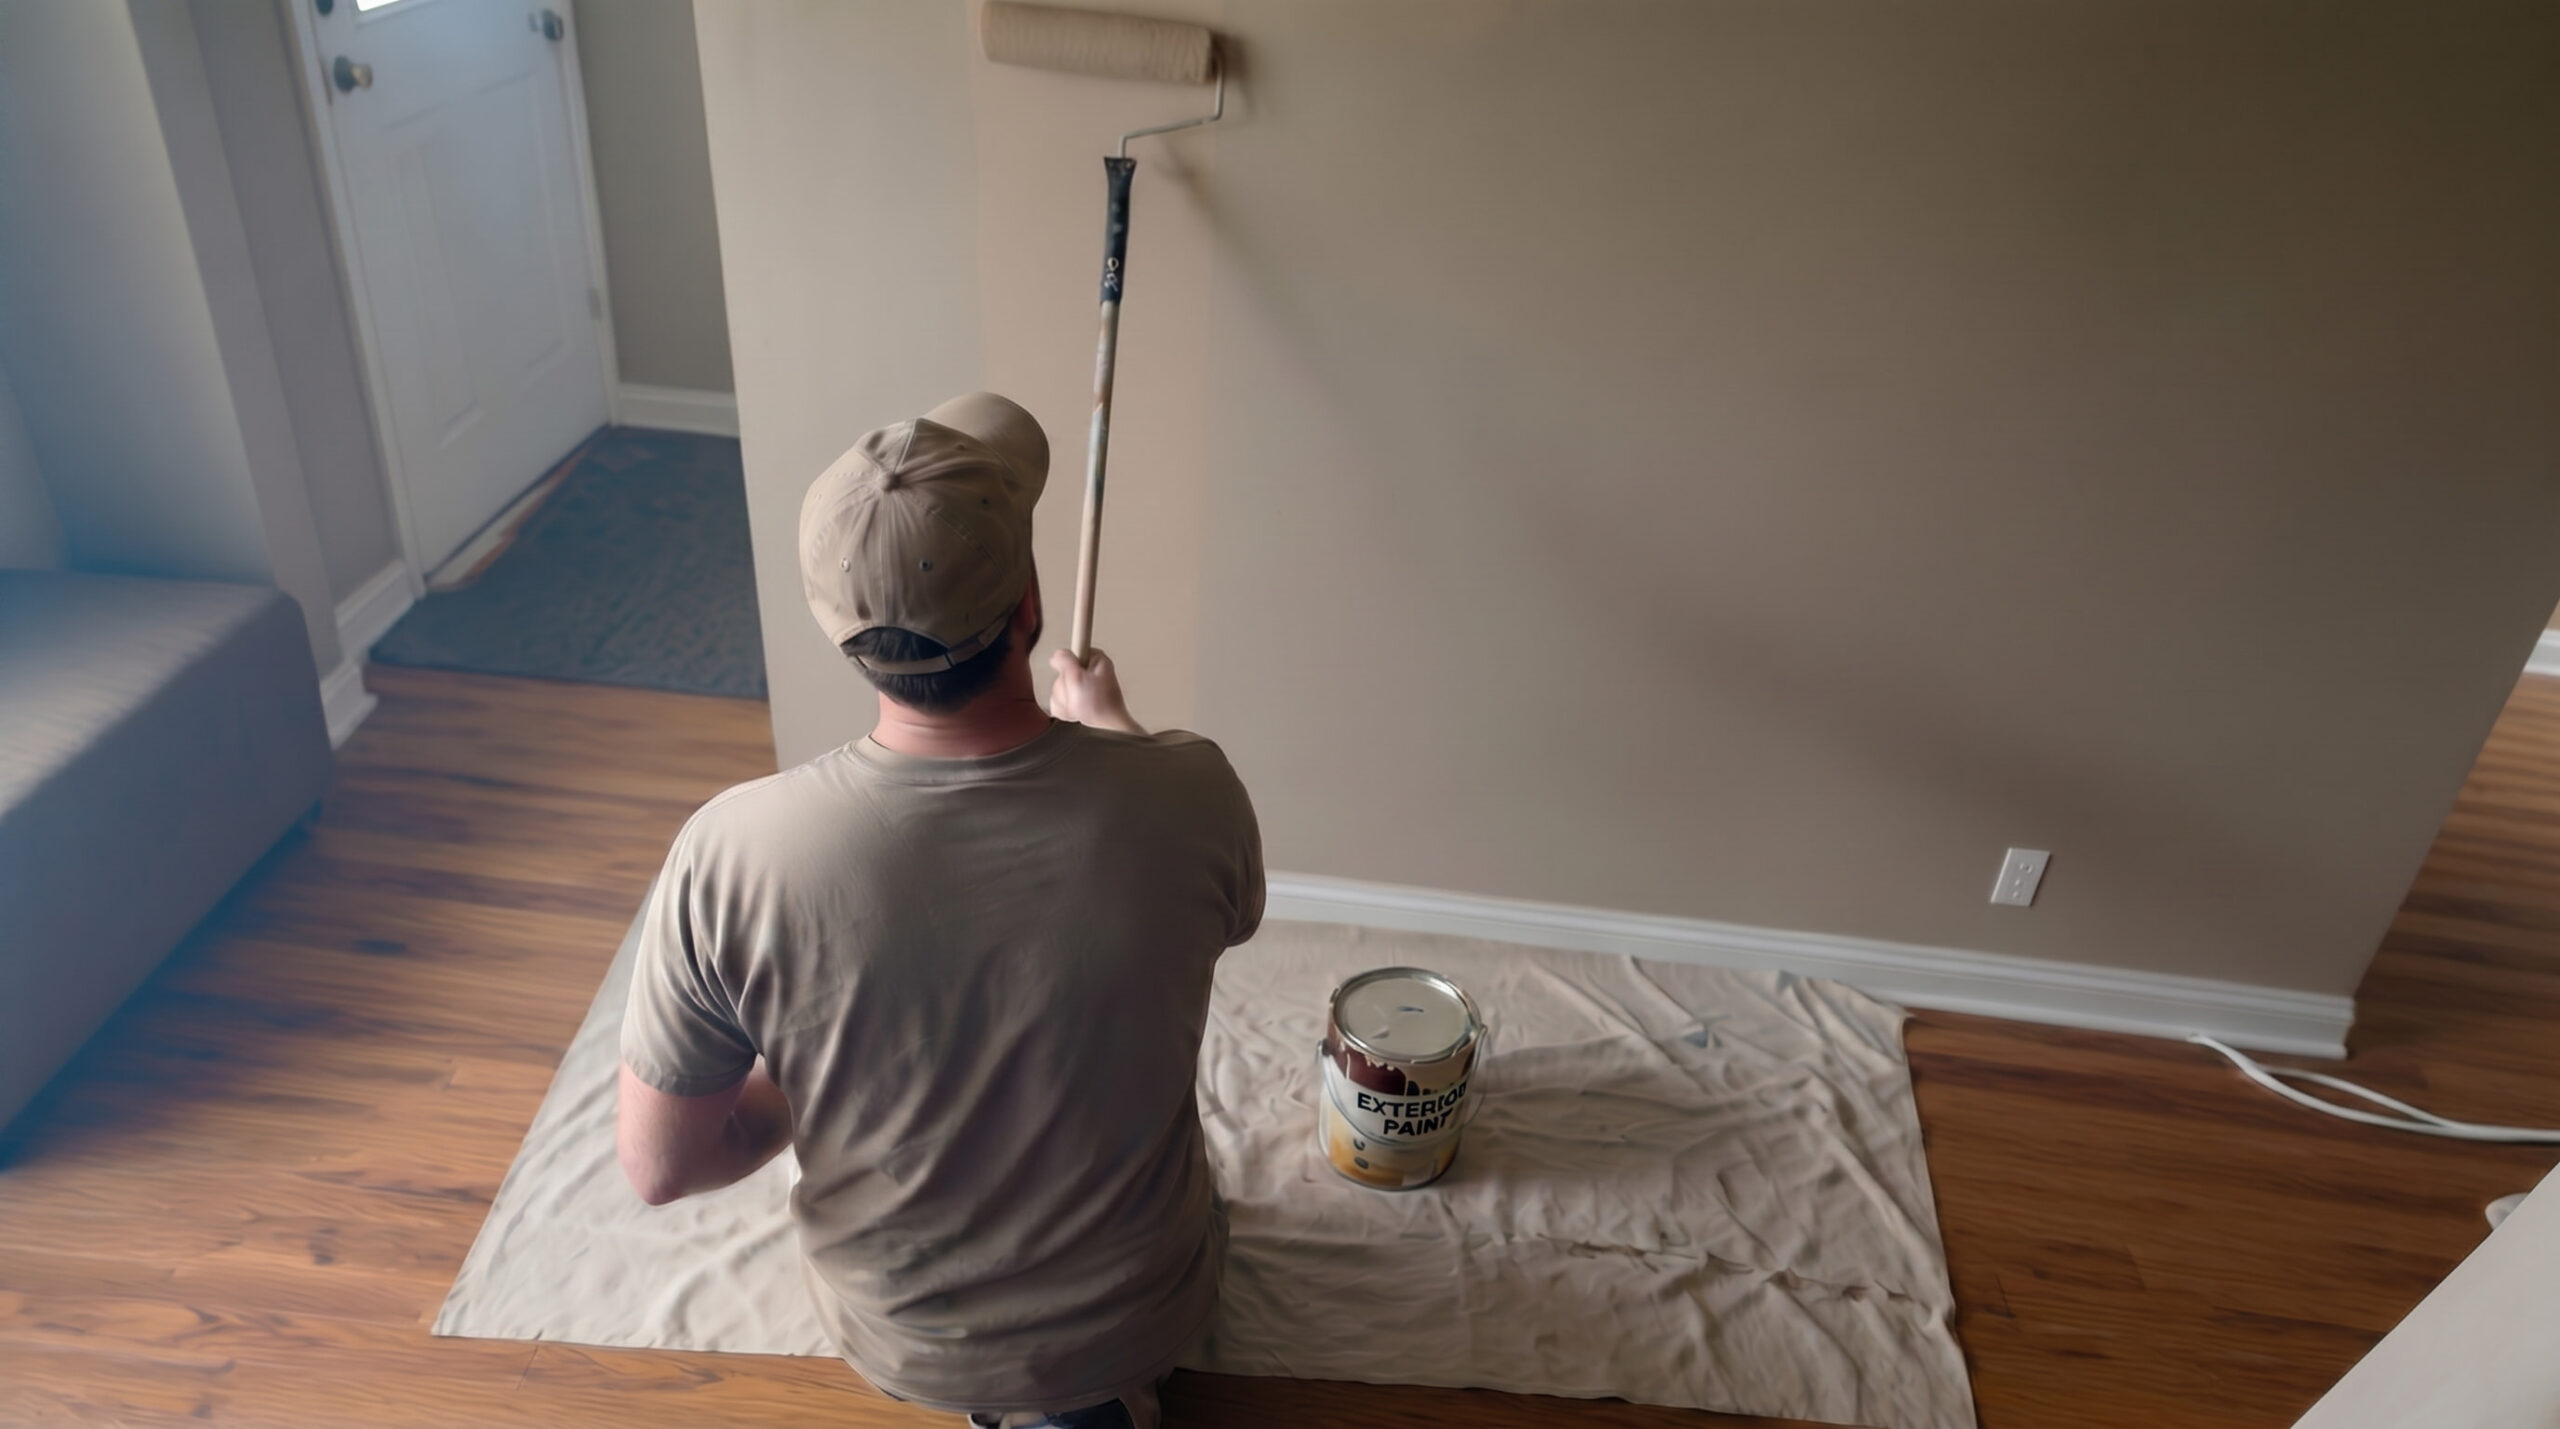
Step-by-step Process of Tiling Stairs
Stairs are among the more demanding tiling jobs in a home, with more cuts, more edge details, and more safety considerations than on a flat floor.
What follows is the honest sequence, including the steps most tutorials leave out.
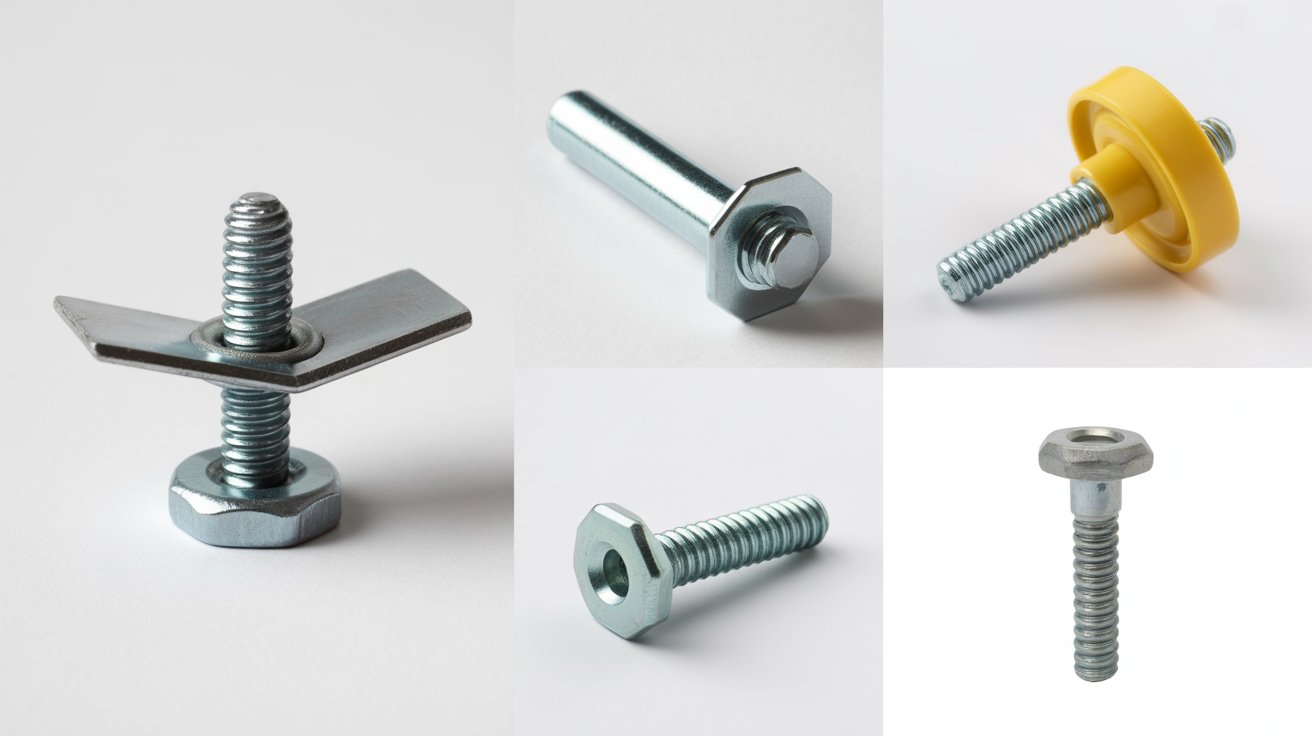
You will need:
- Tile (plus 15% extra for cuts and breakage, go 20% for pattern tile)
- Polymer-modified thinset adhesive rated for vertical and stair applications
- Uncoupling membrane (for wood substrates)
- Notched trowel 3/16 V-notch for smaller tile, 1/4 square-notch for larger formats
- Tile leveling system and clips
- Wet tile saw
- Grout (epoxy or polymer-modified, not standard grout for stairs)
- Grout float and sponge
- Tile spacers
- Bullnose tile or Schluter edge profile for tread nosings
- Spirit level and long straightedge
- Measuring tape and pencil
- Knee pads and stairs are unforgiving on joints
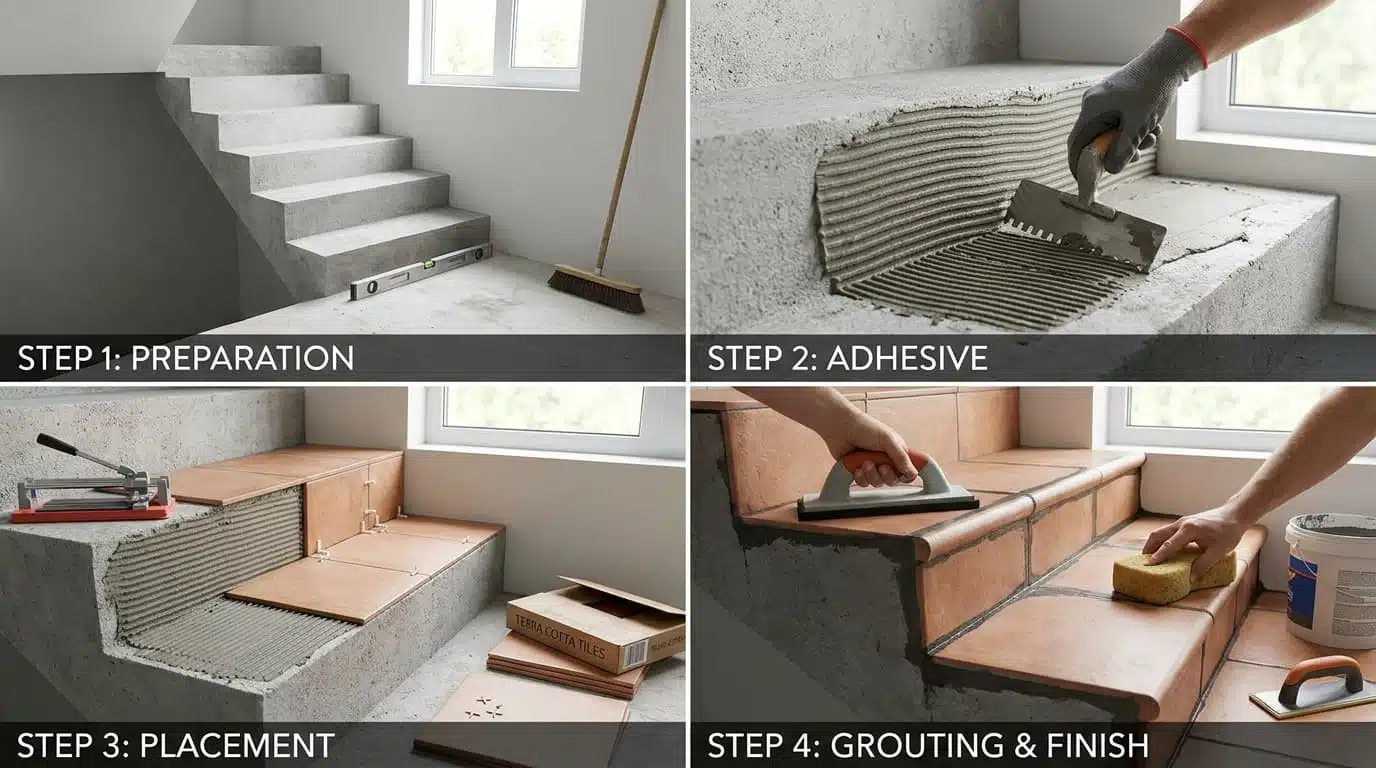
Step 1: Prep the Substrate
Nothing that comes after this step will compensate for skipping it.
- Wood stairs: Run the flex test on every tread. Fix any bounce or movement before proceeding. Install your uncoupling membrane across each tread and riser, cutting it to fit and pressing it firmly into fresh thinset. Let it cure fully before tiling over it.
- Concrete stairs: Fill any cracks with appropriate filler. Apply a waterproofing membrane if moisture is detected. Use a floor-leveling compound to correct any surface variation greater than 3/16 inch over a distance of 10 feet.
- Existing tile: Check every tile with a light tap. A hollow sound means it is not fully bonded; those tiles need to come up before you proceed. Anything loose, pop it off and address the substrate underneath.
Step 2: Dry Lay and Plan Your Layout
This step costs nothing and saves a lot of regret. Before any adhesive goes down, lay your tiles out dry across the stairs to check sizing, pattern alignment, and where cuts will fall.
A few things to confirm during dry layout:
- Measure each riser individually; they are rarely all the same height, especially in older homes. Your tile cuts need to account for each one specifically, not an assumed average.
- Check where grout lines will land. On treads, grout lines running parallel to the nose of the step can visually blur the edge of each step when viewed from below — a safety concern worth planning around. Offset the direction or use contrasting grout color to keep each step clearly defined.
- Confirm your tile format fits the riser height without an awkward sliver cut at the top or bottom. If the numbers do not work cleanly, adjust the layout or consider a different tile size before committing.
Step 3: Set the Risers First
Apply thinset to the riser in sections with a notched trowel. Back-butter each tile, then press it into place to ensure full coverage.
Use spacers and check the level to maintain consistent grout joints and alignment.
For patterned tiles, dry-fit the full riser and center the pattern. Allow 24 hours for the riser tiles to set before working on the treads to prevent shifting.
Step 4: Set the Treads
Tread installation requires greater precision than riser installation because this is the walking surface. Every edge and every level matters here.
Apply thinset to the tread surface. For the nosing edge, the front edge of the tread that overhangs the riser below, you have two options:
- Bullnose tile: A tile with one factory-finished rounded edge. Set it so the rounded edge sits at the front of the tread, overhanging slightly. This creates a clean, safe edge without any additional hardware.
- Schluter or metal edge profile: Install the profile first, pressing it into thinset at the tread nose before setting the field tile behind it. The profile protects the tile edge, provides a clean finished line, and many include grip inserts for added traction.
Step 5: Grout the Joints
Standard grout is not the right choice for stairs. The repeated impact and flex of foot traffic breaks down standard grout faster than on a flat floor. Use either:
- Epoxy grout: The most durable option. Harder to work with but long-lasting and stain-resistant. Worth it on treads especially.
- Polymer-modified grout: More workable than epoxy, still significantly more durable than standard cement grout for high-traffic applications.
Step 6: Seal and Inspect
Once the grout has fully cured, apply a penetrating sealer to natural stone tile and grout joints on porcelain or ceramic tile.
Sealer does not make tile waterproof; it slows absorption and makes cleaning easier. On stairs, where spills and tracked-in moisture are regular occurrences, sealing the grout extends its life noticeably.
After sealing, do a full inspection before opening the stairs to regular use:
- Run your hand across every tread edge, no sharp corners or raised lips
- Tap each tile lightly. A hollow sound means an incomplete bond underneath
- Check every grout joint for gaps, cracks, or low spots
- Confirm the nose edge profile or bullnose is fully adhered with no movement
Any hollow tile needs to be removed and reset. Catching it now costs an hour. Catching it after a year of foot traffic is much more expensive.
Best Tile Types for Stairs
Not every tile that looks good on a staircase belongs on one. The difference between a tile that works and one that causes problems is not always obvious from a sample board or a product photo; it shows up later, underfoot, on a wet morning, or six months into daily use.
What follows is a straight answer on what holds up, what works in specific situations, and what should stay off your stairs entirely.
1. Porcelain
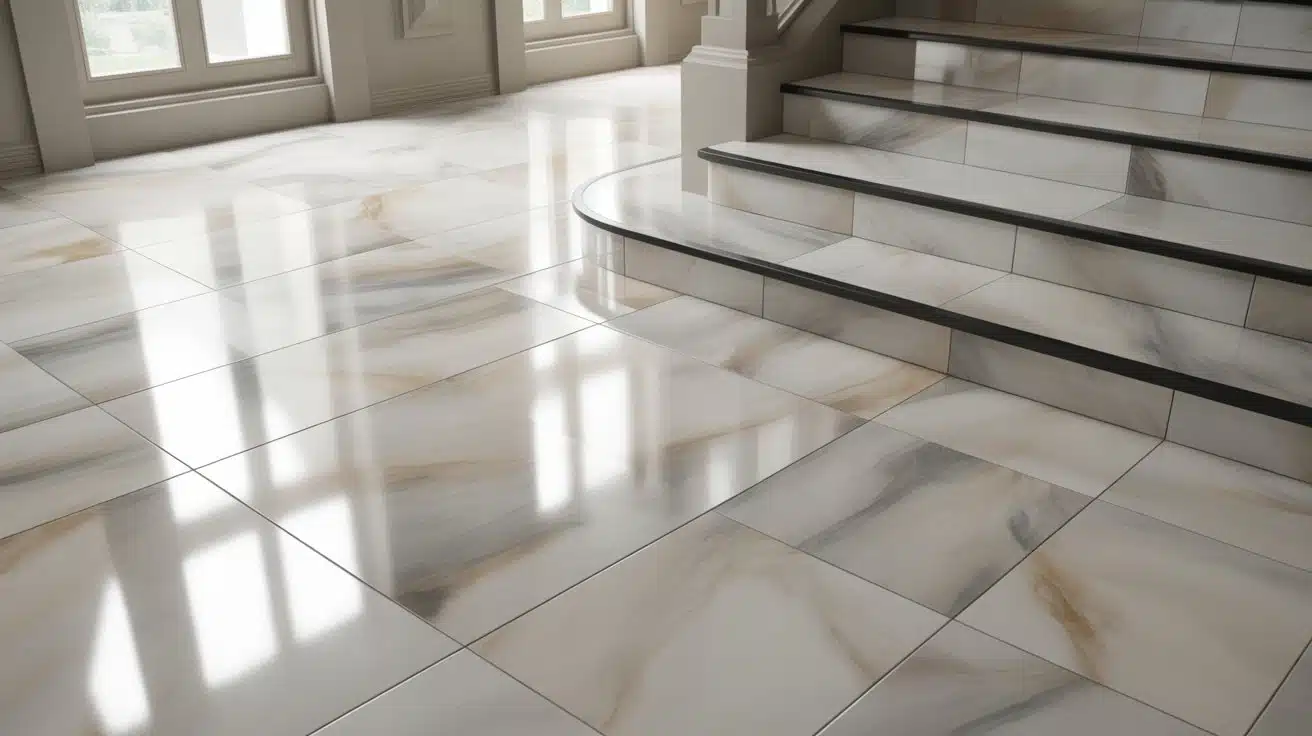
Porcelain is the top choice for a wide range of stair situations, offering durability, resistance to moisture and stains, and a variety of sizes for both treads and risers.
Full-body porcelain has color and texture throughout the tile, making it ideal for areas where edges will be visible or bullnosed.
Surface-glazed porcelain has a decorative layer only on top, so chipped edges will reveal the raw body underneath, making it less suited for stairs.
For slip resistance on treads, look for a minimum R9 rating, which is the standard for indoor stair surfaces. This rating is often found in technical specifications, not packaging.
Finish types: Matte and textured finishes typically meet the R9 slip-resistance threshold, while high-gloss finishes generally do not.
Tile formats for stairs:
- 12×24 tiles work well for wider stair treads and create a clean, modern look.
- Plank-format tiles (long, narrow, wood-look profiles) are excellent for risers, offering a design detail without overwhelming the space.
- Smaller square formats (6×6, 8×8) are easier to cut around profiles and bullnose edges, making them suitable for traditional or decorative designs.
Natural Stone: Marble, Travertine, and Slate
Natural Stone on stairs offers a unique, luxurious look, but when not understood, it can lead to regret, especially with polished tiles.
1. Marble

Polished marble on stair treads can become dangerously slippery when wet due to its low coefficient of friction.
If marble is desired, opt for honed marble with a matte, slightly textured surface for better grip and elegance.
Honed marble requires sealing before use and periodic resealing to prevent staining.
2. Travertine
Honed or brushed finishes are best for treads to ensure safe footing without sacrificing style.
Travertine’s natural variation means no two staircases will look alike, which adds to its charm.
Bullnose pieces are available in most travertine ranges, making edge finishing easy.
3. Slate

Its naturally cleft, textured surface provides excellent grip without additional treatment.
Slate is durable and holds up well under heavy use.
The color range (charcoal, graphite, rust, green-grey) suits both modern and rustic interiors.
Slate is also one of the more affordable natural stone options, making it a great choice if you want stone but at a better value.
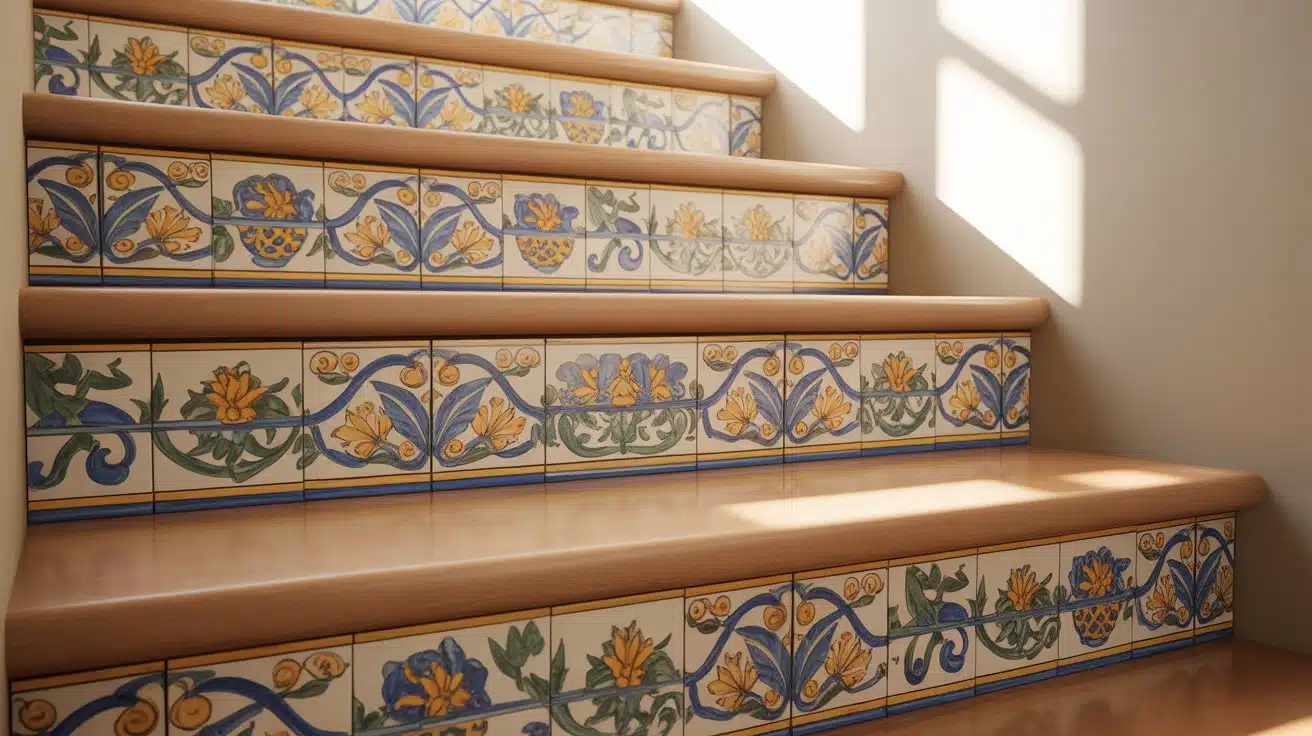
Zellige and Handmade Tile
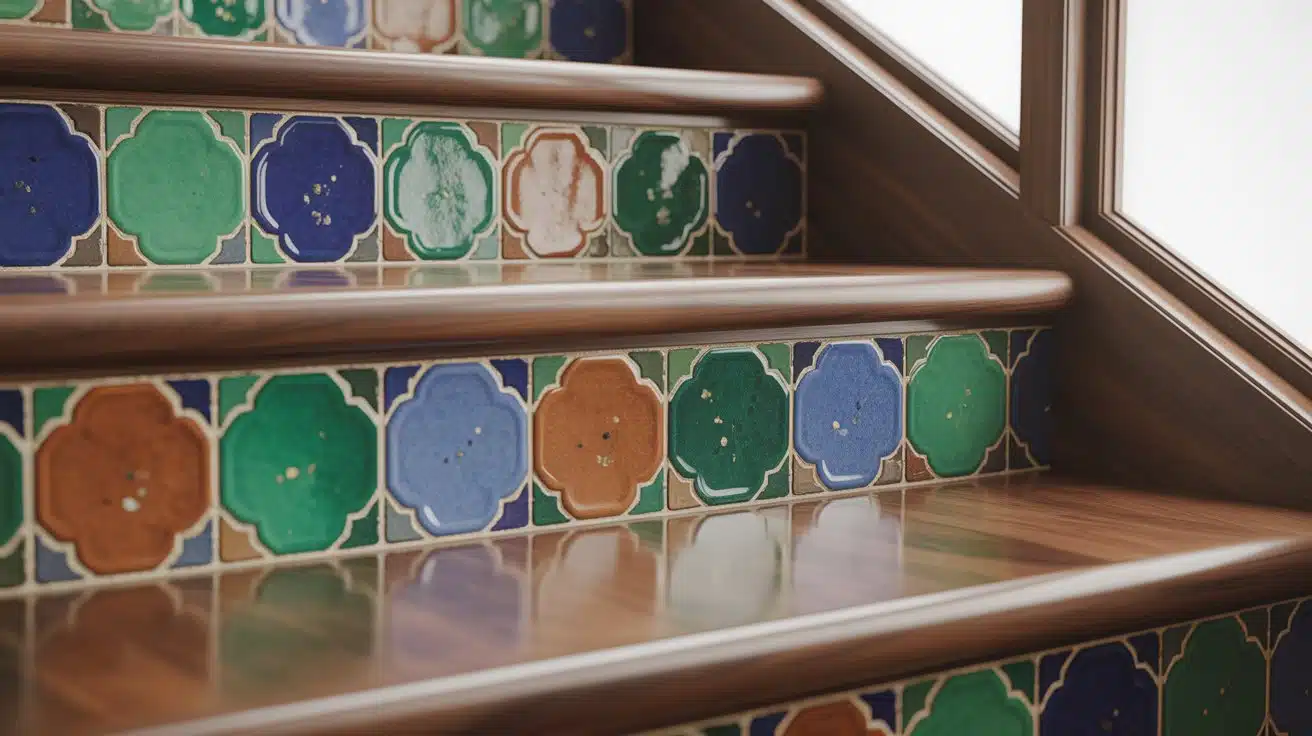
Zellige tile, a handmade Moroccan clay with a unique, uneven glaze, is a hot trend for stair risers.
Its imperfections add character, creating a personalized, stylish look on stairs, especially when paired with wood treads.
True zellige requires extra tiles and an experienced installer, but porcelain versions offer a similar look at a lower cost.
Stair Tiles Materials Cost
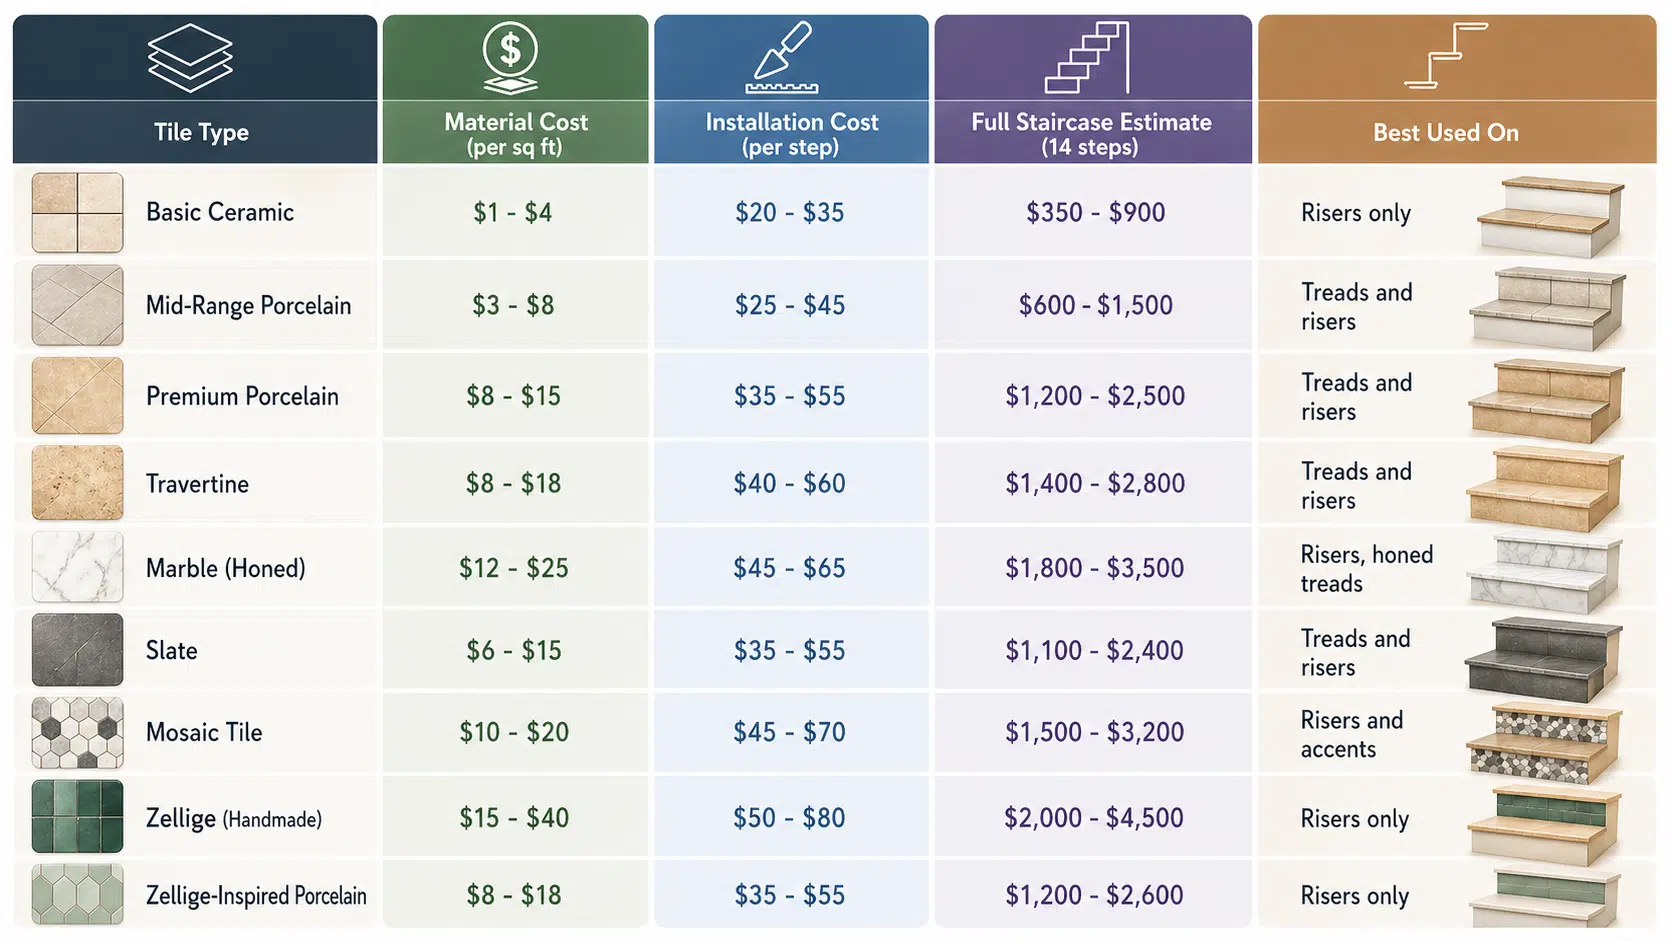
Price is rarely the first thing tile guides talk about, but it is almost always the first thing on a homeowner’s mind.
Conclusion
Tiled stairs, when done right, are one of the most satisfying and rewarding upgrades a home can have. However, when approached without the right information and planning, they can quickly become one of the most expensive and frustrating lessons.
The key to success lies in making informed decisions about the substrate, tile type, safety features, and design that works for real daily life, not just for an attractive photograph.
Take your time with each decision, ensuring everything is thoroughly planned before installation begins. Remember, a staircase is used dozens of times a day by everyone in your home, so it’s worth getting it right the first time rather than facing costly fixes later.
Frequently Asked Questions
Can You Put Tile on Wooden Stairs?
Yes, but it requires careful preparation. Wood is flexible, which can cause tile and grout to crack over time.
What Type of Tile is Safest For Stair Treads?
Textured or matte-finish full-body porcelain with a minimum R9 slip resistance rating (R10 for outdoor stairs).
What is the Best Tile Size for Stair Risers?
Standard riser height is 6–7.75 inches, so tiles in the 4×4”, 6×6”, or 4×8” range fit well.