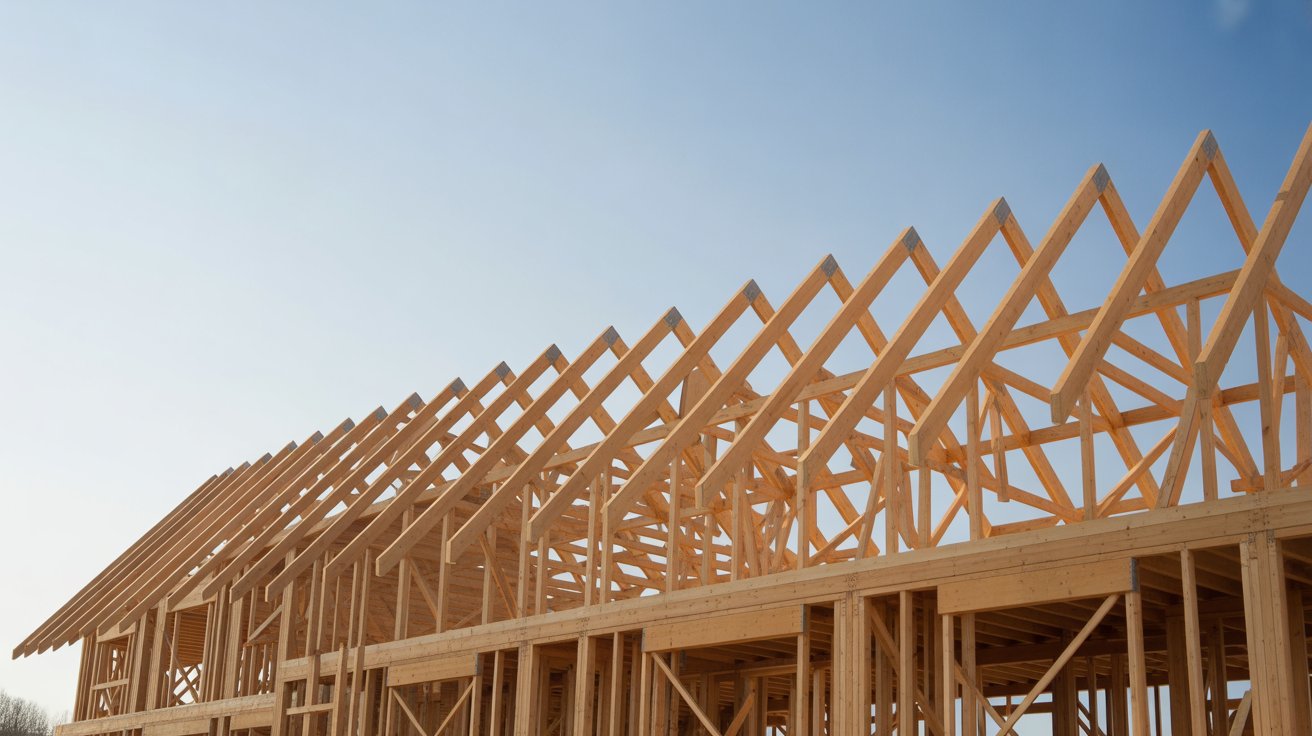
Pick the wrong truss and your roof pays for it. A bad design leads to budget overruns, structural fixes mid-build, and lost space you cannot recover once construction starts.
The right roof truss design does three things at once: it carries the load safely, matches your ceiling goals, and keeps costs under control.
This post covers every major truss type, how each one works, what affects cost, and what to confirm before your build begins.
What Is Roof Truss Design?
A roof truss design is the planned arrangement and configuration of structural members that support a roof. It shows the shape, size, and placement of the truss components, including the top chords, bottom chords, and web members.
The design determines the roof’s strength, load capacity, span, and overall shape, ensuring it can safely support roofing materials and withstand forces such as wind, snow, and other structural loads.
Different designs are chosen based on the building type, roof style, and construction requirements.
How a Roof Truss Works
A roof truss is a prefabricated triangular framework that supports the roof above and transfers its load to the outer walls below through its members.
The triangle shape is what gives it strength. When load pushes down from above, the truss spreads that force outward to the walls rather than concentrating it in one spot.
Most trusses are factory-built and delivered to the site ready for placement, saving time and reducing on-site labor costs. According to the Structural Building Components Association, over 71% of new US single-family homes now use prefabricated roof trusses.
Roof Trusses vs. Traditional Rafter Framing
Traditional rafter framing is cut and assembled on-site by carpenters, which requires more time and skilled labor and results in greater material waste. Trusses, on the other hand, are factory-engineered to exact specifications, delivered ready to install, and far more consistent in quality.
| Feature | Roof Trusses | Traditional Rafters |
|---|---|---|
| Construction | Factory-built, pre-engineered | Cut and built on-site |
| Installation Speed | Fast | Slow |
| Labor Cost | Lower | Higher |
| Material Waste | Minimal | High |
| Structural Consistency | Uniform | Varies by skill |
| Design Flexibility | High | Limited |
| Best For | Most residential and commercial builds | Custom or heritage builds |
Pro Tip: If your project has a unique roof shape or heritage design requirement, traditional rafter framing may still be the better fit. Always discuss this with your structural engineer first.
Key Components of a Roof Truss
Every roof truss consists of specific parts that work together to carry and distribute the load. Knowing each one helps you read plans and communicate clearly with your builder.
Top Chord, Bottom Chord, and Web Members
The top chord runs along the sloped outer edges and carries the direct weight of the roof covering above.
The bottom chord runs horizontally at the base, holding the structure together and stopping the walls from spreading outward.
Web members are the internal pieces connecting both chords. They transfer load between the chords and stop the truss from bending or twisting under pressure.
Connector Plates and Bearing Points
Metal connector plates are pressed into the timber at every joint inside the truss. Made from galvanized steel with small gripping teeth, they hold each joint firmly under load.
Bearing points are where the truss rests on the walls, usually one at each end. Each plate is sized based on the force that the joint must carry. Bearing points must sit at the correct height to avoid stress and cracking over time.
Pro Tip: Never cut or modify web members on-site without written approval from the engineer. It weakens the truss load capacity and can void the manufacturer’s warranty.
Construction Note: Roof trusses are engineered structural components. Any on-site modification, including trimming, notching, or adding loads, requires review and written approval from a licensed structural engineer before work proceeds.
Main Factors That Affect Roof Truss Design
No two roof truss designs are the same. Several key factors directly shape how your truss is built, sized, and spaced across the structure.
1. Roof Span, Pitch, and Load Types
The span sets the total width the truss must cover. The pitch defines the roof slope angle. Together, these two figures set the starting point for every other design decision.
Load types break into three categories:
- Dead loads: Permanent weight from roofing materials, insulation, ceiling finishes, and mechanical systems.
- Live loads: Temporary weight from maintenance workers or stored materials.
- Environmental loads: Wind, snow, and rain pressure specific to your location. In Texas and coastal regions, wind load calculations carry extra weight in the design process.
Getting any one of these wrong leads to a truss that is either unsafe or far more expensive than it needs to be.
2. Ceiling Type, Attic Use, and Building Layout
A flat ceiling suits standard trusses, while a vaulted ceiling requires scissor trusses.
If you plan to use the attic as a room or for storage, the truss type must be changed to support that load and provide clear space inside. Interior wall placement also plays a role. Load-bearing walls can shorten the required span and simplify the overall truss design considerably.
3. Local Building Codes
Every region sets minimum safety standards for truss design. These cover load values, materials, spacing, and joint specifications. Meeting these requirements is mandatory before any building permit is issued or construction begins.
Pro Tip: Do not assume that code requirements from a previous project apply to your current one. Codes are updated regularly and vary between regions. Always verify before you design.
Common Types of Roof Truss Designs
The right truss type depends on your span, ceiling goal, and building budget. Here are the most widely used designs and what each one is built for.
1. King Post Truss
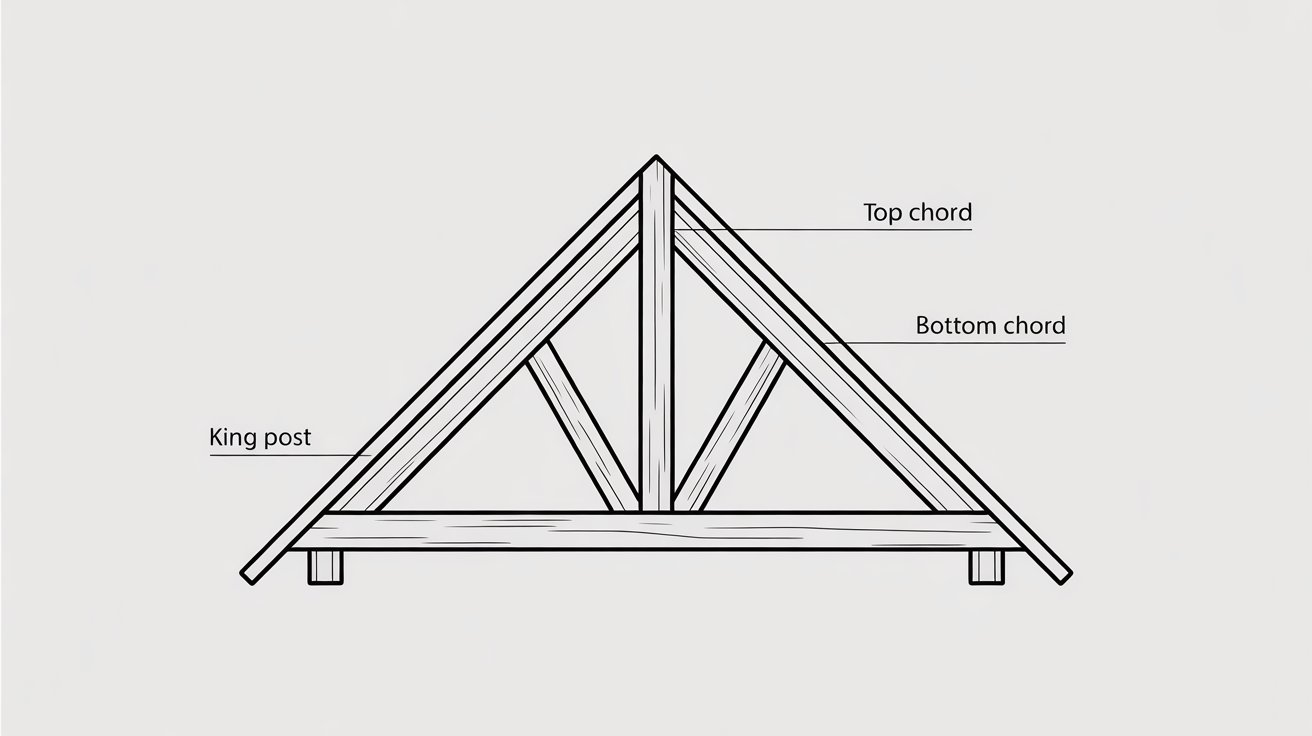
The king post is the simplest truss design available. It uses one central vertical post connecting the top and bottom chords at the midpoint.
Best suited for short spans up to 26 feet, it is a practical and affordable choice for garages, sheds, and small outbuildings where a complex design is not required.
2. Queen Post Truss
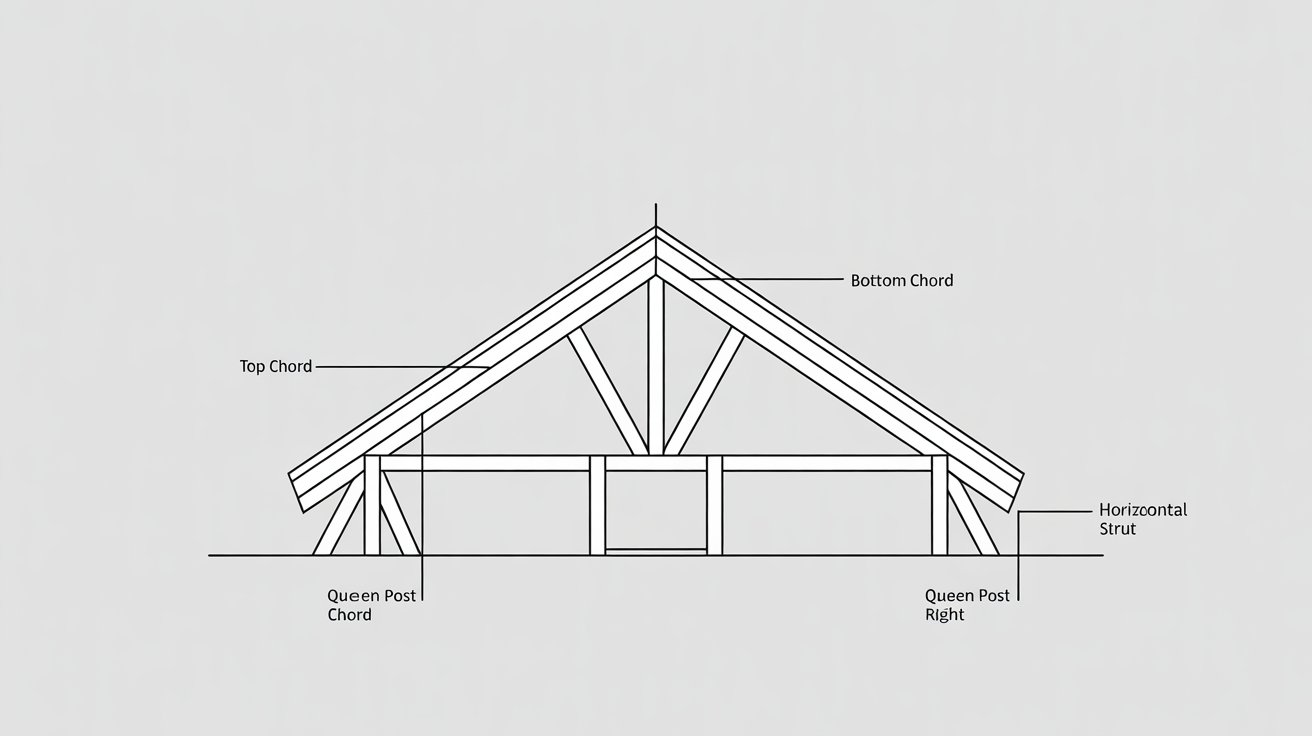
The queen post truss uses two vertical posts instead of one, giving it greater strength across wider spans. A horizontal strut connects the two posts, improving the overall stability of the frame.
It works well for medium-span buildings between 25 and 40 feet that need a bit more internal clearance without the complexity or cost of a fully engineered web truss design.
3. Fink Truss
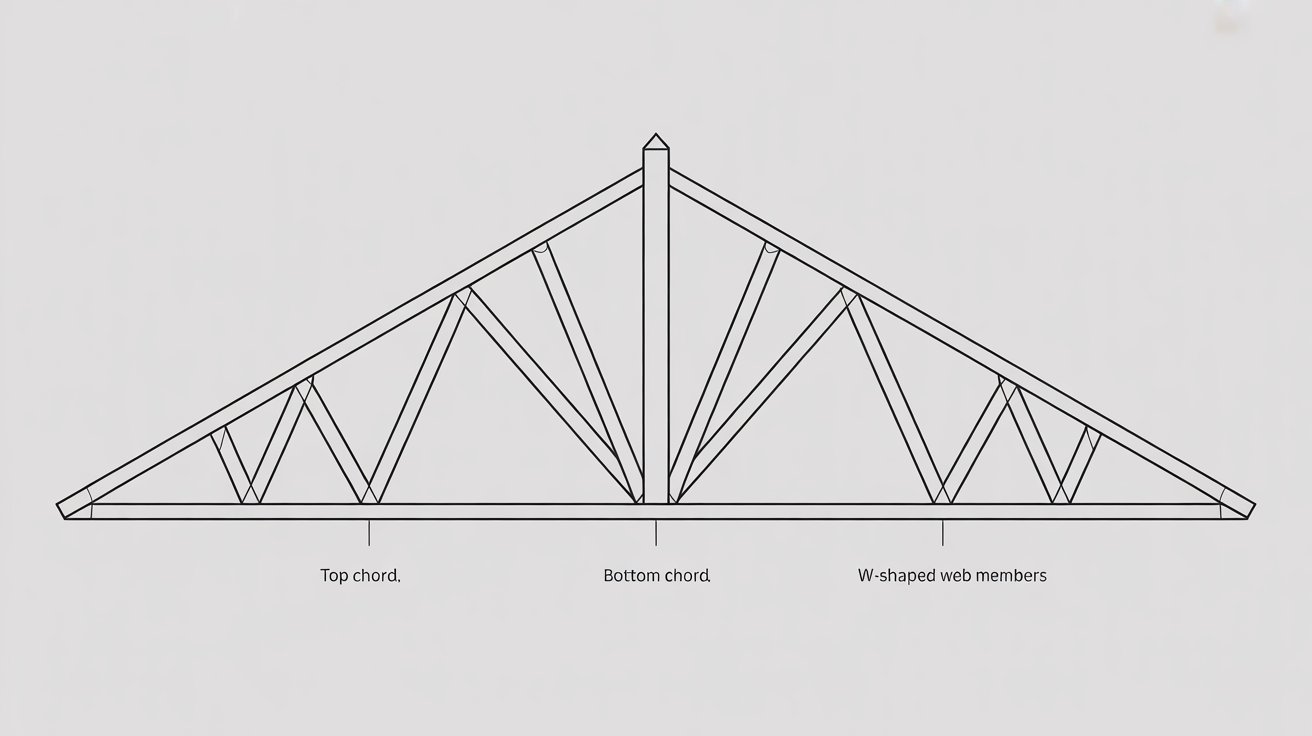
The Fink truss is the most widely used design in residential construction in the US. Its distinctive W-shaped web pattern distributes load efficiently and handles spans between 20 and 52 feet with ease.
It is fast to manufacture, affordable, and adaptable to a wide range of pitches, making it the standard choice for most new home builds.
4. Scissor Truss
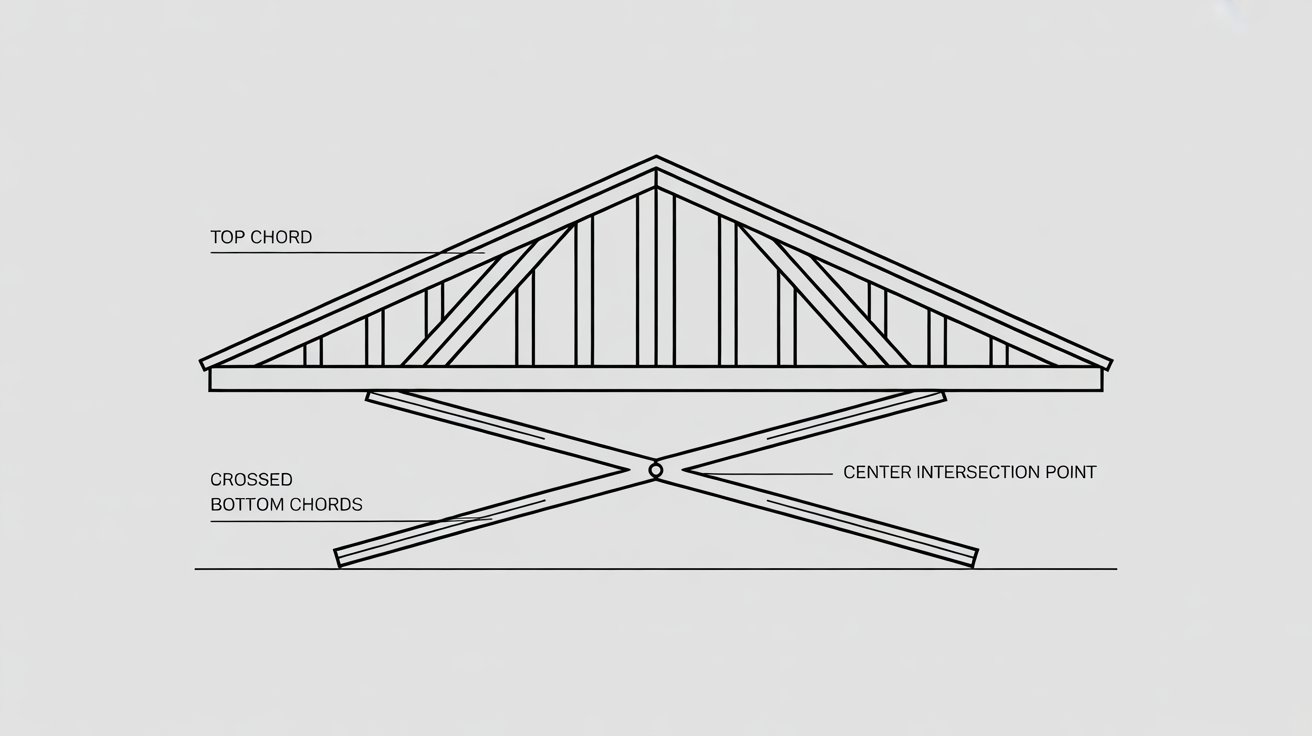
The scissor truss is built for vaulted or cathedral ceilings. Its bottom chords cross each other at the center, creating a sloped interior ceiling that gives rooms a taller, more open feel.
It is commonly used in living rooms, open-plan homes, and churches. The trade-off is a higher cost compared with a standard Fink truss.
5. Attic Truss
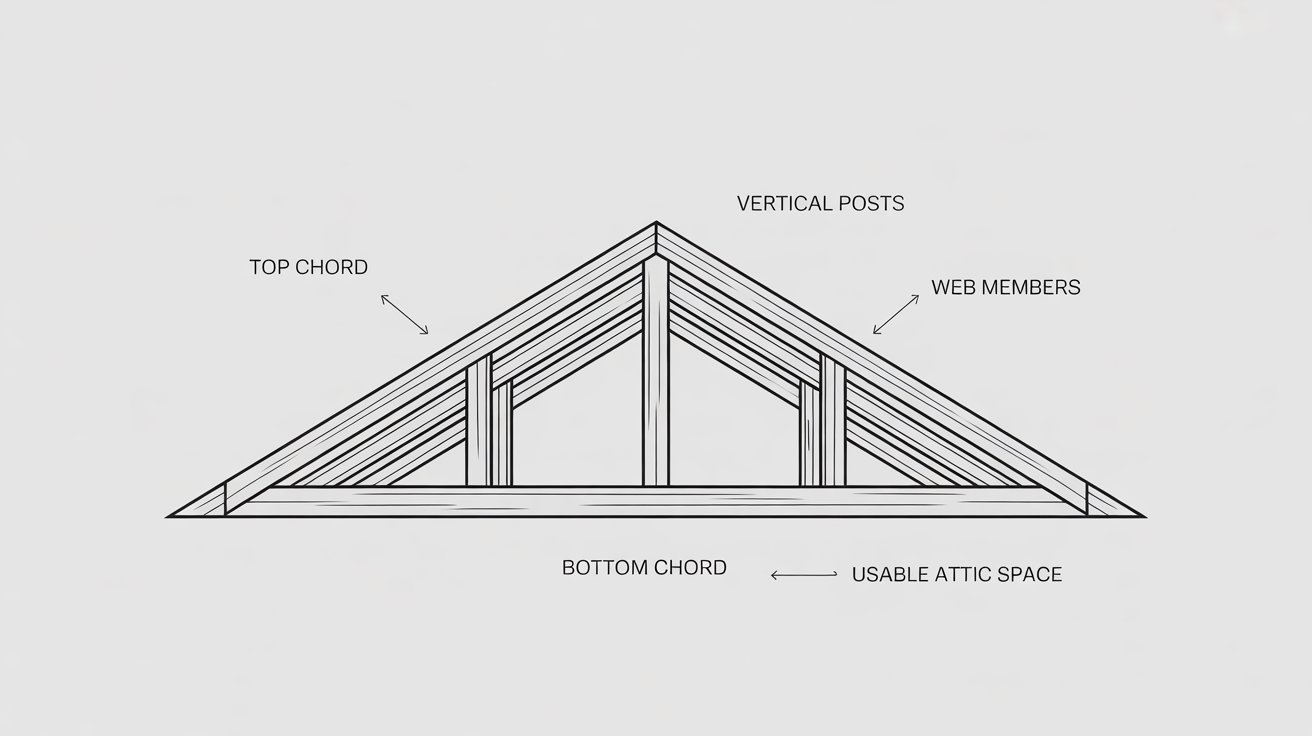
The attic truss is designed with a clear, open space in the center, large enough to use as a bedroom, office, or storage room. It adds usable square footage to a build without the expense of constructing an additional floor.
Attic trusses cost more than standard designs because they require additional structural members to carry both roof and floor loads within the same frame.
6. Raised-Heel Truss
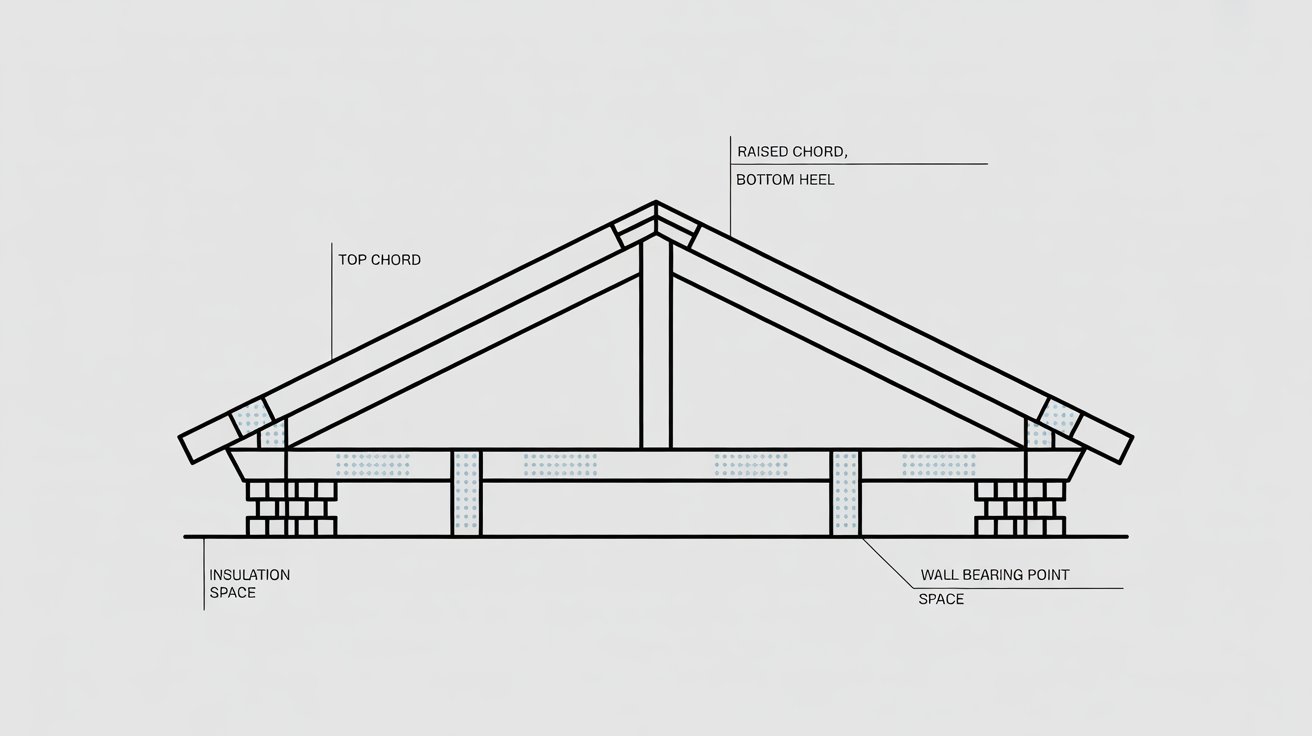
A raised-heel truss sits higher at the wall bearing point than a standard truss. This extra height creates room for full-depth insulation at the eaves, where heat loss is most common in conventional designs.
It is increasingly recommended or required by energy codes in many regions, particularly in climates with extreme temperatures. Research from the APA and Nexant estimates that raised-heel trusses can reduce annual energy costs by 4 to 6 percent through better eave insulation.
7. Hip Truss
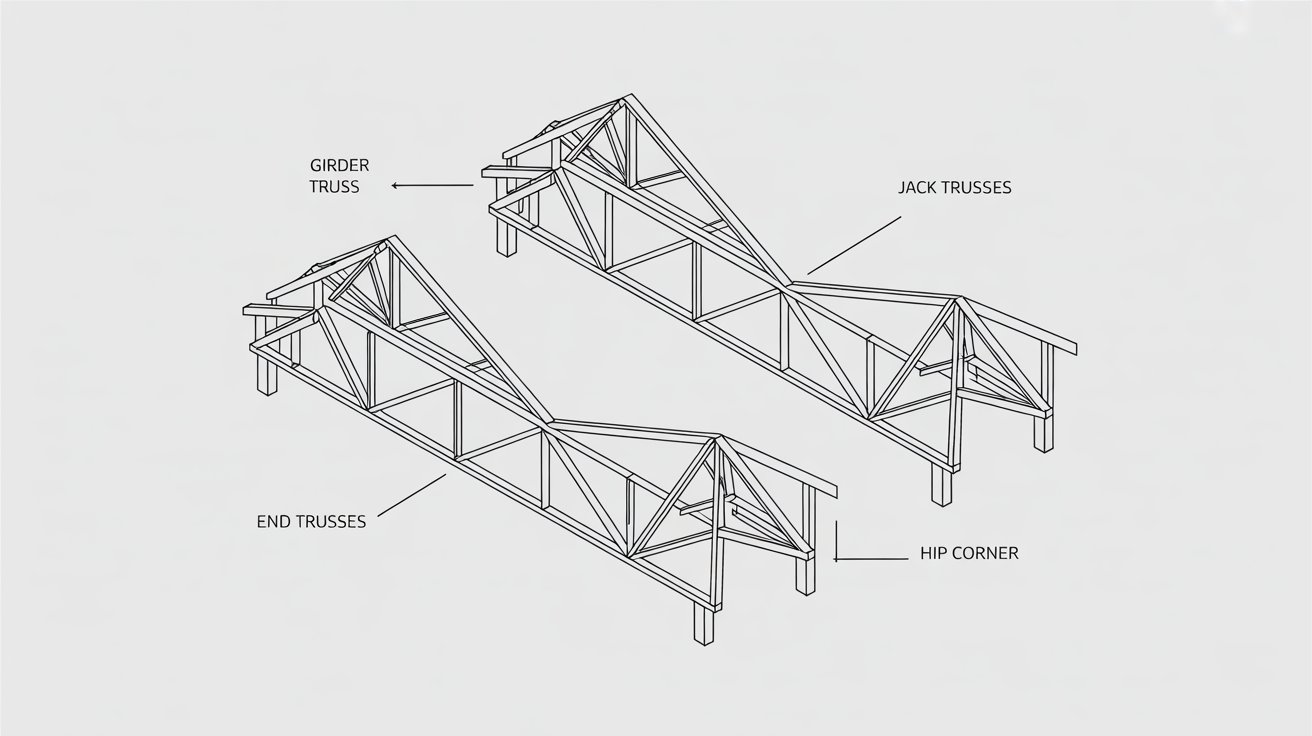
A hip truss system is used on roofs that slope on all four sides. It includes end trusses, jack trusses, and girder trusses that all work together to form the angled corners of the roof. The four-sided slope also affects how the roof overhang is framed at each corner.
8. Gable Truss
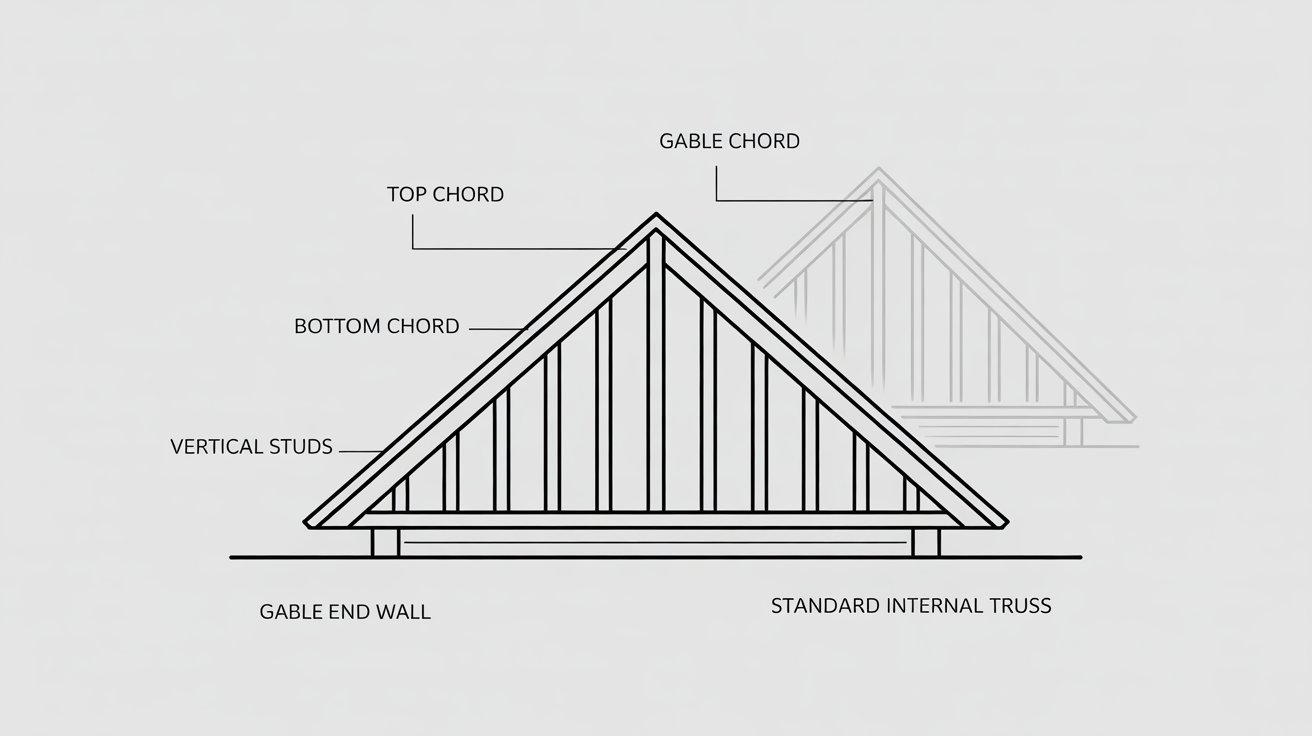
The gable truss is placed at each end of a gable roof to form the triangular wall section beneath the roofline. It works alongside the internal standard trusses to complete the frame and provides a solid backing for outer cladding or brickwork.
9. Mono Truss
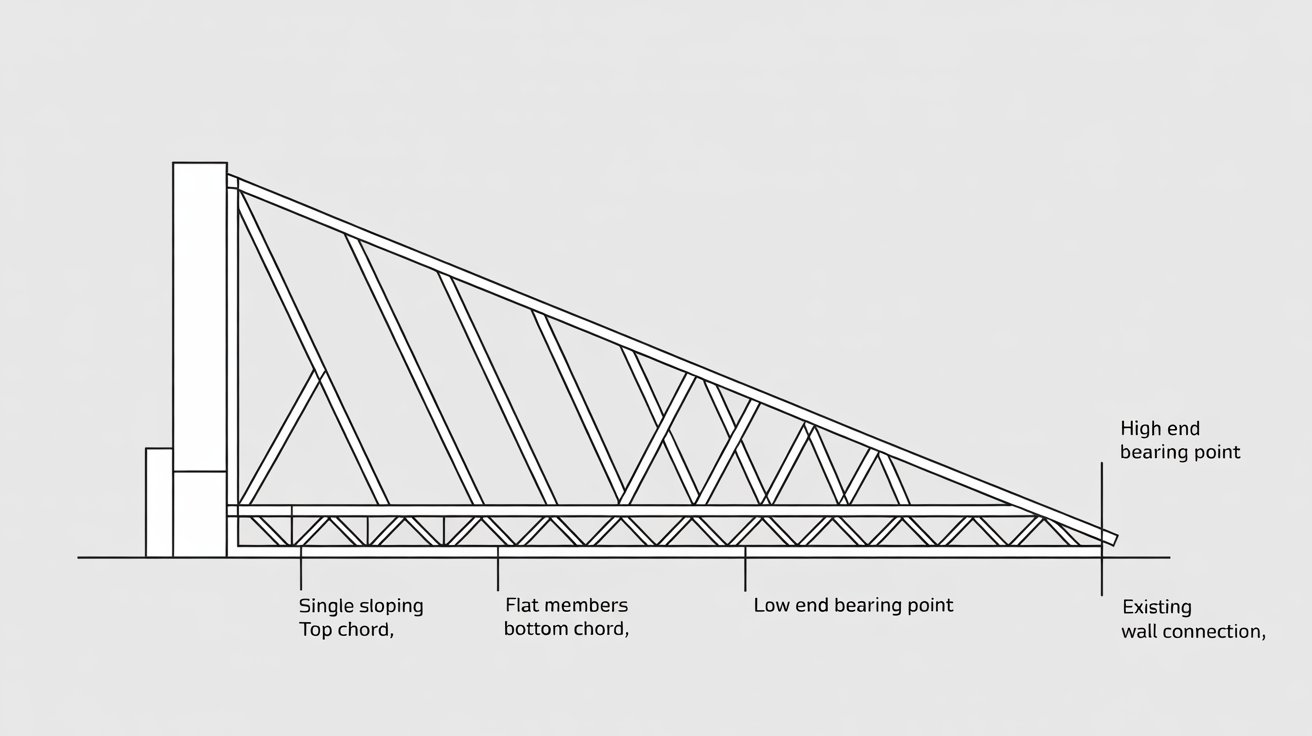
A mono truss has a single sloping top chord and a flat bottom chord, making it look like half of a standard truss. It is used for single-slope roofs, lean-to extensions, covered walkways, and home additions that attach to an existing building wall.
Roof Truss Spacing: How Far Apart Should Trusses Be?
Roof truss spacing is the center-to-center distance between each installed truss. In residential construction, the two most common spacings are 16 inches on center and 24 inches on center.
The correct spacing depends on:
- Roof covering material and its weight per square foot
- Truss design and span length
- Local building code requirements
- Snow and wind load requirements for your region
A licensed structural engineer or truss manufacturer should determine final spacing based on all project-specific conditions. Incorrect spacing causes overloaded members and creates uneven load distribution across the roof system.
Wood vs. Steel Roof Trusses
Material choice affects cost, span capability, and long-term performance. Both wood and steel are viable, but they suit different project types.
| Feature | Wood Trusses | Steel Trusses |
|---|---|---|
| Cost | Lower | Higher |
| Weight | Lighter | Heavier |
| Span Capability | Good for most residential spans | Strong for large commercial spans |
| Moisture Risk | Can warp if unprotected | Resistant to moisture |
| Pest Resistance | Requires treatment | Resistant to termites |
| Best For | Standard residential builds | Large commercial and industrial buildings |
Pro Tip: For most residential builds in the US, wood trusses are the right starting point. Steel becomes the better option when spans exceed 60 feet or when the building requires large open interior areas without support columns.
How Roof Truss Installation Works
Roof truss installation follows a set sequence. Skipping steps or altering the order creates problems that are expensive to fix after the fact.
Step 1: Review Engineering Plans
The builder confirms truss dimensions, load requirements, and installation layout before any truss leaves the ground.
Step 2: Prepare Supporting Walls
Walls must be level and properly aligned before installation begins. Misaligned walls cause trusses to sit unevenly, shifting load paths and creating long-term movement in the structure.
Step 3: Lift and Position Trusses
Trusses are lifted by crane and set according to the approved spacing layout. Each truss is temporarily braced as it goes up to prevent collapse before permanent connections are made.
Step 4: Install Permanent Bracing
Permanent bracing locks the trusses in place and prevents lateral movement under wind and live load. The bracing pattern is specified in the engineering drawings and must be followed exactly.
Step 5: Final Inspection
The completed system is checked for correct placement, secure connections, and code compliance before roof sheathing begins.
Pro Tip: Keep a copy of the approved truss drawings on site throughout construction. Inspectors may request them at any stage, and having them ready avoids unnecessary stoppages.
Safety Note: The most dangerous phase of truss installation is before the roof sheathing is complete. Temporary bracing is not optional during this window. Follow BCSI (Building Component Safety Information) guidelines published by the Structural Building Components Association for bracing requirements.
Cost Factors in Roof Truss Design
Truss costs vary widely depending on what you are building. Understanding what drives the price helps you plan your budget before committing to a final design.
Material, Span, and Complexity
Wood trusses cost less and suit most residential builds. Longer spans and complex web configurations require more material and engineering time, increasing the overall price.
Standard vs. Custom Truss Costs
Standard trusses follow common span-and-pitch combinations, making them quicker and cheaper to produce. Custom trusses are designed for unique roof shapes and cost more due to the extra engineering and manufacturing time required.
| Feature | Standard Trusses | Custom Trusses |
|---|---|---|
| Cost | Lower | Higher |
| Production Time | Fast | Longer lead time |
| Design Flexibility | Limited | Fully flexible |
| Engineering Required | Minimal | Detailed engineering needed |
| Best For | Regular residential builds | Unique or complex roof shapes |
Pro Tip: If your roof design allows for standard trusses, stick with them. The savings in both cost and lead time are real, and the structural performance is just as reliable as a custom design for the same span and load.
Roof Truss Maintenance and Inspection
Roof trusses require little ongoing maintenance, but regular inspections catch problems before they become structural failures.
During each inspection, look for:
- Cracks or splits in timber members
- Water stains or rot from moisture infiltration
- Sagging roof lines visible from outside
- Loose or missing connector plates at joints
- Signs of insect activity, including frass or hollow-sounding wood
Inspections matter most after severe storms or when purchasing an older property. In Texas, inspect after any hurricane or tropical storm event to confirm no web members have been displaced or cracked.
Conclusion
Roof truss design is not a one-size-fits-all decision. Your span, pitch, building layout, ceiling goals, material choice, and local codes all shape the right answer for your specific project.
From the simple king post to the space-creating attic truss, every design type serves a clear purpose. Getting this choice right at the start saves money, prevents costly mid-build changes, and keeps the structure safe for the life of the building.
Before finalizing any plan, work with a licensed structural engineer, confirm local code requirements, and choose a truss that fits both your current build and any future plans for the space.
The right decision made early costs nothing extra. A wrong decision made late costs everything.
Frequently Asked Questions
What Is the Formula for Roof Trusses?
Use: truss count = ((roof length x 12) / 24) + 1. For a 40-foot roof: ((40 x 12) / 24) + 1 = 21 trusses. This formula applies to standard 24-inch spacing.
Can Roof Trusses Be Modified?
No. Trusses must never be cut or altered without a structural engineer’s written approval. Unauthorized changes reduce load capacity and void the manufacturer’s warranty.
What Is the Best Roof Truss Design for Texas Climates?
In Texas, wind load and heat are the two primary factors. Fink trusses work well for most builds. In coastal areas, the structural engineer should specify wind-rated connector plates and spacing to meet Texas wind zone requirements.