Most people searching for a metal roof installation diagram end up on pages that describe installation steps.
The steps are fine, but they skip the actual problem: you have a manufacturer’s diagram in front of you and no idea what you’re looking at.
That’s what this guide covers. A metal roof installation diagram is not decorative. It’s the document that controls the entire job component placement, fastener spacing, flashing sequence, and material compatibility.
If your installer ignores it or misreads it, the warranty is void. The leak is already scheduled.
Whether you’re about to DIY a shed, supervise a contractor, or just want to understand what “proper installation” actually looks like on paper, this is where to start.
What is a Metal Roof Diagram?
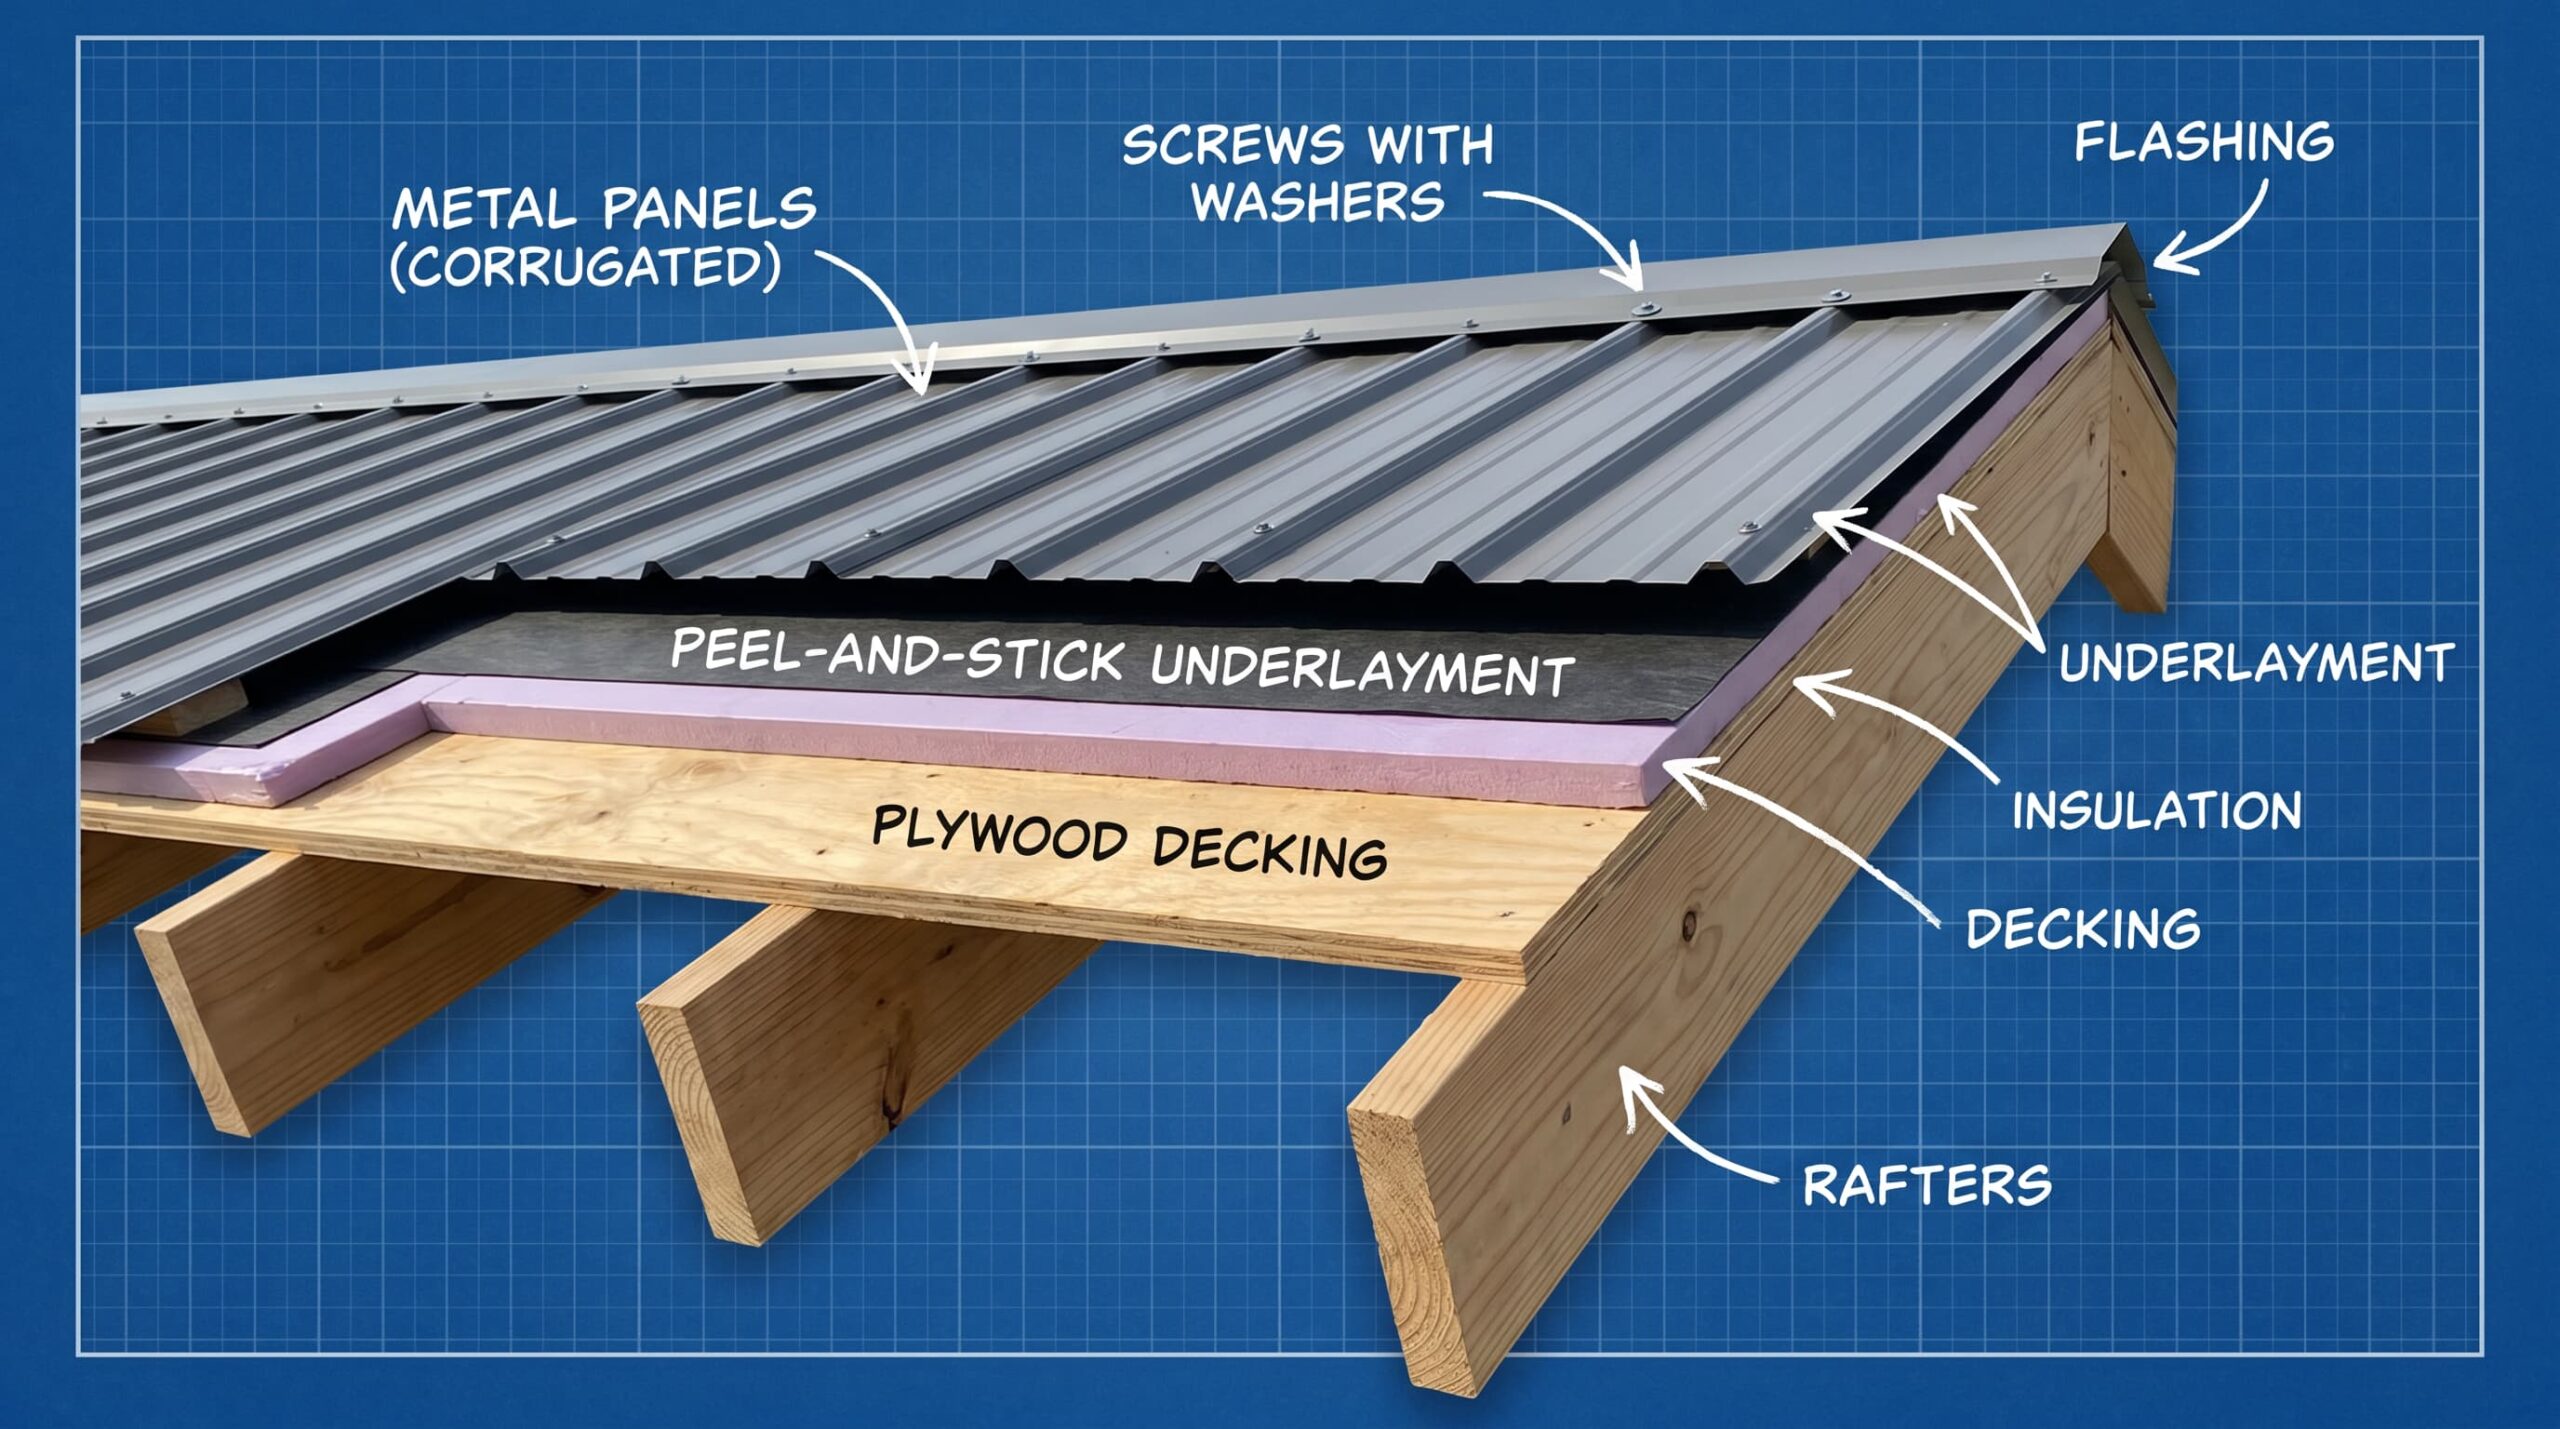
A manufacturer’s installation detail drawing does two things: it shows where each component goes and specifies how to install it.
The drawings are based on tested, engineered specifications. They account for how that specific panel behaves in wind, heat, and rain.
Every diagram covers the same six zones of the roof: the eave, the field (panel area), the ridge, the valley, the sidewalls/endwalls, and penetrations.
Each zone has its own drawing, its own measurements, and its own failure modes when someone skips a step.
Here’s the thing most people don’t know: if your installation doesn’t match the diagram, the manufacturer’s warranty is void. Not reduced. Void. The time to understand the diagram is before the first panel goes on.
The 6 Zones of a Metal Roof Diagram Covers
The 6 zones of a metal roof diagram typically represent different areas of the roofing system, each with specific functions.
These include the ridge, valley, eave, gutter, hip, and flashing areas, all of which work together to ensure proper water runoff, ventilation, and structural integrity, providing long-lasting protection against the elements.
Zone 1: The Eave (Where Water First Hits)
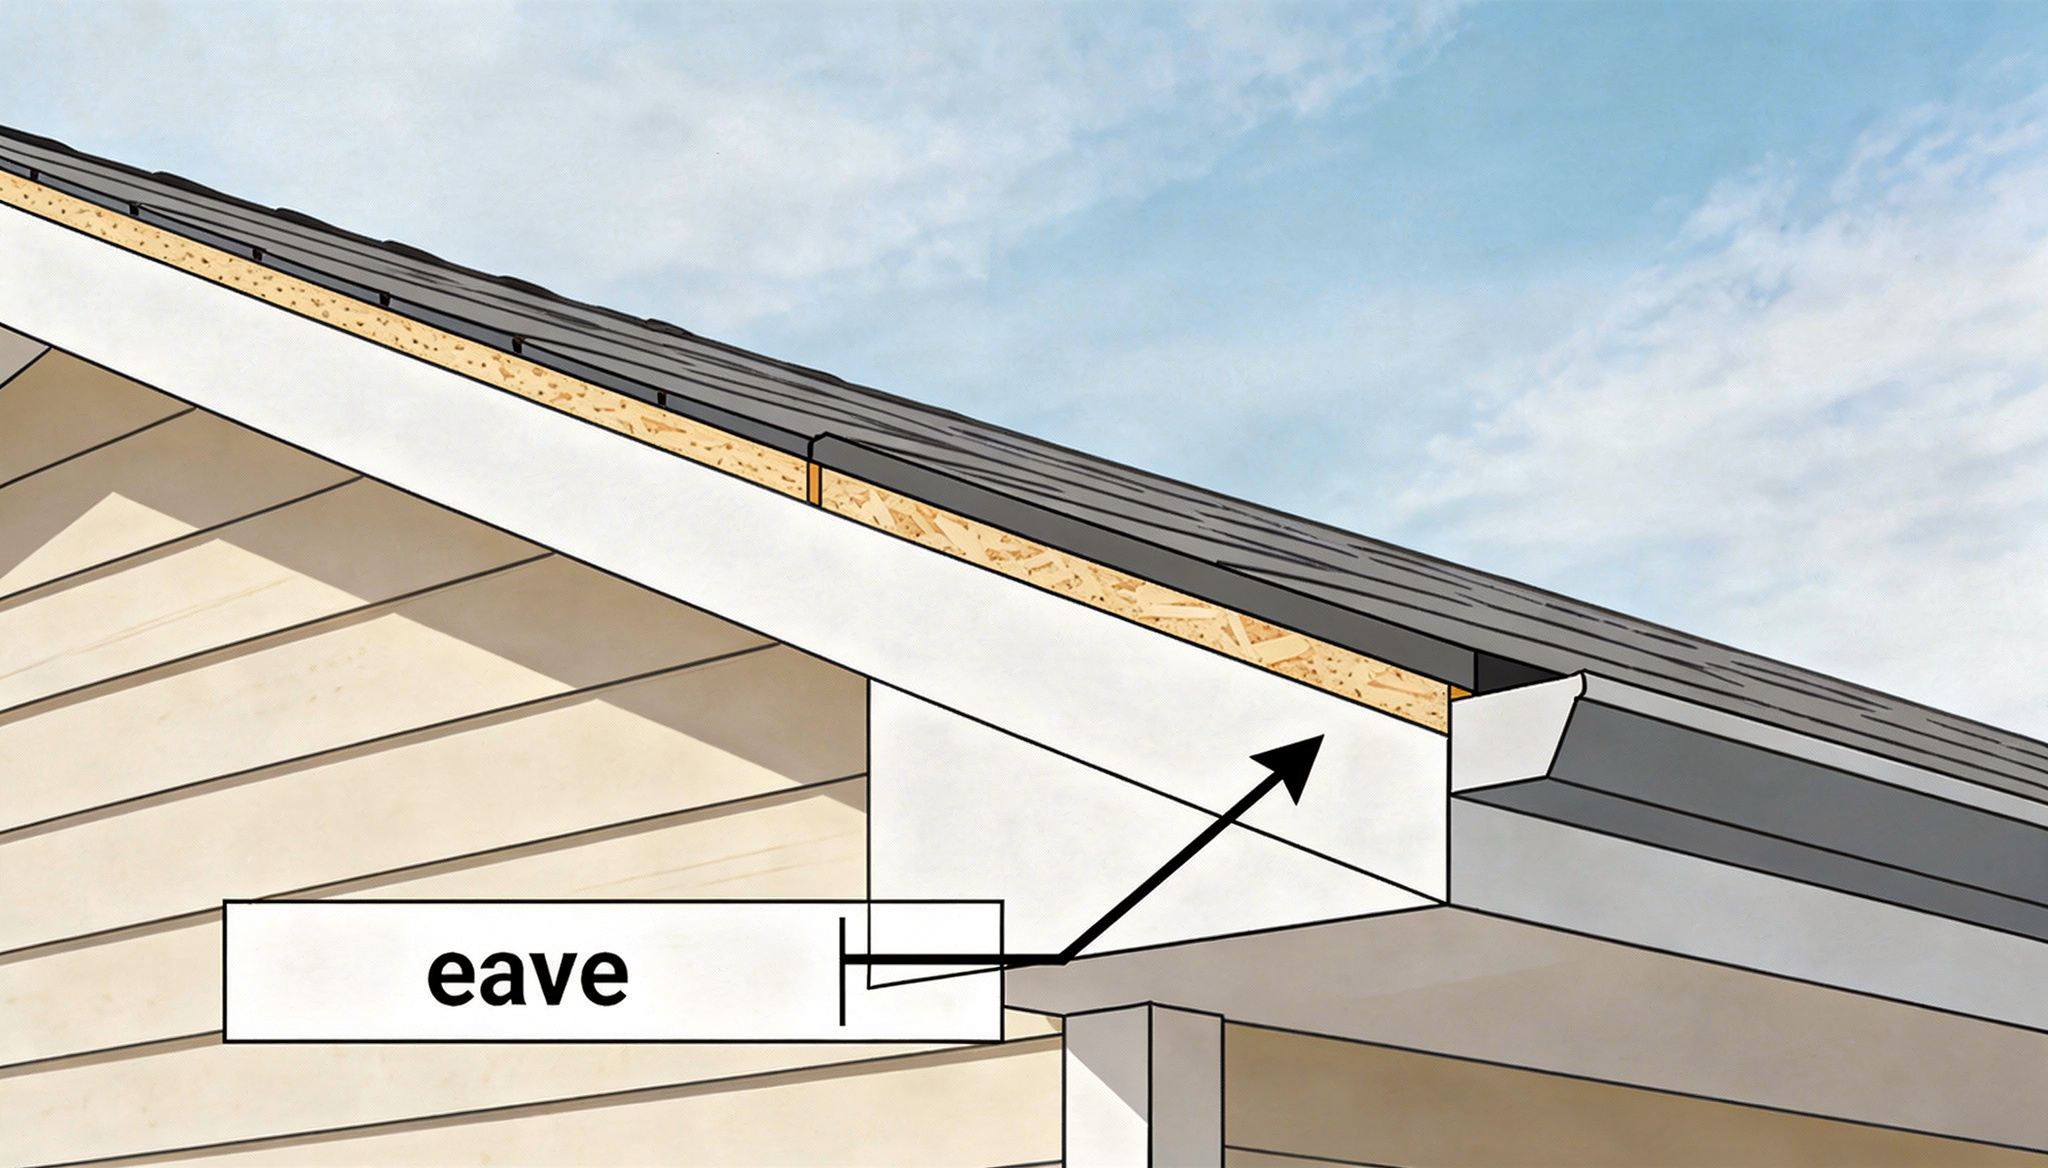
The eave detail is often misunderstood but very important.
On metal roofs, the drip edge goes under the underlayment, not over it like shingles. If installed incorrectly, water can seep into the roof deck.
The panel should extend about 1 to 1.25 inches past the fascia. Too little overhang affects drainage, while too much can catch the wind.
In colder climates, an ice and water shield is used and usually extends farther up the roof because metal conducts heat more quickly.
Zone 2: The Field (The Panel-to-Panel Zone)
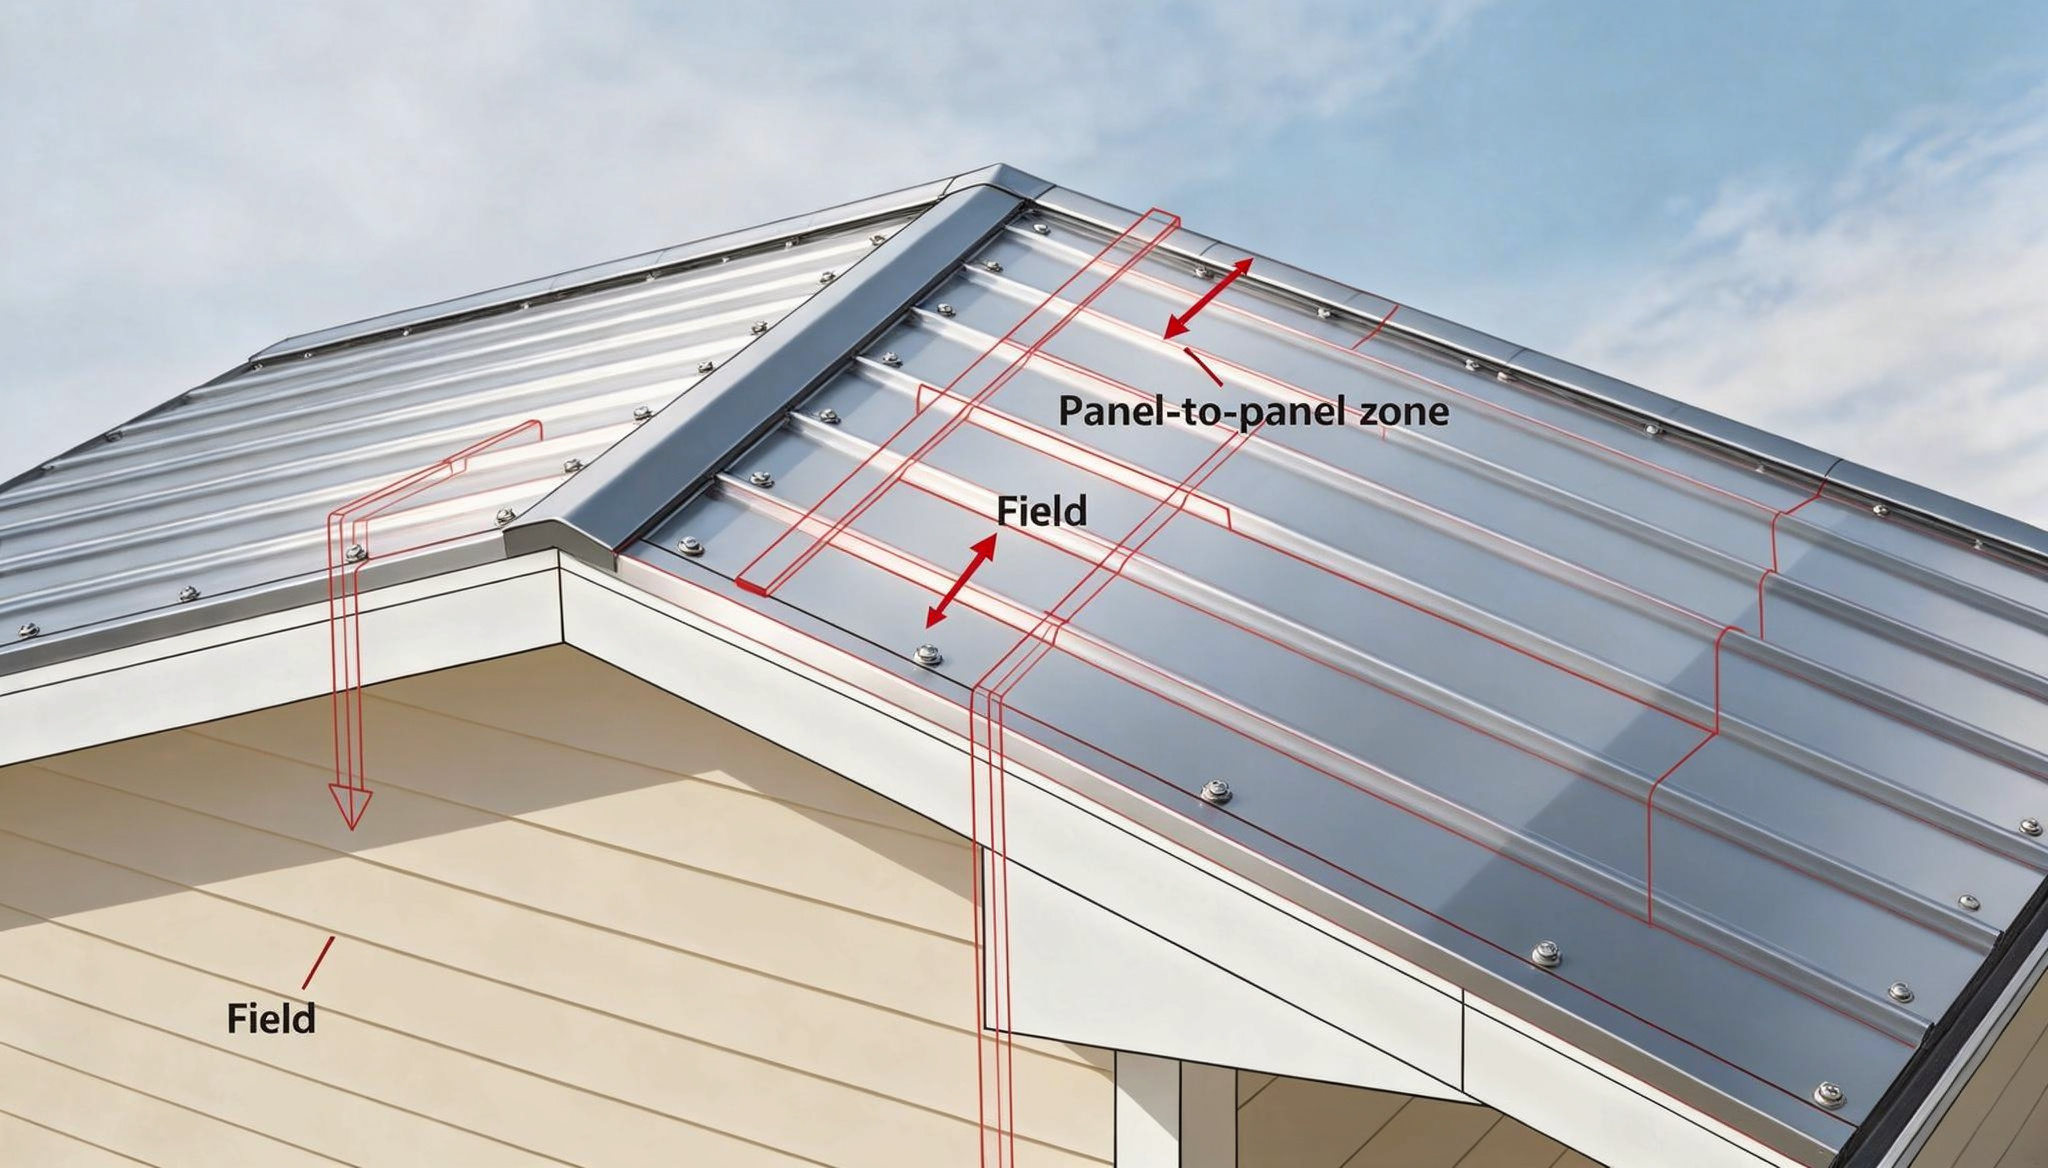
The field is the main section of the roof between the eave and ridge. Two key things shown in the diagram are panel overlap and fastener placement.
Panels usually overlap by at least one rib, while standing seam systems follow a different locking method.
Fastener spacing is not the same across the roof. Areas like edges and corners need closer spacing due to wind, while the center can have wider spacing.
Oil canning is the wavy look sometimes seen on metal roofs. It usually happens when fasteners are over-tightened, preventing the panels from expanding.
As the metal heats up, it has no room to move and buckles. Fasteners should be tightened just enough to keep the washer slightly compressed, not flattened.
Zone 3: The Ridge Cap
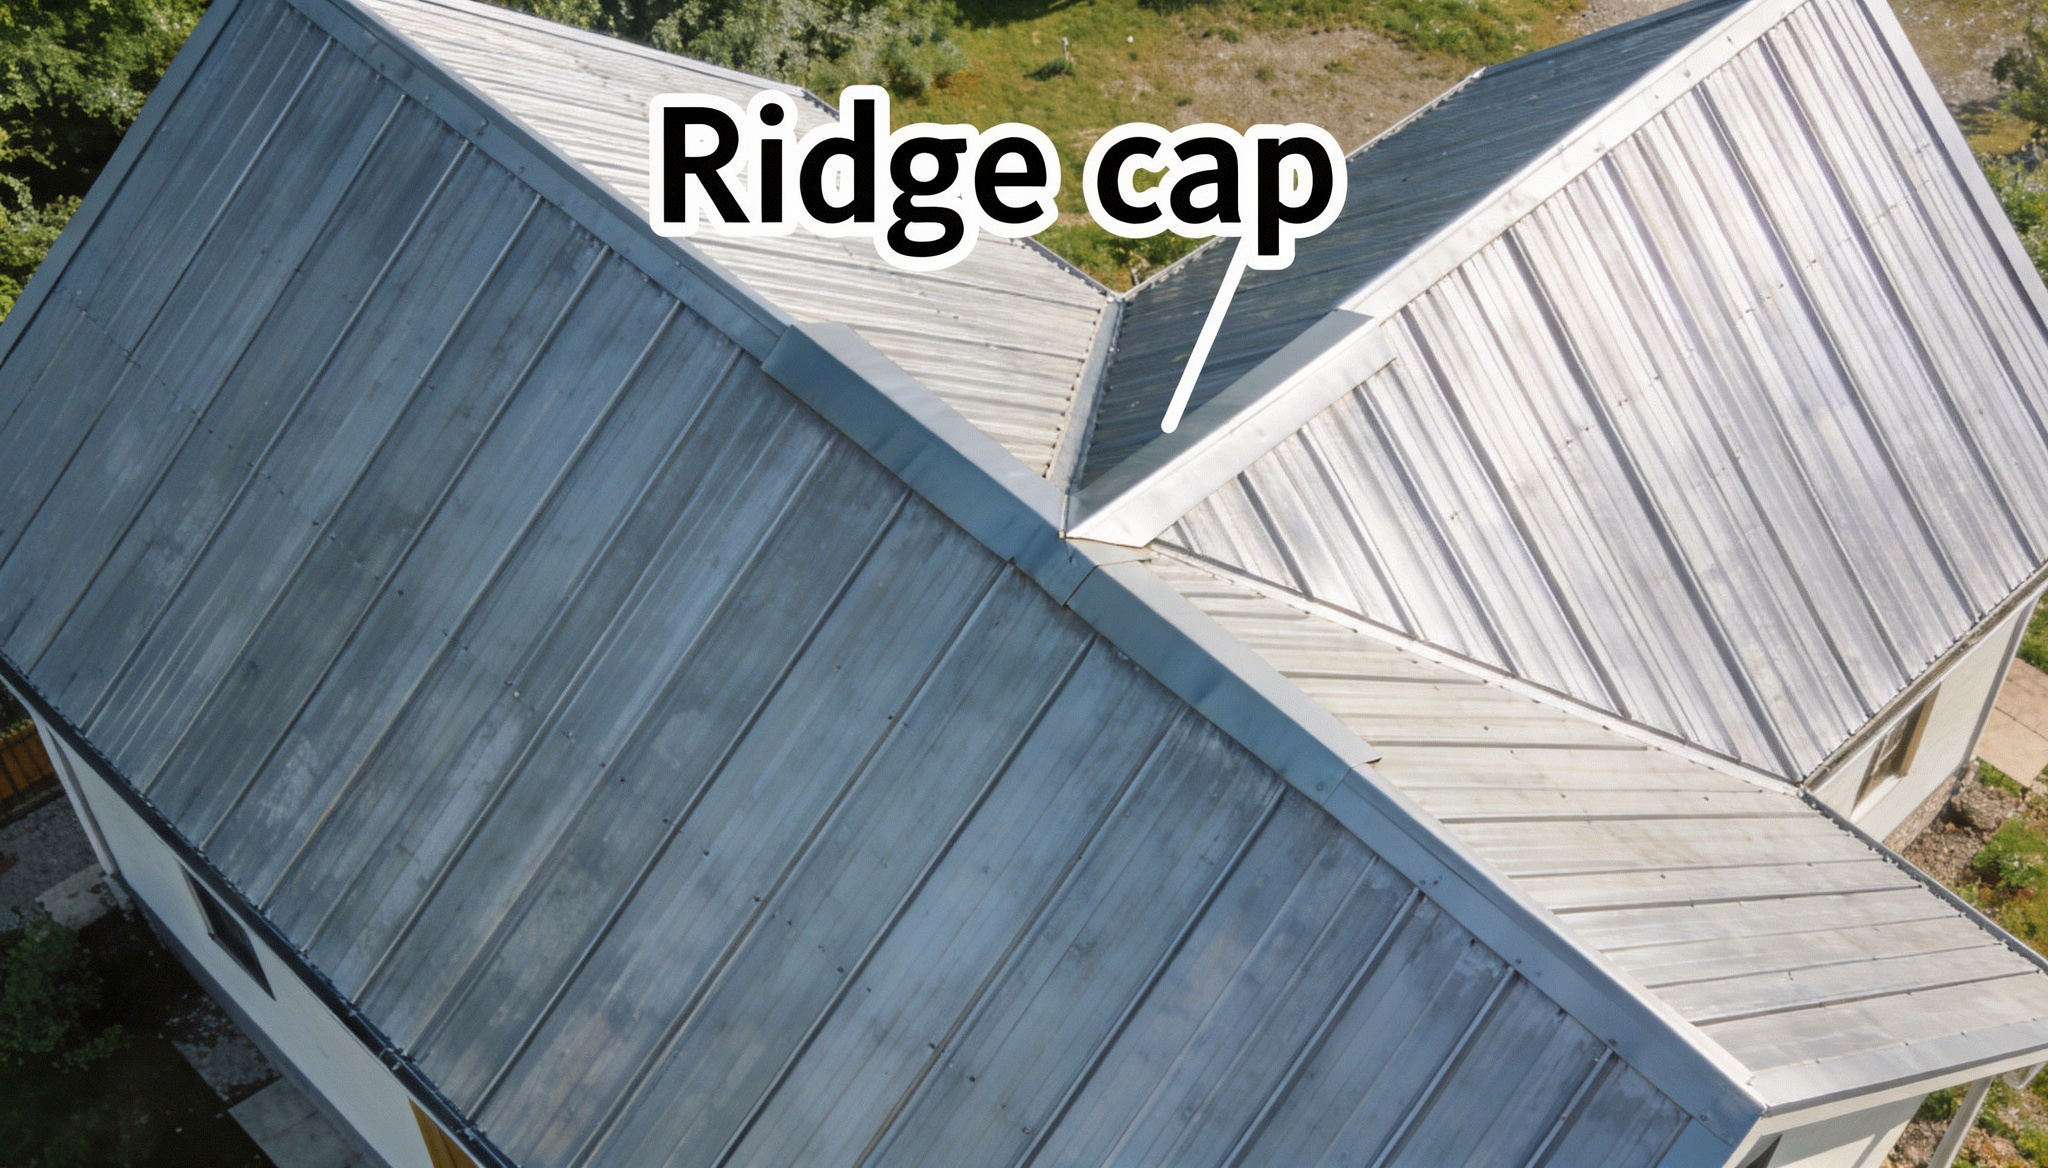
Two things that trip up installers in the ridge zone:
Gable flashing should be installed before the ridge cap. If done wrong, water can get underneath.
Ridge details vary. A vented ridge allows airflow, while a non-vented ridge uses a foam closure. Using the wrong type can lead to moisture problems over time.
Fasteners at the ridge are usually spaced about 9 inches apart and set slightly back from the edge.
Zone 4: The Valley (Highest Leak Risk on Any Roof)
Valley details are more complex and show flashing, measurements, and support requirements.
Flashing must overlap by at least 6 inches to prevent water leaks. The valley needs solid decking underneath, not just purlins, for proper support.
There are two types: open valleys (visible flashing) and closed valleys (panels meet), so it’s important to use the correct diagram.
Zone 5: Sidewalls and Endwalls
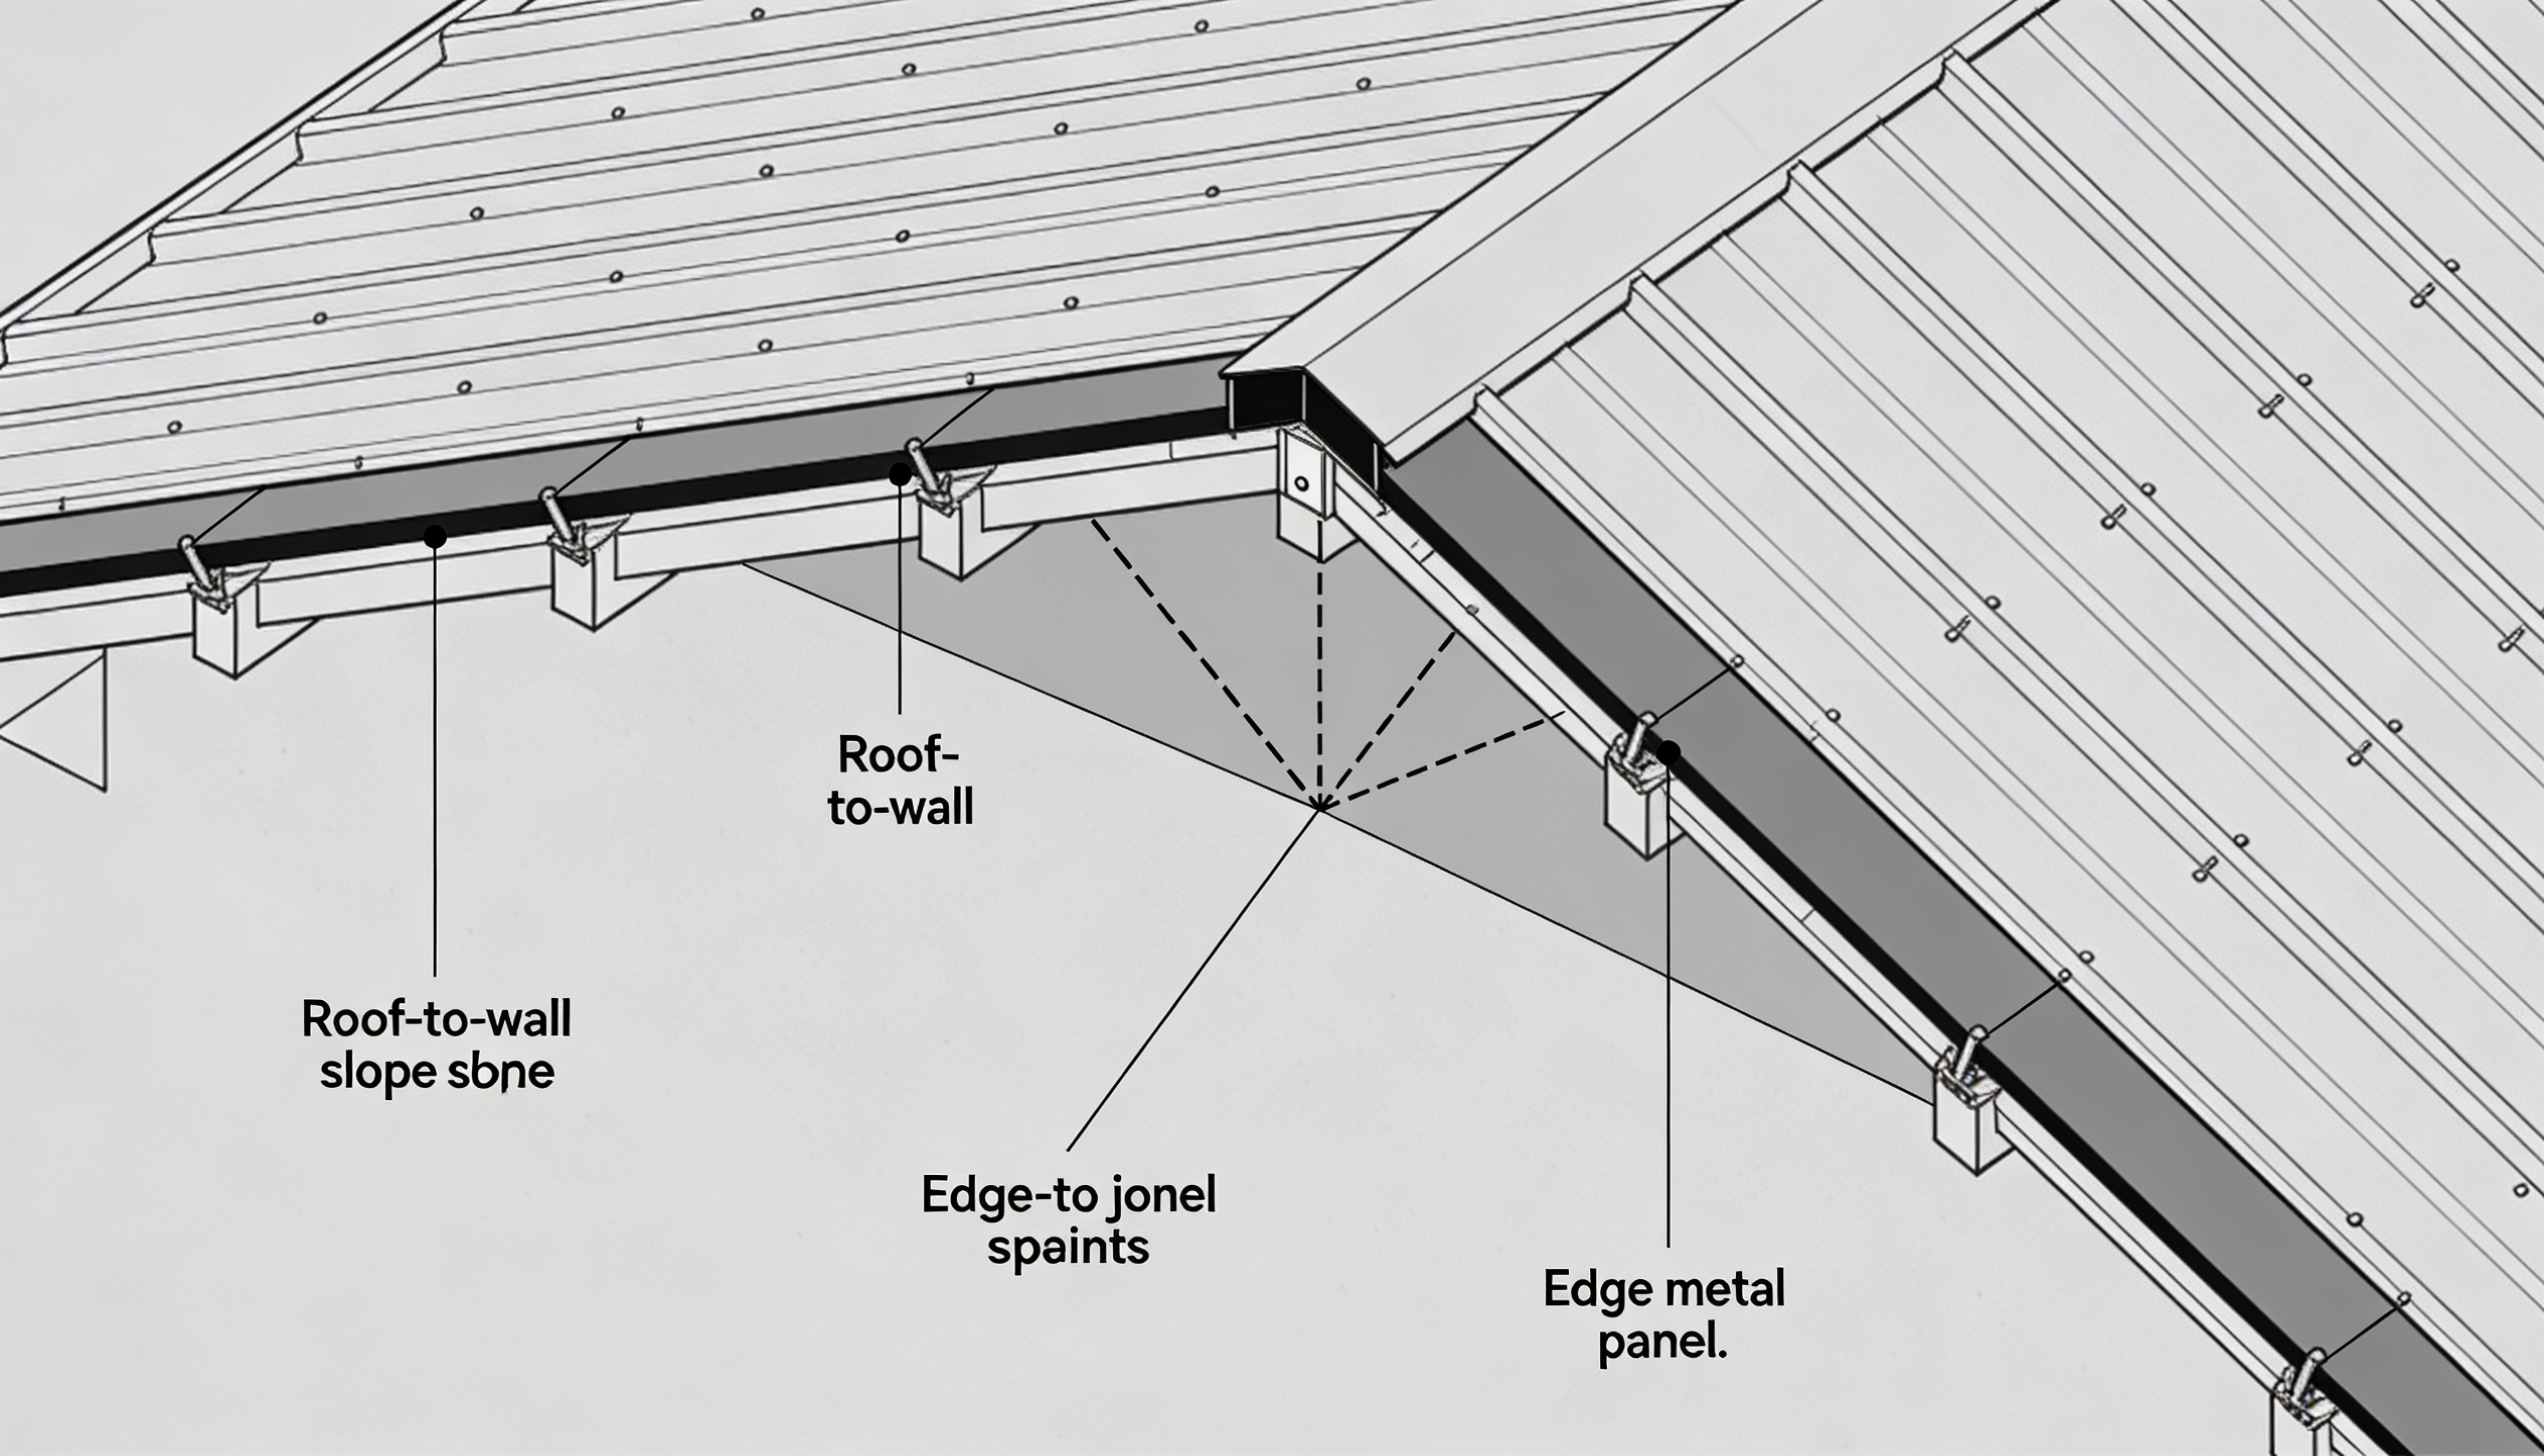
Sidewalls and endwalls are different roof-to-wall connections and use different flashing details.
Z-flashing at sidewalls acts as an expansion joint, allowing panels to move. It should be fixed to the wall, with panels sliding underneath.
The diagram also shows where to use sealants. Butyl tape is used for metal joints, while caulk is used for edges and openings. Using the wrong one can cause damage over time.
Zone 6: Penetrations (Pipe Boots, Vents, Skylights, Chimneys)
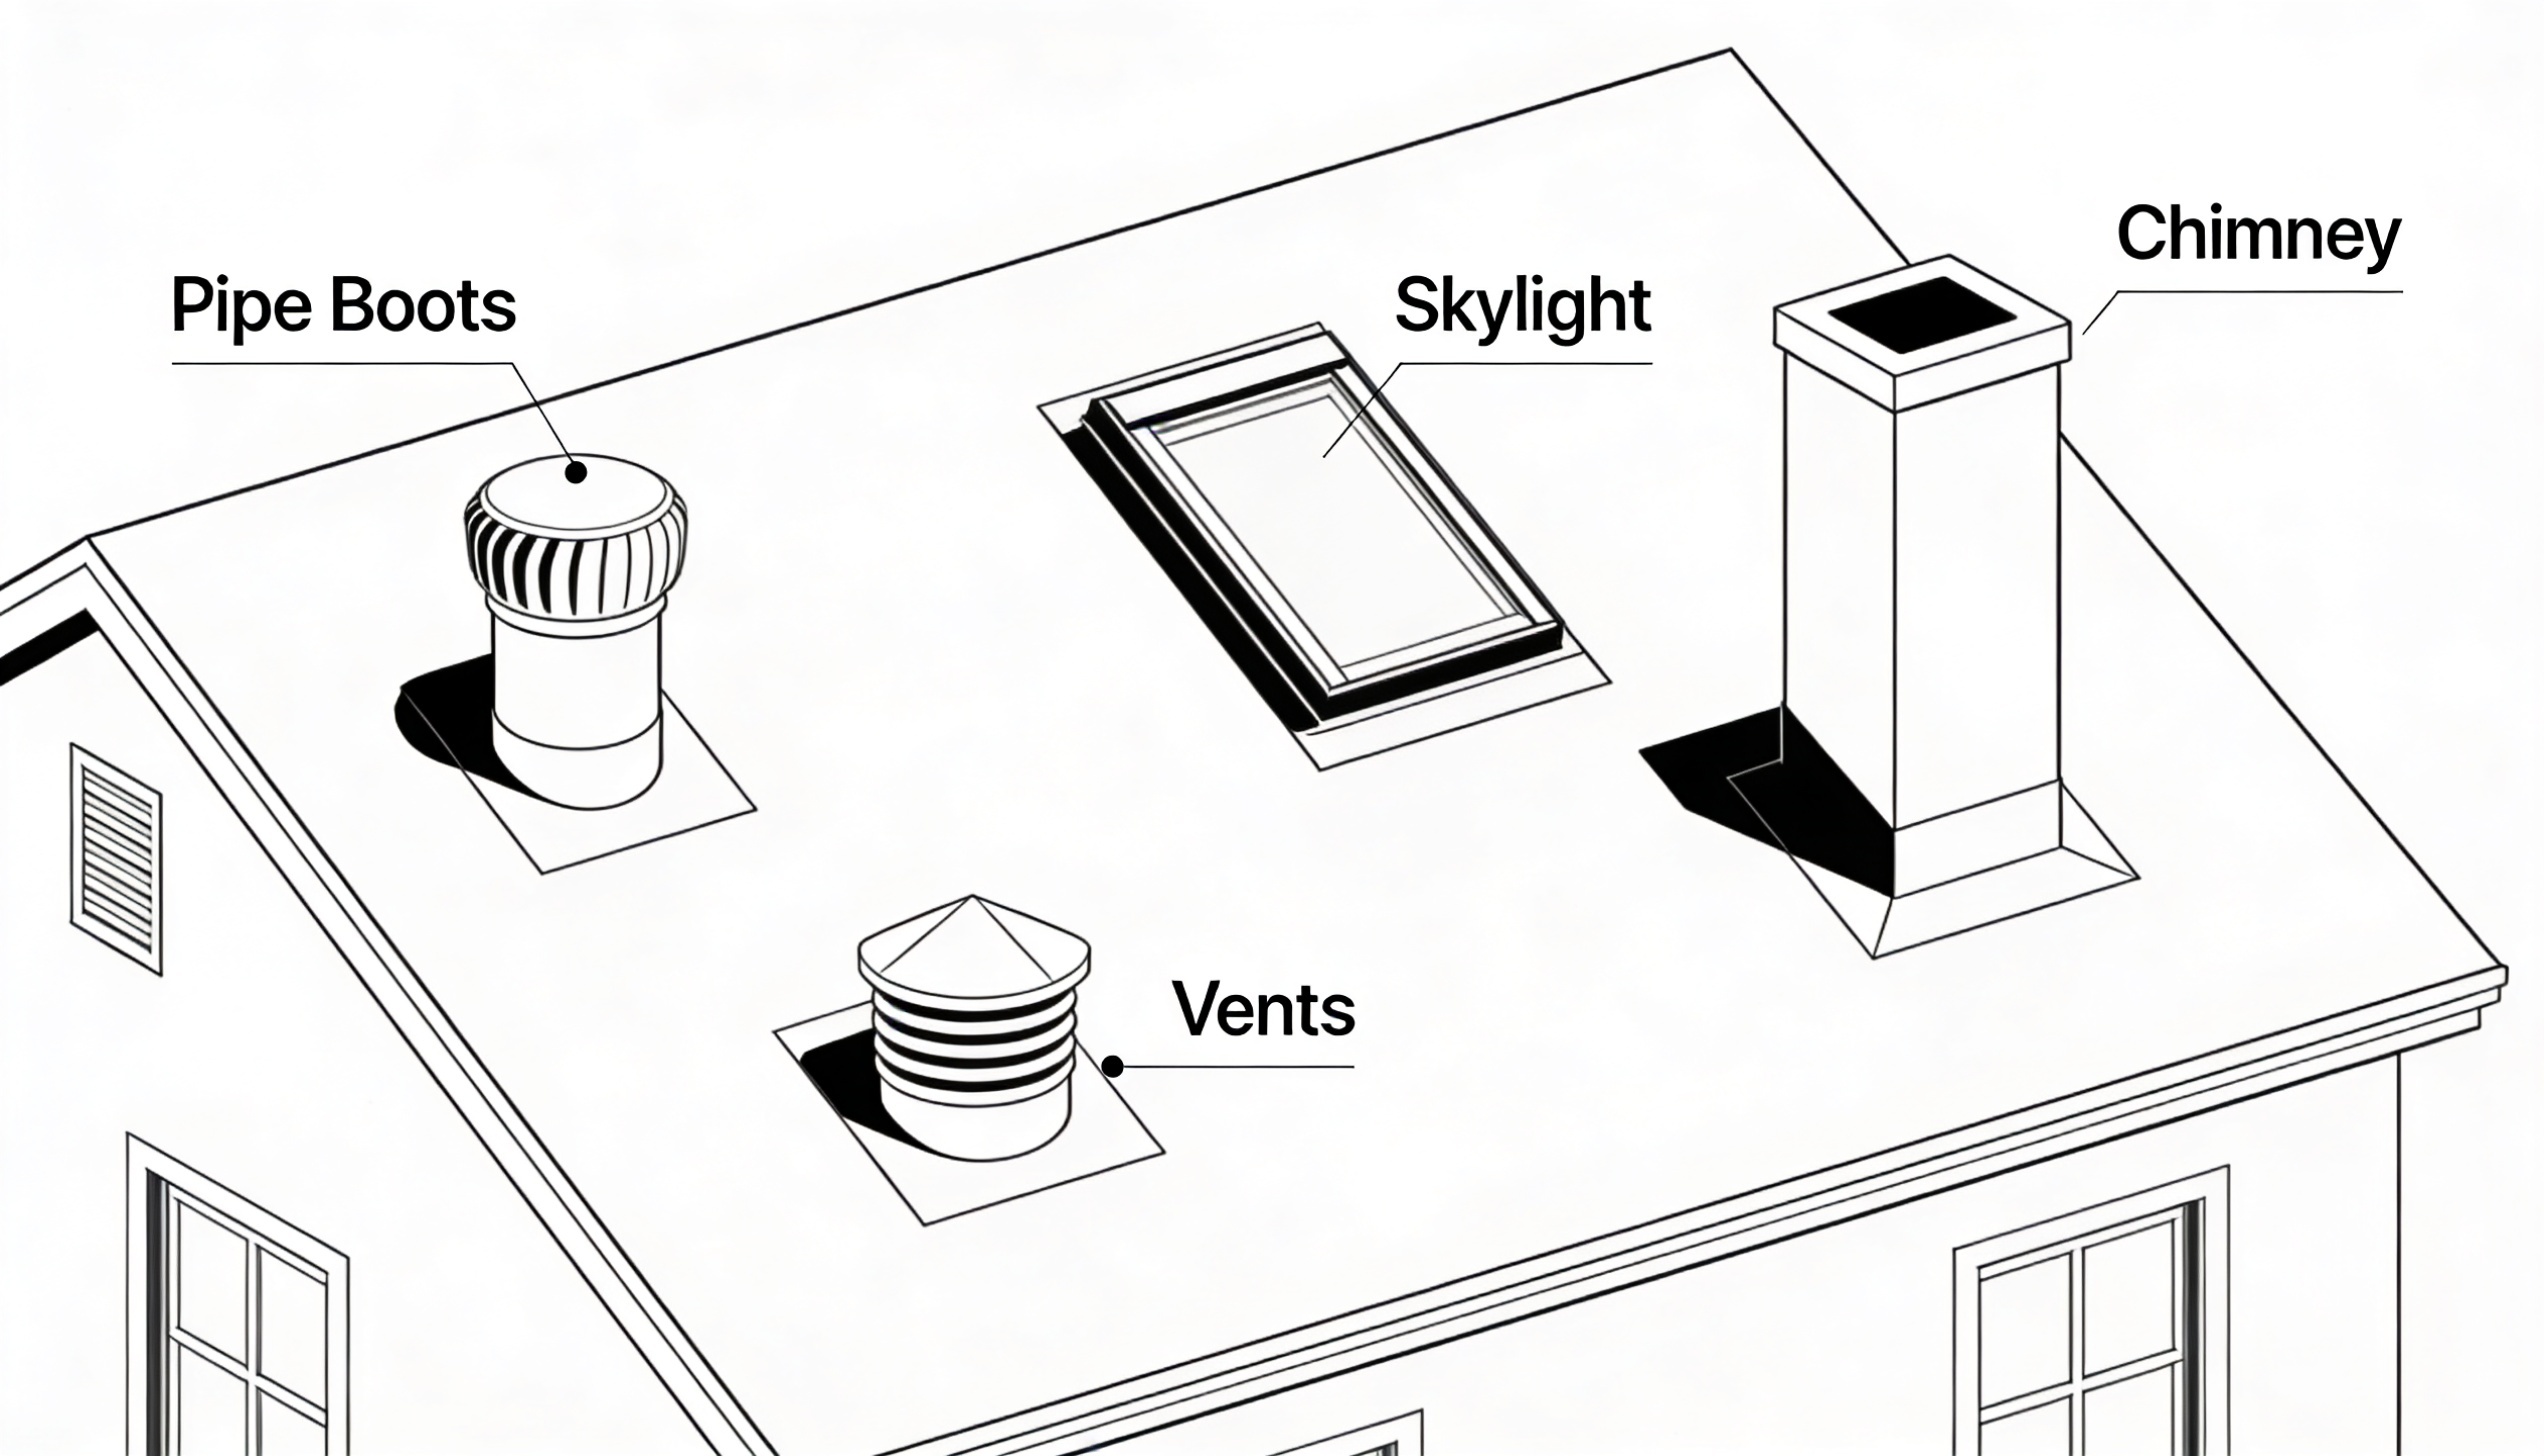
Penetrations are common leak points if not installed correctly. Pipe boots should be cut slightly smaller than the pipe for a tight seal. Loose cuts can let water in.
Flashing around skylights and chimneys should be installed in the following order: bottom, sides, then top, to direct water properly.
Wide chimneys need a cricket to divert water and snow. Use two foam closures for proper sealing, not just one.
Step-by-Step Metal Roof Installation
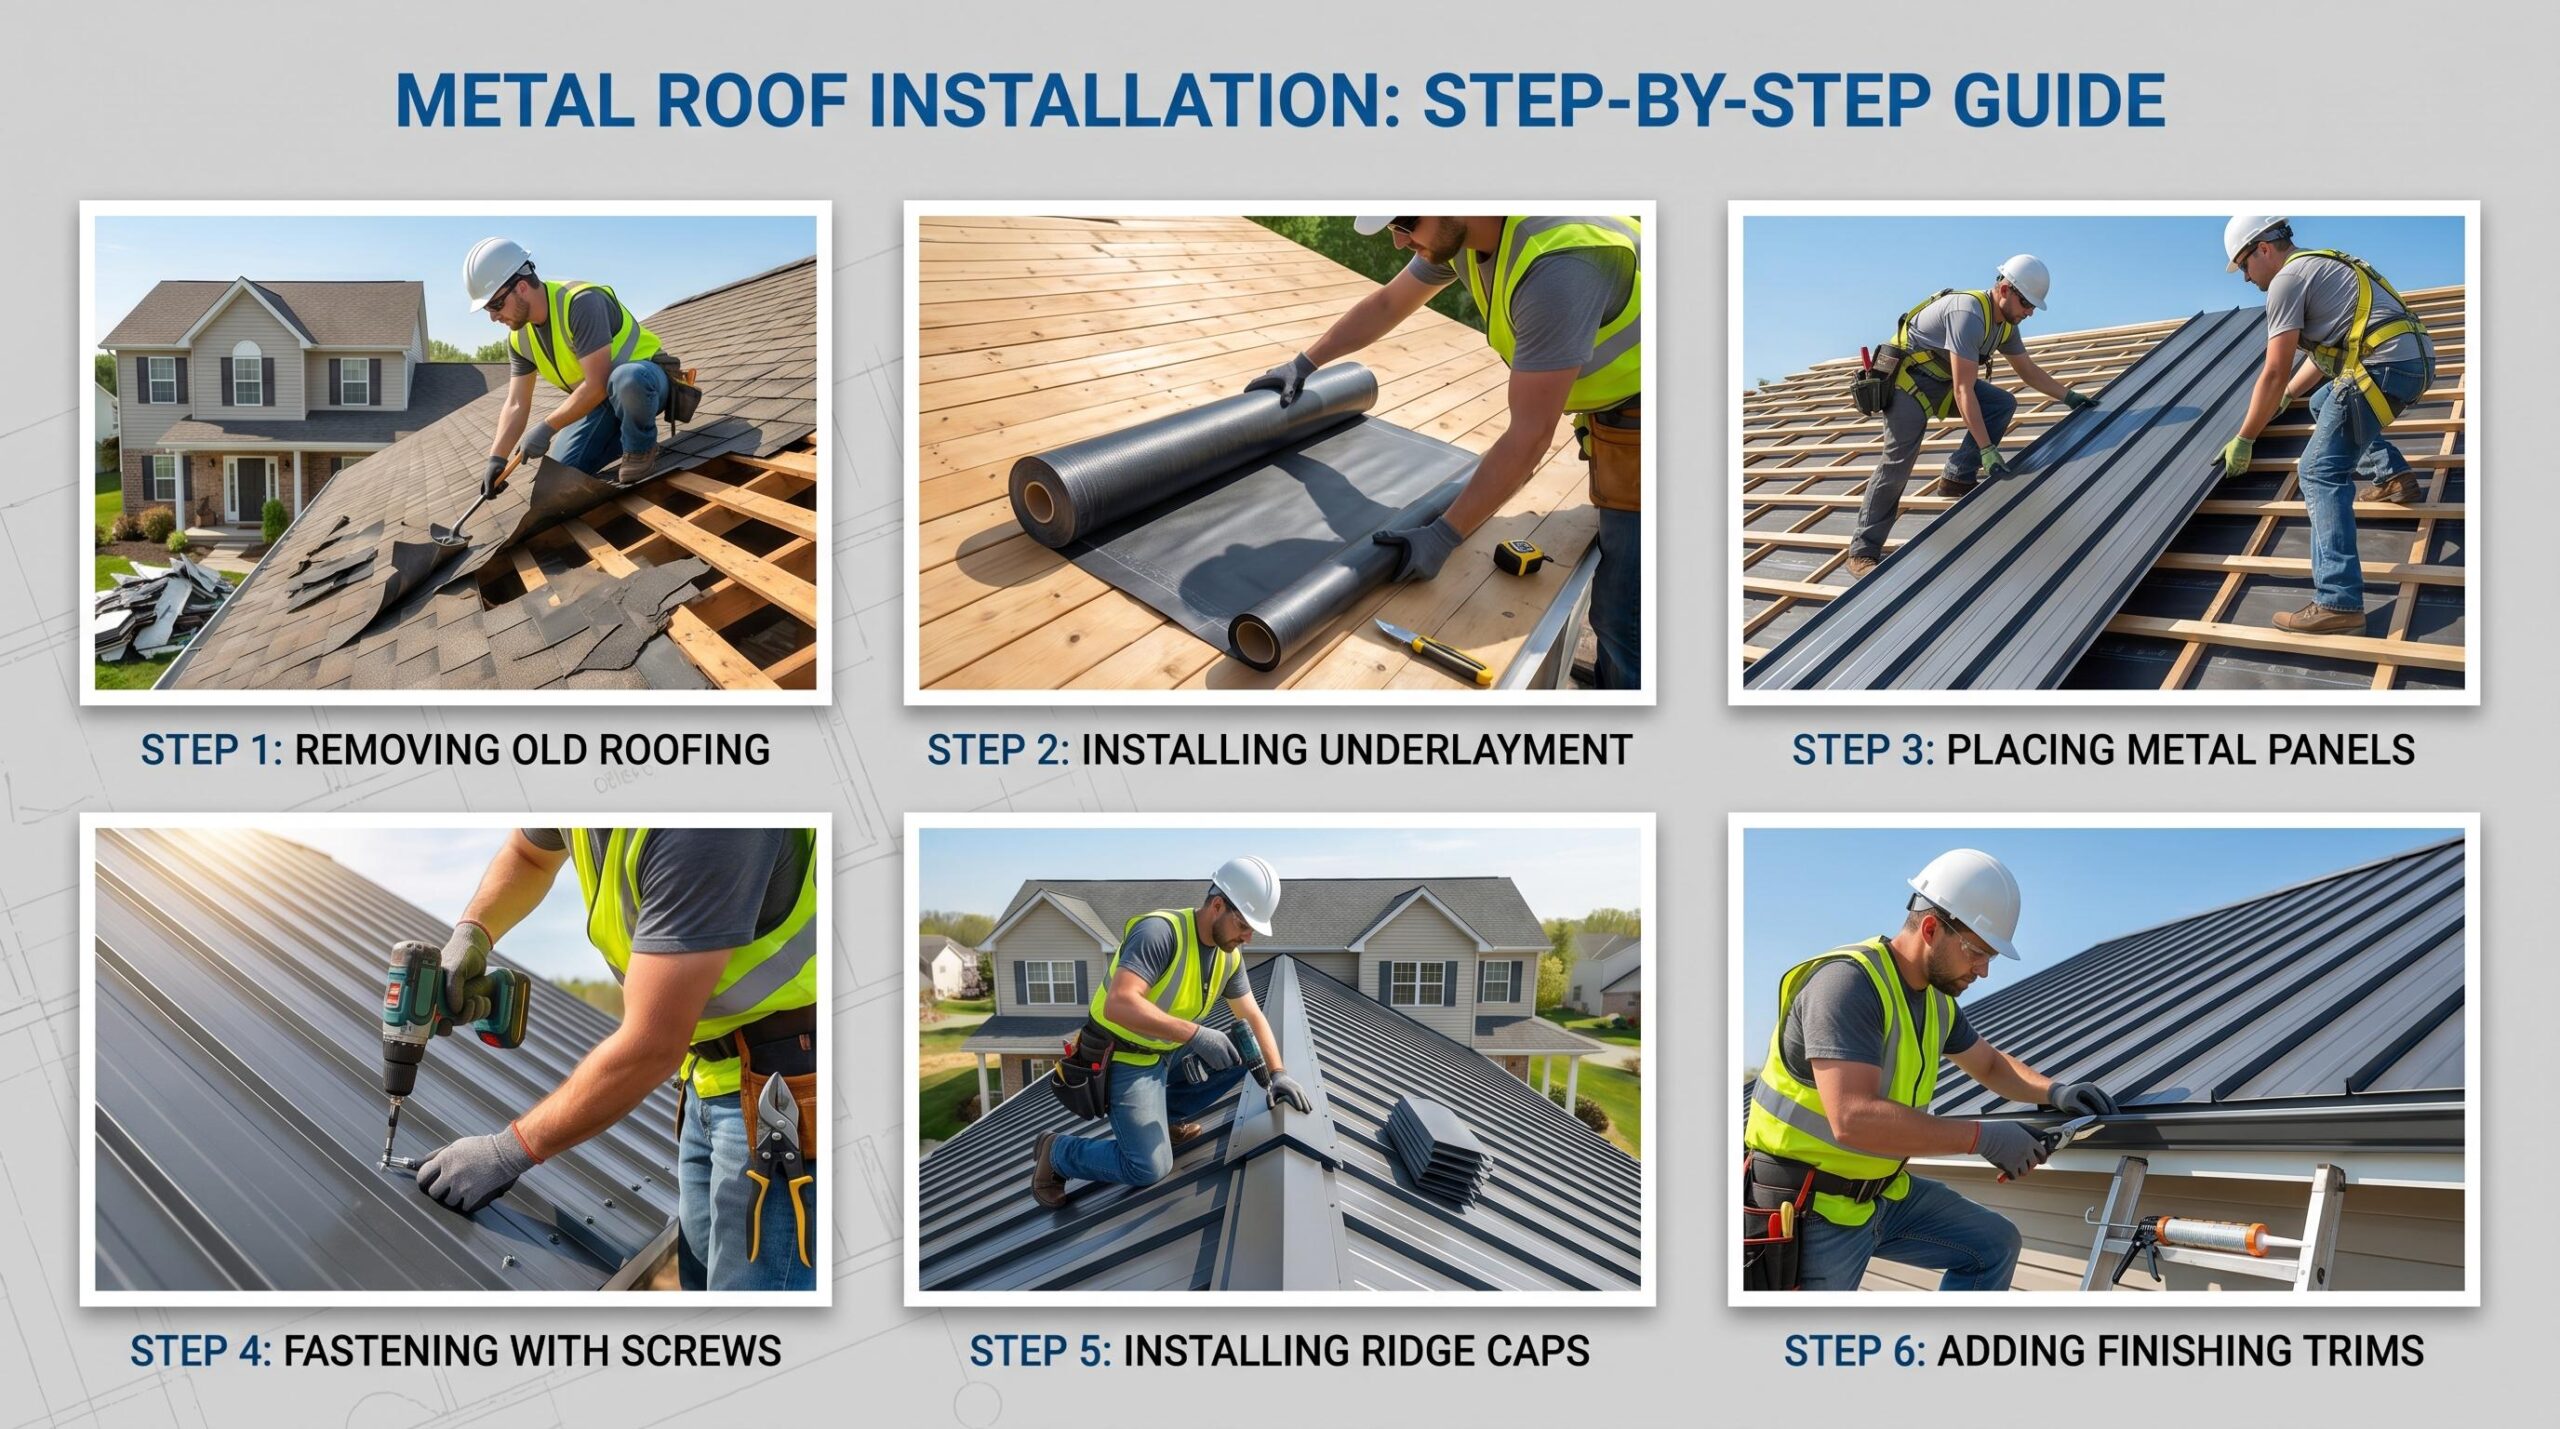
Reading the diagram is one thing. Knowing the order in which the work actually happens is another. These steps follow the sequence in which manufacturer installation diagrams are built, from deck to ridge cap.
Skip a step or reverse the order, and you’ll undo work or chase a leak.
Step 1: Ensure the roof deck is at least 15/32” thick and free of defects. Verify the slope meets panel requirements for proper drainage and safety, and check weather conditions before installation.
Step 2: Roll out high-temperature synthetic underlayment, overlapping each row by 6 inches. Secure it, and use butyl tape for overlaps and caulk for edges and penetrations.
Step 3: Install the drip edge under the underlayment at the eave to direct water into the gutter. Set the correct overhang and fasten every 12 inches for proper water flow.
Step 4: Install valley flashing before panels, centering it in the valley and fastening it along the outer edges. Ensure at least a 6-inch overlap and add solid decking for support if needed.
Step 5: Mark a reference line and start installing panels from one side. Overlap as required, ensuring the fastener spacing is tighter near the edges and wider in the center. Handle panels carefully, drive screws evenly without over-tightening.
Step 6: Install flashing around penetrations like pipes, vents, skylights, and chimneys. Start with the bottom, then the sides, and finish with the top. Use proper sealants and two layers of foam closures for effective weather sealing.
Step 7: Install the gable trim first, then place the ridge cap. For vented systems, install the vent strip beforehand. Fasten the ridge cap along the ribs, ensuring screws are aligned and set back slightly from the edge.
Step 8: Perform a final inspection by checking fasteners, ensuring washers are compressed without over-tightening. Clean the roof surface, check gutters, and verify proper drainage.
Metal Roof Installation Mistakes
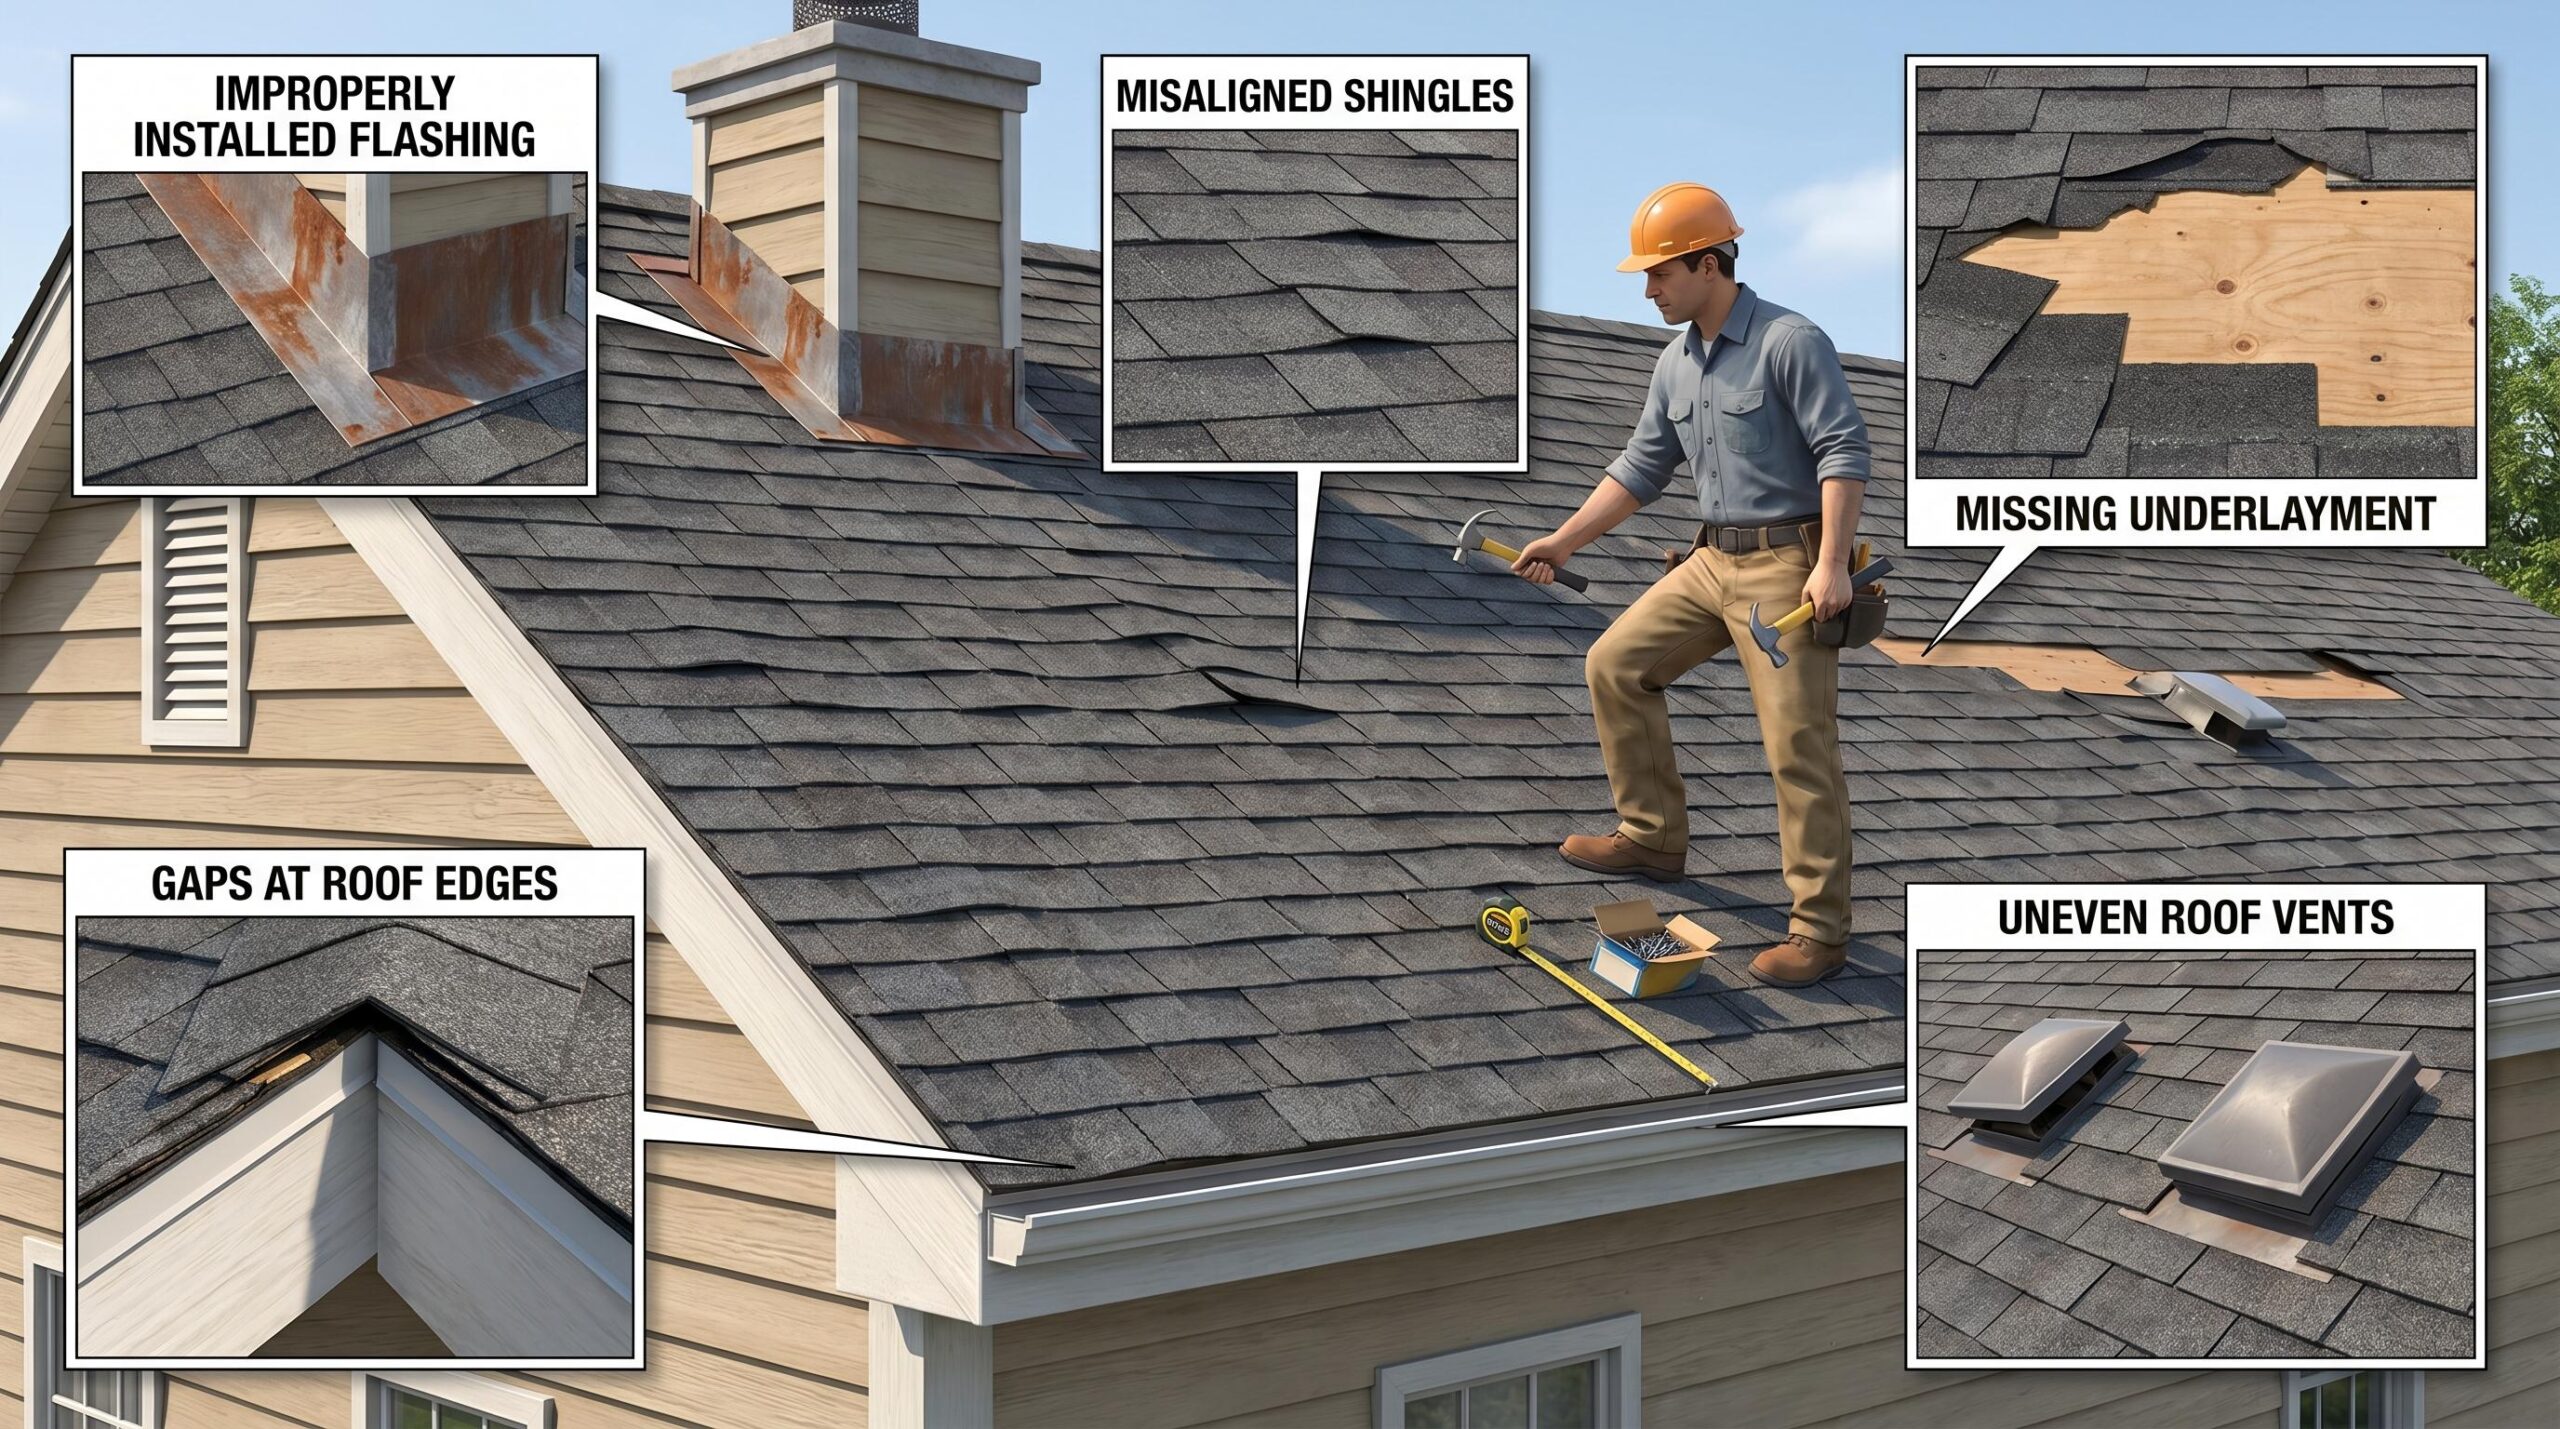
Most metal roof problems aren’t material failures. Their installation failures are small decisions made during the job that don’t show up as leaks or damage until months or years later.
These are the ones that show up most often, and almost all of them are preventable if you know what to watch for
- Ignoring manufacturer diagrams leads to incorrect installation because panel types and requirements vary for each system
- Wrong drip edge placement at the eave allows water to flow back into the decking instead of into the gutter
- Using the same fastener spacing everywhere weakens edge areas where stronger wind resistance is needed
- Over-tightening screws damages the washer seal and can cause leaks and panel distortion over time
- Double pinning standing seam panels blocks natural movement and leads to stress and long-term failure
- Cutting pipe boots too large prevents a tight seal and allows water to seep through gaps
- An incorrect flashing sequence at skylights and chimneys lets water get behind the flashing layers
- Using standard felt underlayment reduces durability since it breaks down under high heat from metal roofs
- Lack of solid support in valleys causes flashing to flex and eventually leak under pressure
- Skipping the final inspection leaves small issues unnoticed that can turn into costly repairs later
When to DIY and When to Hire a Certified Installer
When DIY May Work
- Simple shed roofs need fewer detailed drawings
- Basic designs are easier to handle
- DIY is possible with careful diagram reading
- Snap-lock systems are more beginner-friendly
- Requires attention to sequence and details
When to Call a Contractor
- Complex roofs need many detailed drawings
- Multiple features like valleys, chimneys, and skylights add difficulty
- The installation order becomes more critical
- Mechanically seamed roofs require special tools
- Mistakes can affect the entire roof system
What to Check Before Hiring
- Ask if they follow the manufacturer’s installation details
- Request to see the drawings
- Be cautious if they cannot provide them
- Look for certified installers for better reliability
How Standing Seam and Exposed Fastener Systems WorkThis is where a lot of confusion happens. The installation diagrams for a standing-seam roof and an exposed-fastener roof look nothing alike. Treating them as the same job leads to real problems.
|
Conclusion
Most metal roof failures do not start with bad materials. They start with a diagram nobody reads.
Every detail drawing your manufacturer includes with those panels, the eave, the valley, the fastener spacing, and the flashing sequence exists because someone skipped that step and paid for it eventually.
The roofs that last 50 years are not built from better metal alone.
They are built by people who actually followed the drawings. Whether you are doing this yourself or having a contractor do it, that document is your strongest protection against leaks and voided warranties.
Read it before the first panel goes down. Check it again in every zone. When something on the roof does not match what is on paper, stop and find out why before moving forward.
Frequently Asked Questions
What Does a Metal Roof Installation Diagram Show?
It shows how panels, underlayment, flashing, fasteners, and trim fit together during installation.
Why is the Manufacturer’s Diagram Important?
Each roofing system has different spacing, overlap, and flashing rules, so the diagram helps prevent leaks and mistakes.
Can I Install a Metal Roof Myself?
Simple roofs may be DIY-friendly, but complex roofs with valleys, chimneys, skylights, or standing-seam panels usually require a contractor.