The wrong tile pattern can make an expensive renovation look cheap in seconds. Most people spend weeks choosing the perfect tile, then ruin the final look with the wrong layout. The pattern matters more than most people realize.
It changes how large a room feels, where your eye moves, and how polished the finished space looks.
A simple subway tile can look expensive with the right layout, while high-end tile can feel awkward in a poor pattern. Some layouts make narrow rooms feel wider. Others add movement, texture, or a cleaner finish.
Before you start tiling, it helps to know what each pattern actually does in a real space. In this guide, I will walk through the most popular floor and wall tile patterns, where they work best, and what to expect before installation begins.
What Are Tile Layouts?
You can spend weeks picking the perfect tile. The right color, finish, and size. Then you lay it down in a basic grid, and the room still feels wrong. That happens more often than you’d think.
How you arrange your tiles matters just as much as the tile itself. A tile pattern layout is simply the way tiles are placed on a floor or wall. The same tile can look completely different depending on the arrangement.
Get it right, and a small bathroom can feel twice as open. A plain hallway can feel sharp and well-put-together.
The pattern you choose does real work in a room. Here is what each direction does:
- Horizontal tiles make a room feel wider
- Diagonal tiles draw the eye toward the center and add visual depth
- A straight grid keeps the look calm and balanced
- Long tiles placed lengthwise make a short hallway feel longer
Layout also affects your budget. A straight lay is the fastest to install and wastes the least tile. More complex patterns, such as herringbone or diagonal, require more cuts. That means more tile waste and higher labor costs.
Pro Tip: Budget for 10-15% extra tile when using detailed layouts.
Match the Pattern to the Tile Shape First
Before choosing a layout, consider the shape of your tile. Not every pattern works with every tile.
| Tile Shape | Best Layouts |
|---|---|
| Square | Straight, lay, diagonal, pinwheel |
| Rectangular | Stacked, brick, herringbone |
| Hexagonal | Honeycomb, offset arrangements |
Starting with the tile shape keeps the pattern looking intentional. It also saves you from costly mistakes during installation.
Popular Tile Layout Patterns for Floors and Walls
These patterns have been around for decades because they work in most rooms, with most tile sizes, and at most budgets. I always come back to these when a client is not sure where to start.
1. Straight Lay (Grid Pattern)
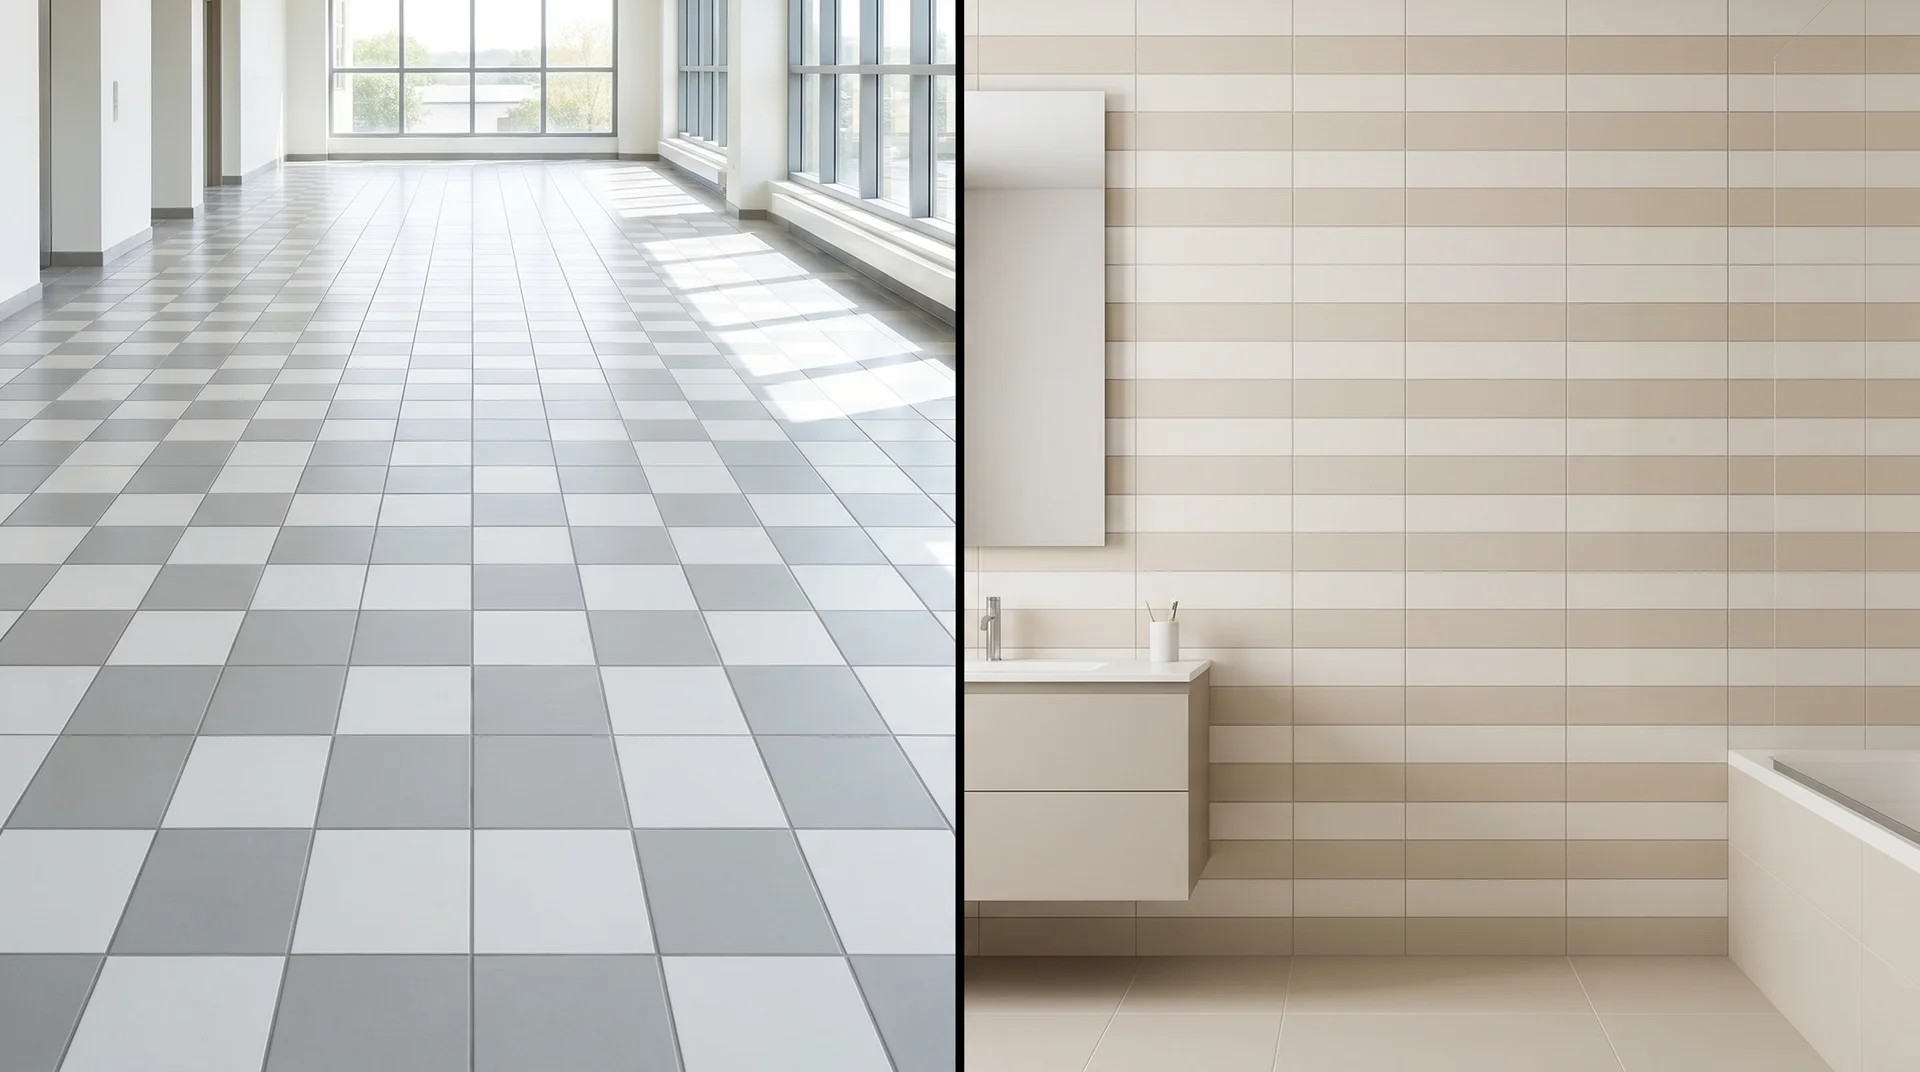
Most tiling projects start here, and for good reason. The straight lay is the most common tile layout pattern in homes today. Tiles sit in a clean, even grid with all edges lining up. Installation is straightforward, and material waste stays low.
On floors, it works well in large rooms where clean lines and a balanced look matter most. Kitchens, living rooms, and hallways all suit this layout well.
On walls, it keeps the surface calm and structured. It is a strong choice for bathroom walls and kitchen backsplashes where a simple, neat finish works best. It works with square and rectangular tiles of any size across both surfaces.
Best for: First-time installations, large floor spaces, bathroom walls, kitchen backsplashes, and tight budgets.
2. Running Bond (Brick Pattern)
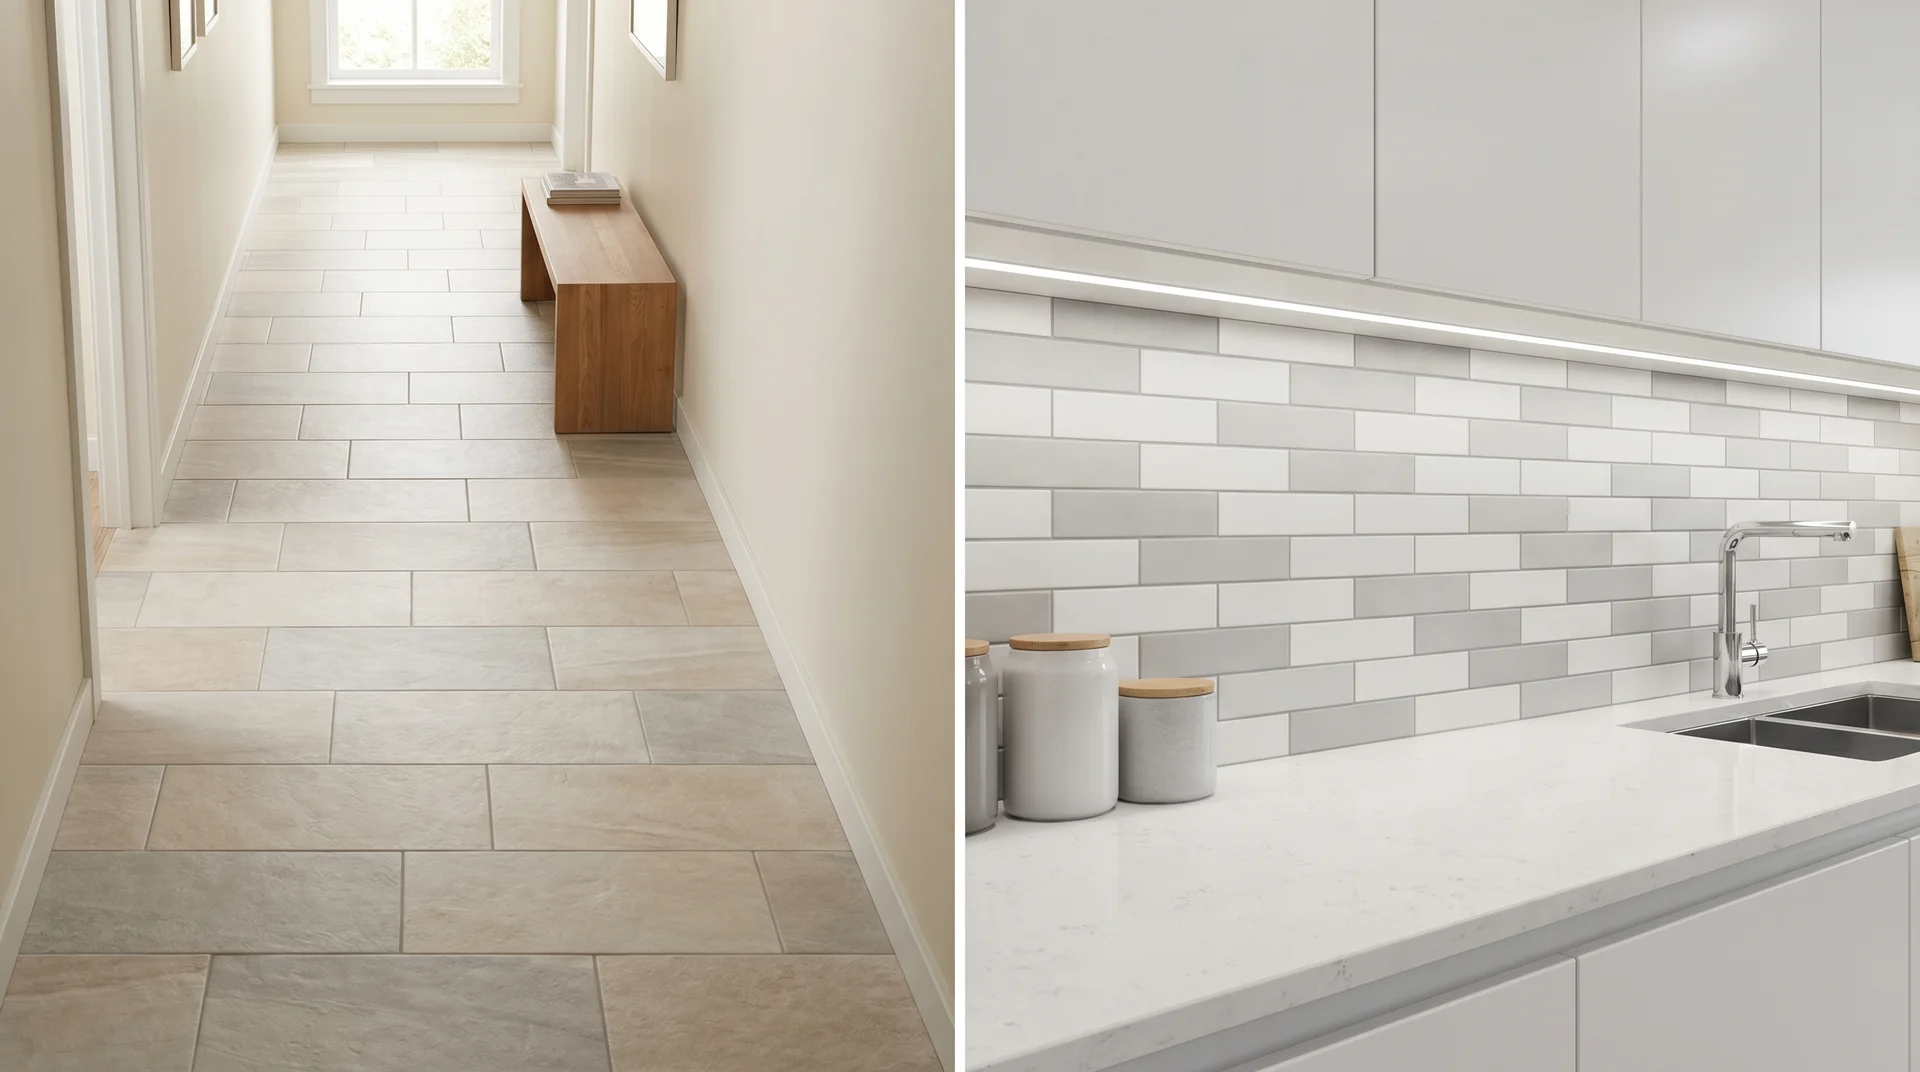
It looks simple, but the offset rows do more work than you might expect. Each row is offset by half a tile length, just like bricks on a wall. This staggered layout adds a sense of movement without looking busy.
It also hides small grout line imperfections better than a straight grid. It works well on both floors and walls. On floors, it suits long and narrow rooms where you want the space to feel more open.
On walls, it is one of the most popular choices for kitchen backsplashes. The offset rows add quite a bit of visual interest without pulling attention away from the rest of the room.
Rectangular tiles work best here. The longer the tile, the more noticeable the stagger effect becomes.
Best for: Rectangular tiles, long, narrow rooms, kitchen backsplashes, and walls where you want subtle visual interest without a bold pattern.
3. Diagonal (Diamond Layout)
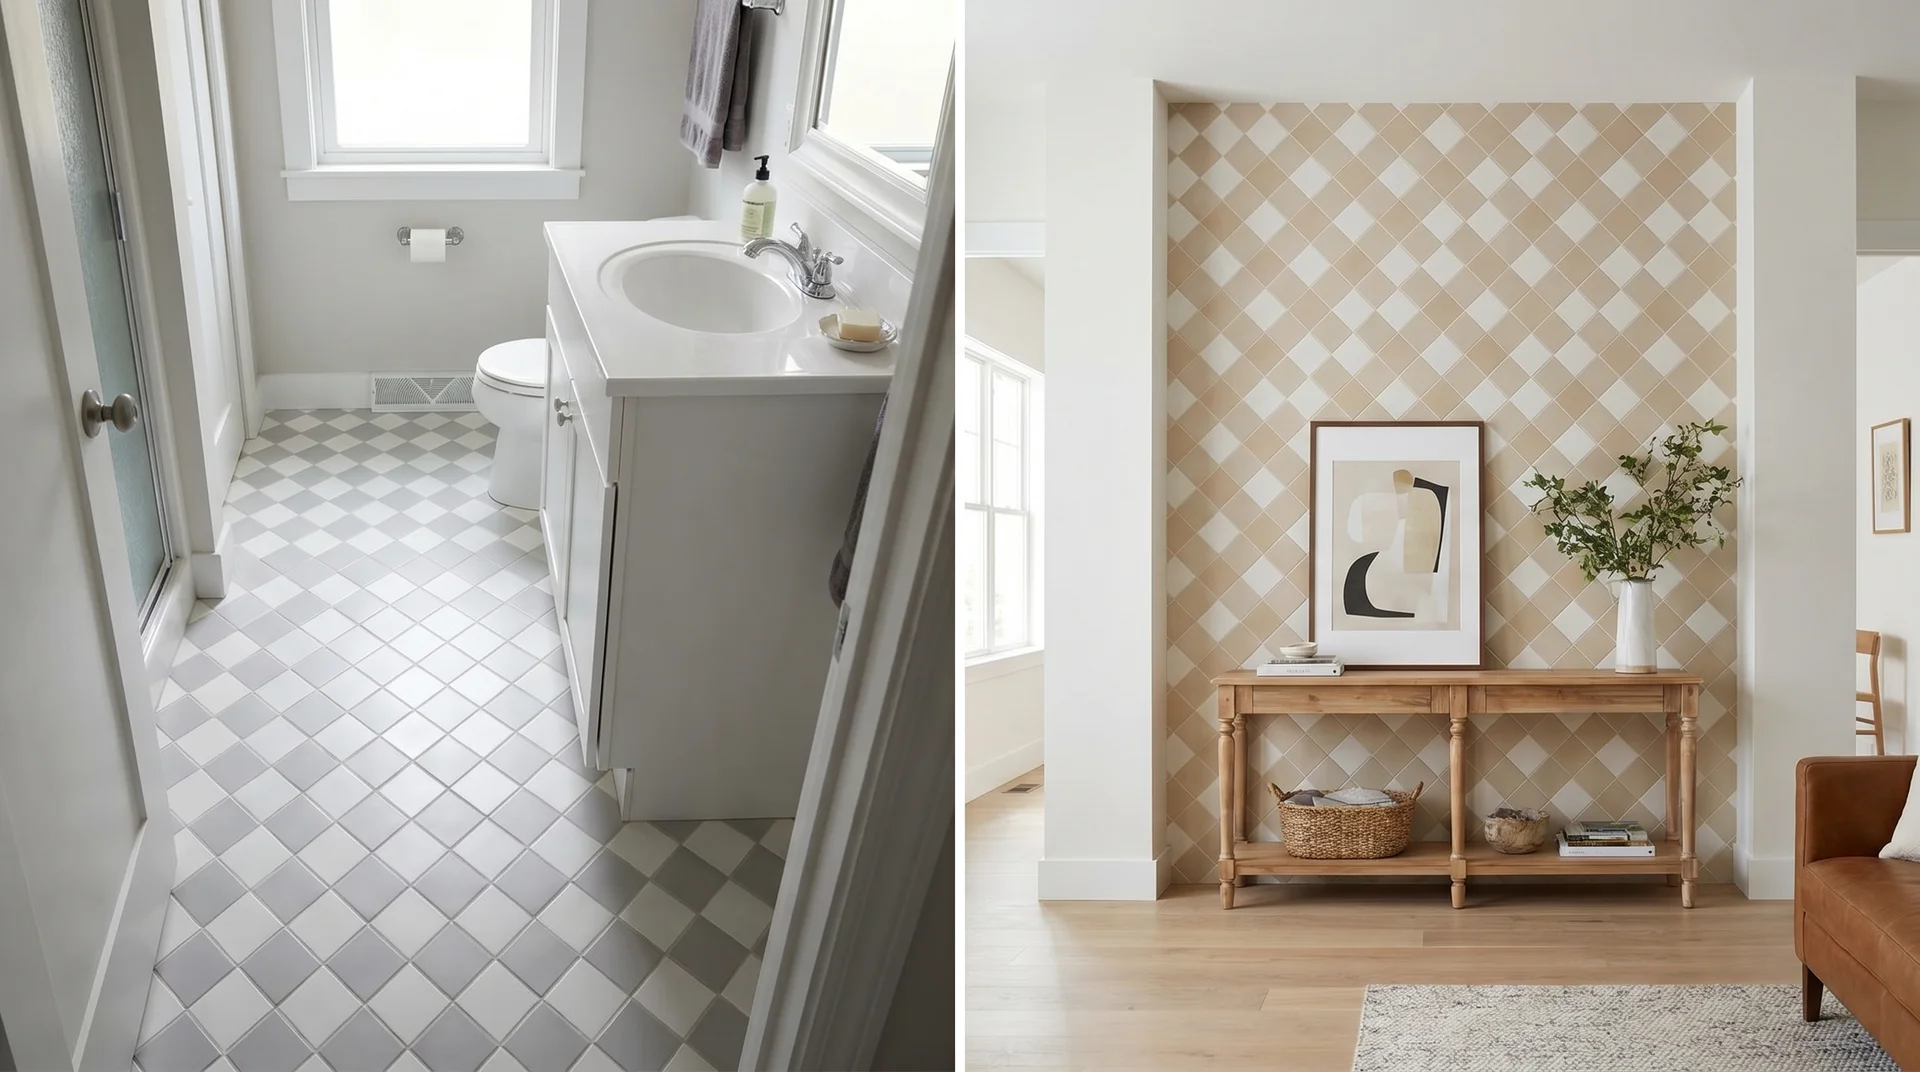
One 45-degree rotation can make a cramped room feel like a different space. This is the straight grid pattern rotated 45 degrees. That single change makes small or narrow rooms feel noticeably larger.
The angled lines draw the eye across the full width of the room rather than straight ahead. It works on both floors and walls. On floors, it is a strong choice for compact kitchens, small bathrooms, and entryways.
On walls, the diagonal angle adds energy to a plain surface without needing a complex pattern or bold color. Keep in mind that diagonal layouts require more cuts along the edges. This applies to both floors and walls.
Best for: Small rooms, entryways, square tiles, compact kitchens, and accent walls where you want added visual interest.
4. Vertical and Horizontal Stack

The direction you stack your tiles tells the eye exactly where to go. Tiles are placed in perfectly aligned rows, either stacked side by side or directly on top of each other.
There is no offset, no angle. Just clean, straight lines running in one direction. This layout works particularly well on walls. A vertical stack draws the eye upward, making ceilings feel higher. A horizontal stack spreads the eye across the room, making it feel wider.
Both directions work well with large-format tiles, where the clean lines have more room to make an impact.
On floors, a horizontal stack works well in long rooms where you want to emphasize width. A vertical stack suits narrow hallways where length is the focus.
The key is deciding what you want the room to feel like first. Then pick the direction that gets you there.
Best for: Modern interiors, accent walls, feature bathroom walls, hallways, and any room where you want to control how the space feels.
5. Herringbone
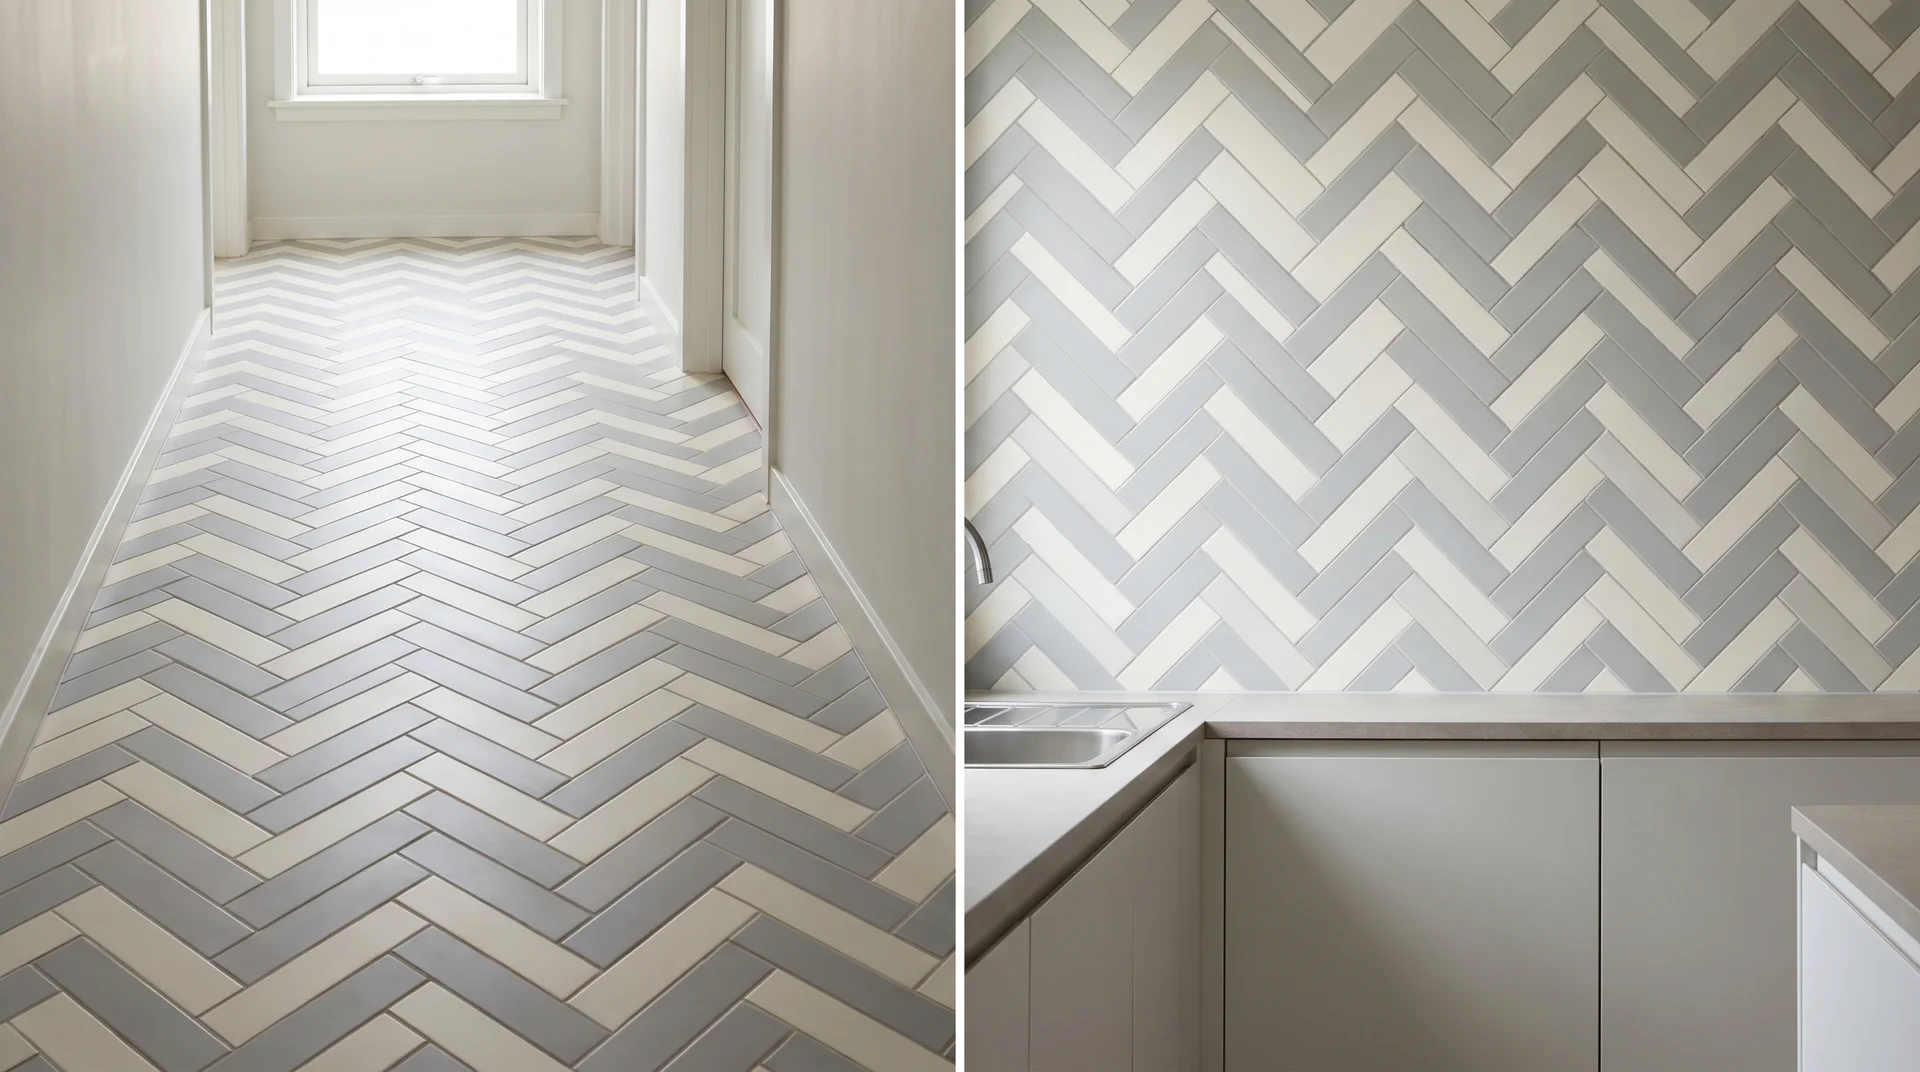
A few patterns can add as much energy to a space as bold colors or shapes. Rectangular tiles are placed in a V-shape, each tile at a 90-degree angle to the one next to it. This creates a strong zigzag, adding clear visual movement.
It works on both floors and walls. On floors, it suits hallways and kitchens best, drawing the eye along the length of the space. On walls, it adds character to kitchen backsplashes and bathroom feature walls without needing any extra decoration.
Cuts need to be precise. Expect 10-15% more tile waste than with a straight lay.
Best for: Rectangular tiles, narrow spaces, kitchen backsplashes, and feature walls.
6. Chevron
![]()
It shares the zigzag look of herringbone but lands with a sharper, cleaner finish. Chevron tiles are cut at an angle so the points meet in a continuous zigzag line with no breaks or offsets.
On floors, it works best in large open areas where the full pattern has room to repeat. On walls, it makes a strong feature wall in bathrooms and living rooms.
Chevron tiles are usually custom-cut, which adds cost. But the finish is cleaner and more uniform than herringbone.
Best for: Modern spaces, feature walls, large floors, and open areas.
7. Basketweave
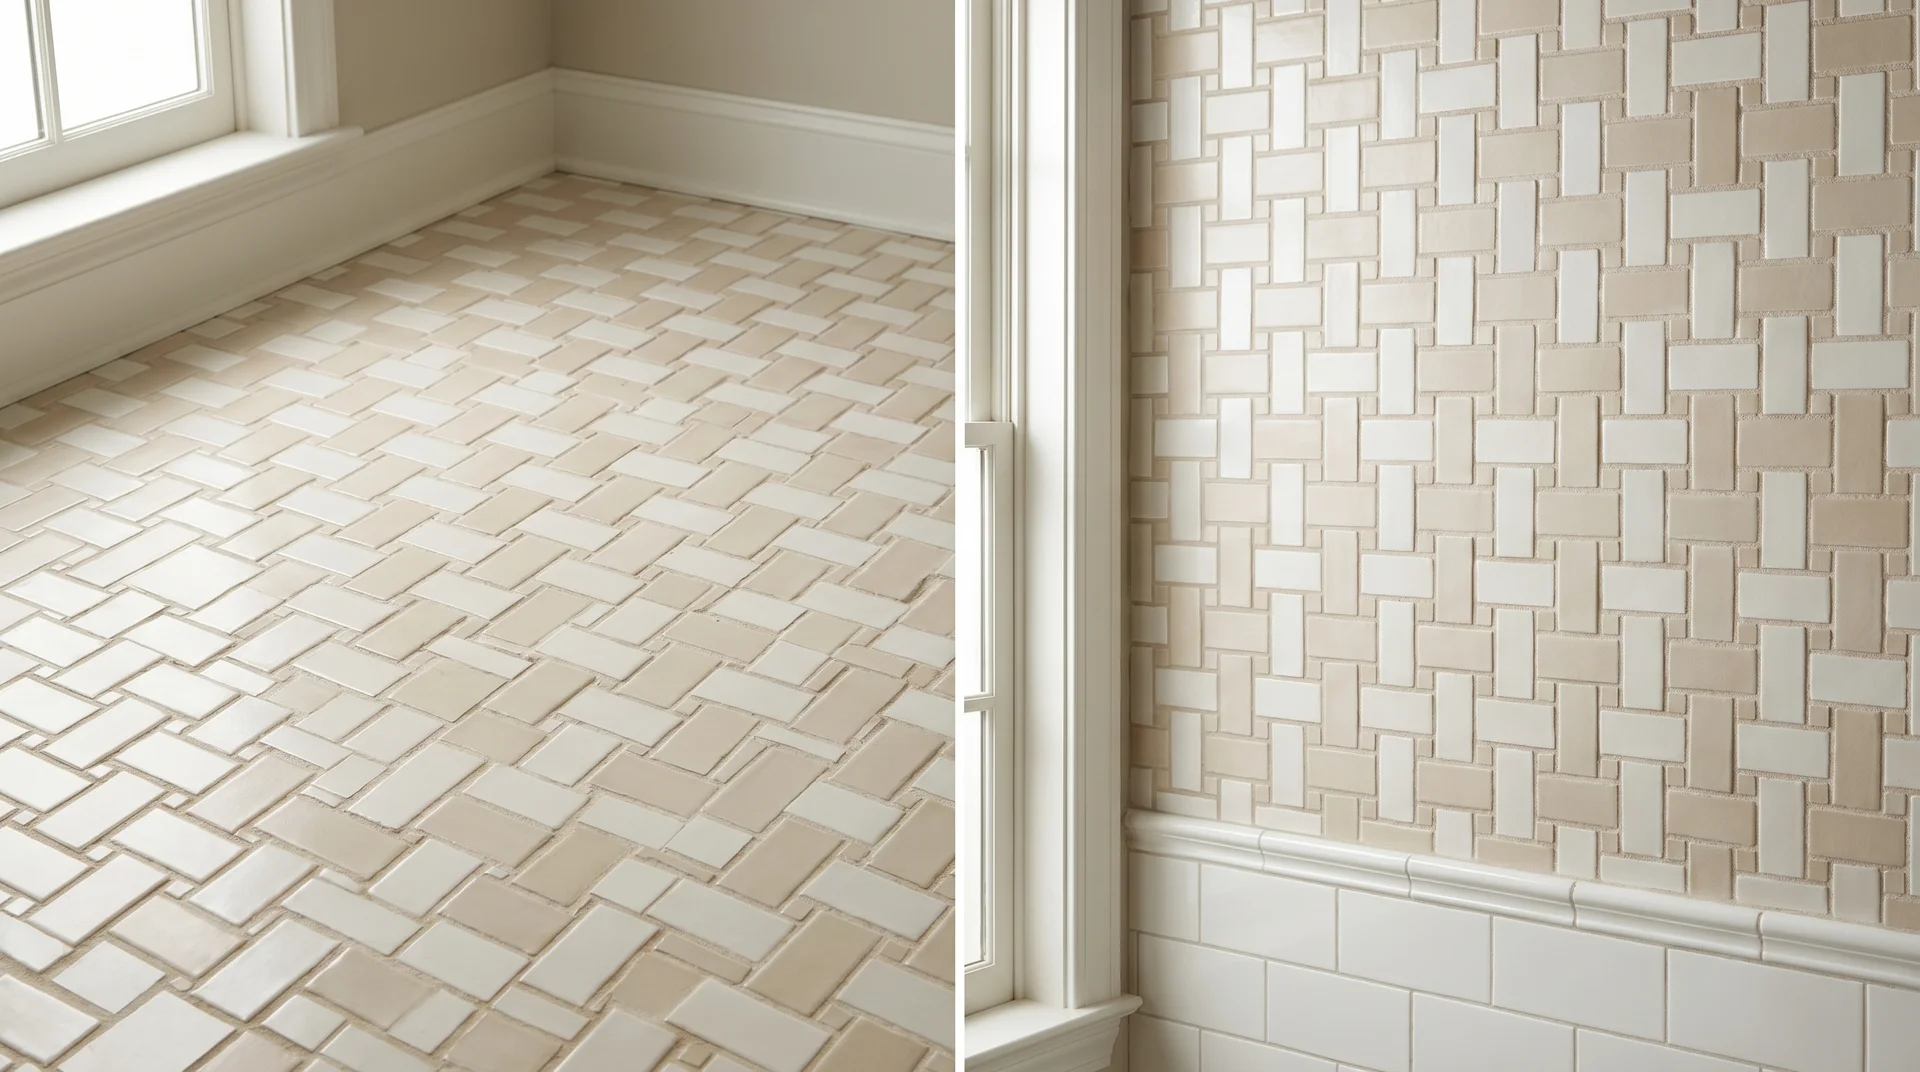
This pattern has been around for centuries, and it still holds up just as well today. Two or more rectangular tiles are placed alternately, first horizontal, then vertical. This creates a repeating block effect across the surface.
On floors, it is a popular choice for bathrooms and classic interiors. The extra grout lines also improve grip in wet areas. On walls, it adds texture and depth without relying on bold color or complex shapes.
It is one of the oldest decorative patterns still widely used. And honestly, it never goes out of style.
Best for: Classic interiors, bathrooms, shower floors, and walls where you want texture without a bold pattern.
8. Pinwheel (Windmill)
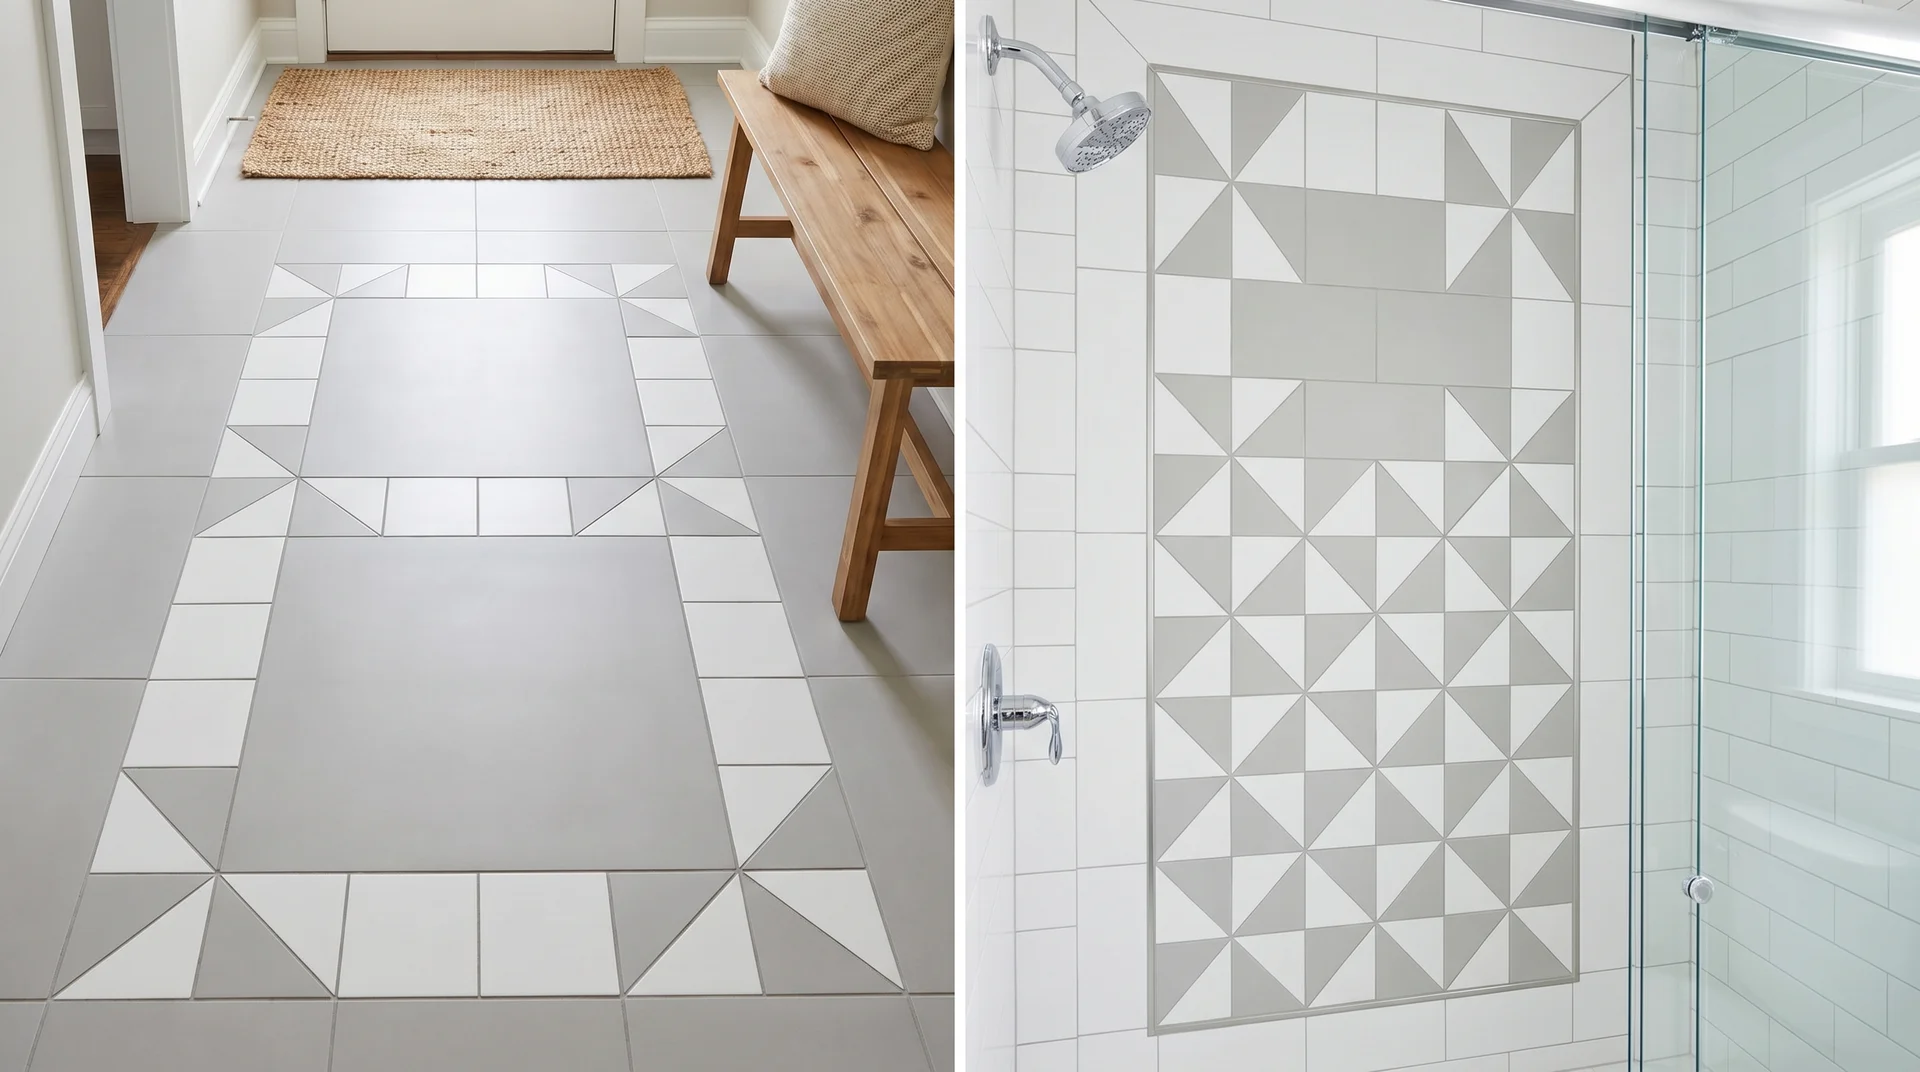
Mixing two tile sizes sounds complicated, but this layout keeps it structured and clean.
One large square tile sits in the center with four smaller tiles placed around it. This creates a repeating block that adds strong visual interest without complex shapes.
On floors, it works well as a feature section within a larger straight-lay floor. Entryways and hallways are particularly good spots. On walls, it adds a classic decorative touch to bathroom walls and shower surrounds without feeling too busy.
Best for: Entryways, feature floors, bathroom walls, and projects combining two tile sizes.
9. Modular (Versailles)
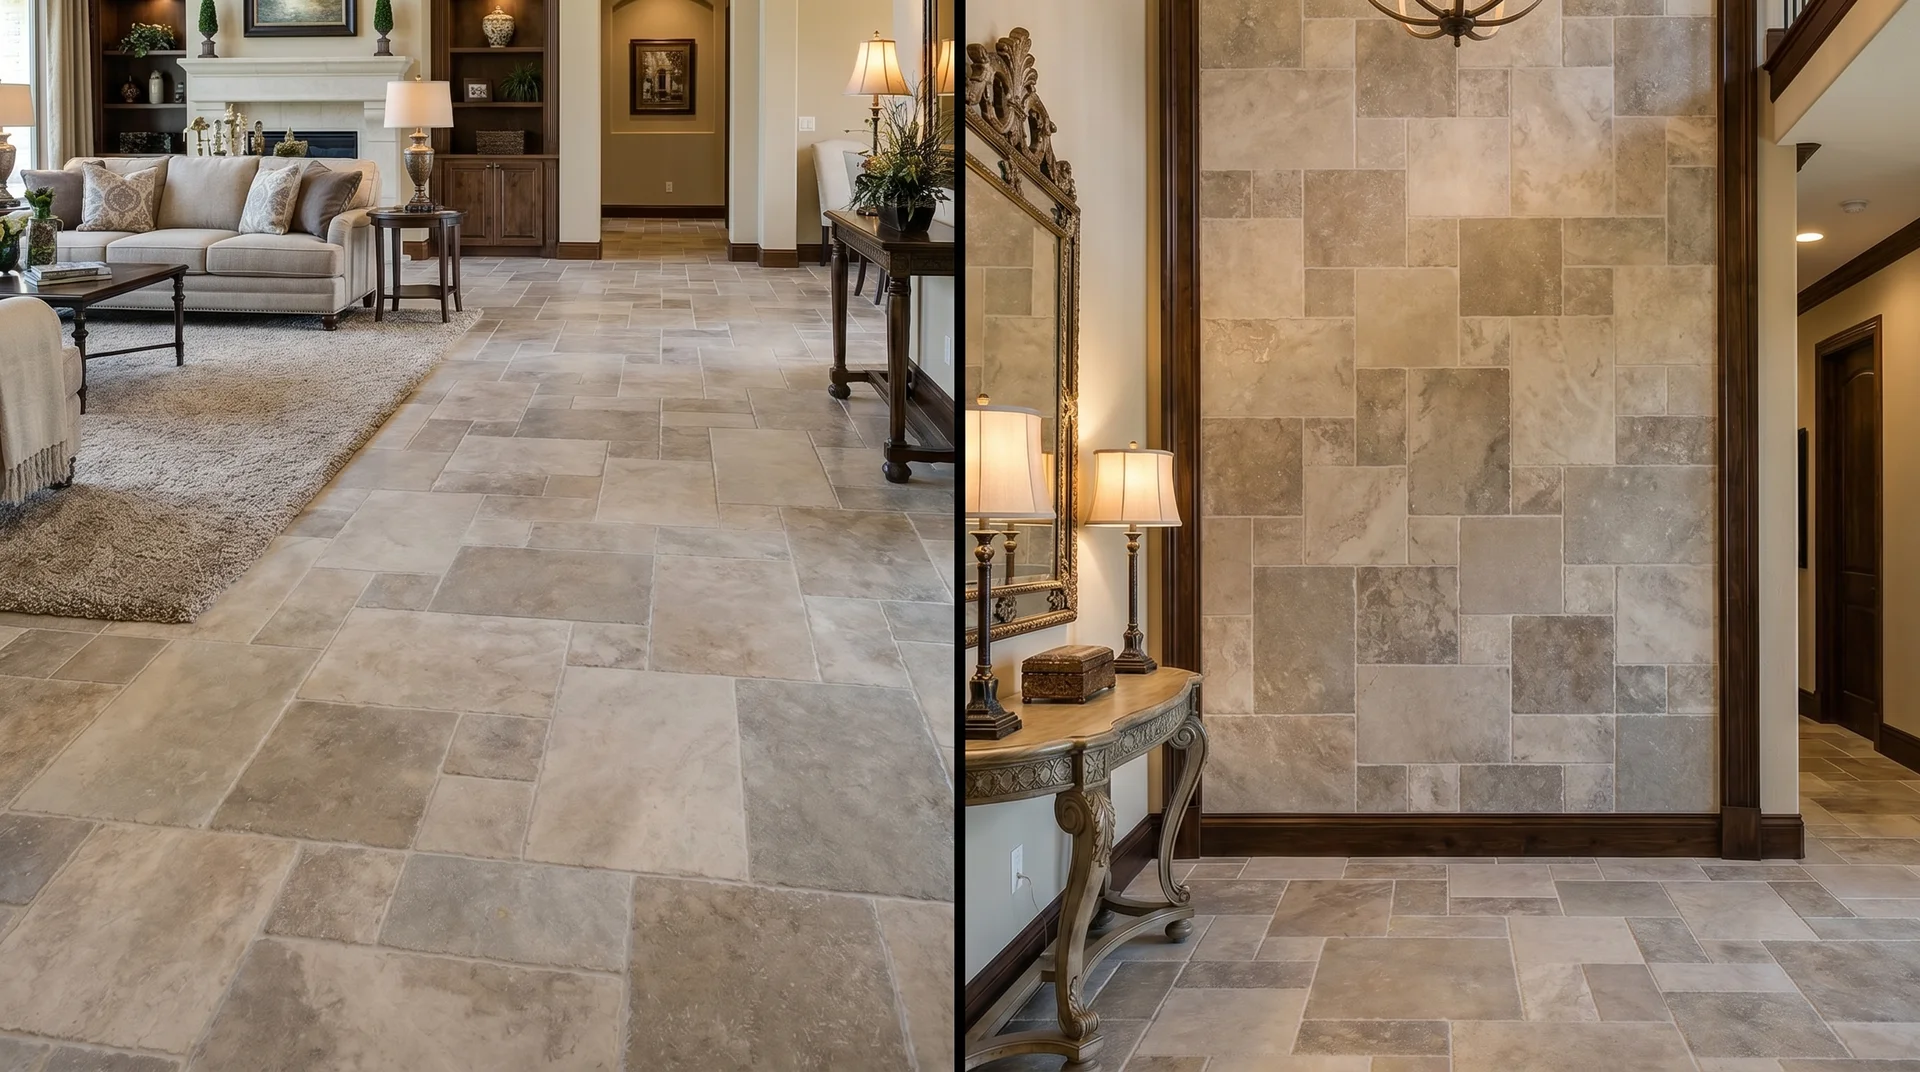
If you have a large floor and natural stone tiles, this layout makes both look their best. Three or four different tile sizes are arranged in a repeating layout. Originally used in large European stone floors, this pattern still works best in bigger spaces.
On floors, it breaks up the repetition of a single tile size and gives natural stone a more traditional, high-end appearance. On walls, it adds depth and structure to large feature walls in living rooms and entryways.
This pattern needs space to breathe. In small rooms, the varying sizes can feel too busy and hard to follow.
Best for: Large rooms, natural stone tiles, feature walls, and traditional or high-end interiors.
10. Checkerboard
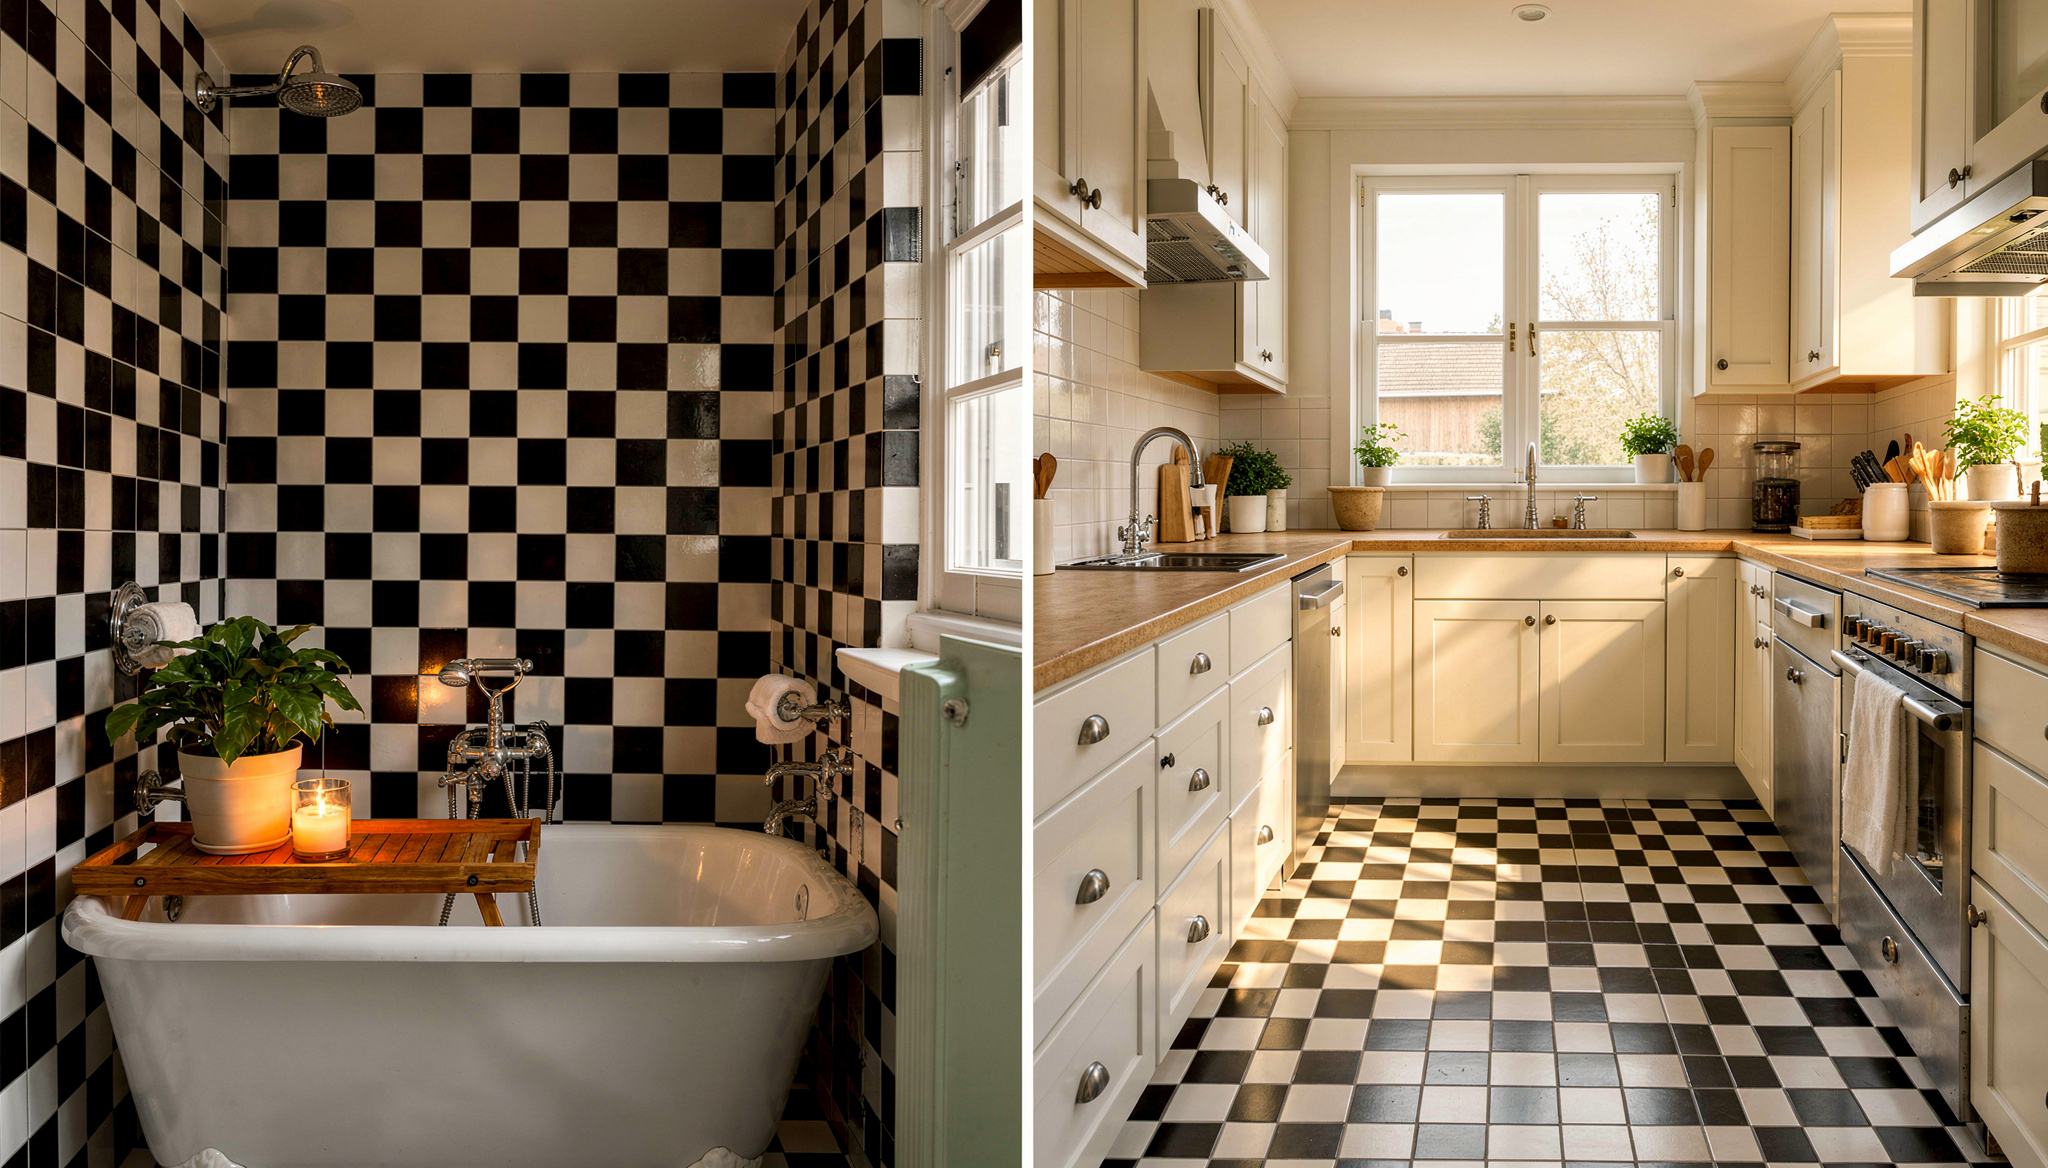
Few patterns make a room stand out faster than a checkerboard floor. Alternating light and dark square tiles create a strong contrast that instantly draws attention.
On floors, it works especially well in kitchens, entryways, laundry rooms, and vintage-style bathrooms. On walls, it can add a bold retro look in smaller sections, such as backsplashes or accent areas.
The pattern itself is simple to install, but spacing and alignment need to stay precise, or the contrast will make mistakes obvious.
Best for: Vintage interiors, kitchens, entryways, laundry rooms, and bold black-and-white designs.
11. Mosaic
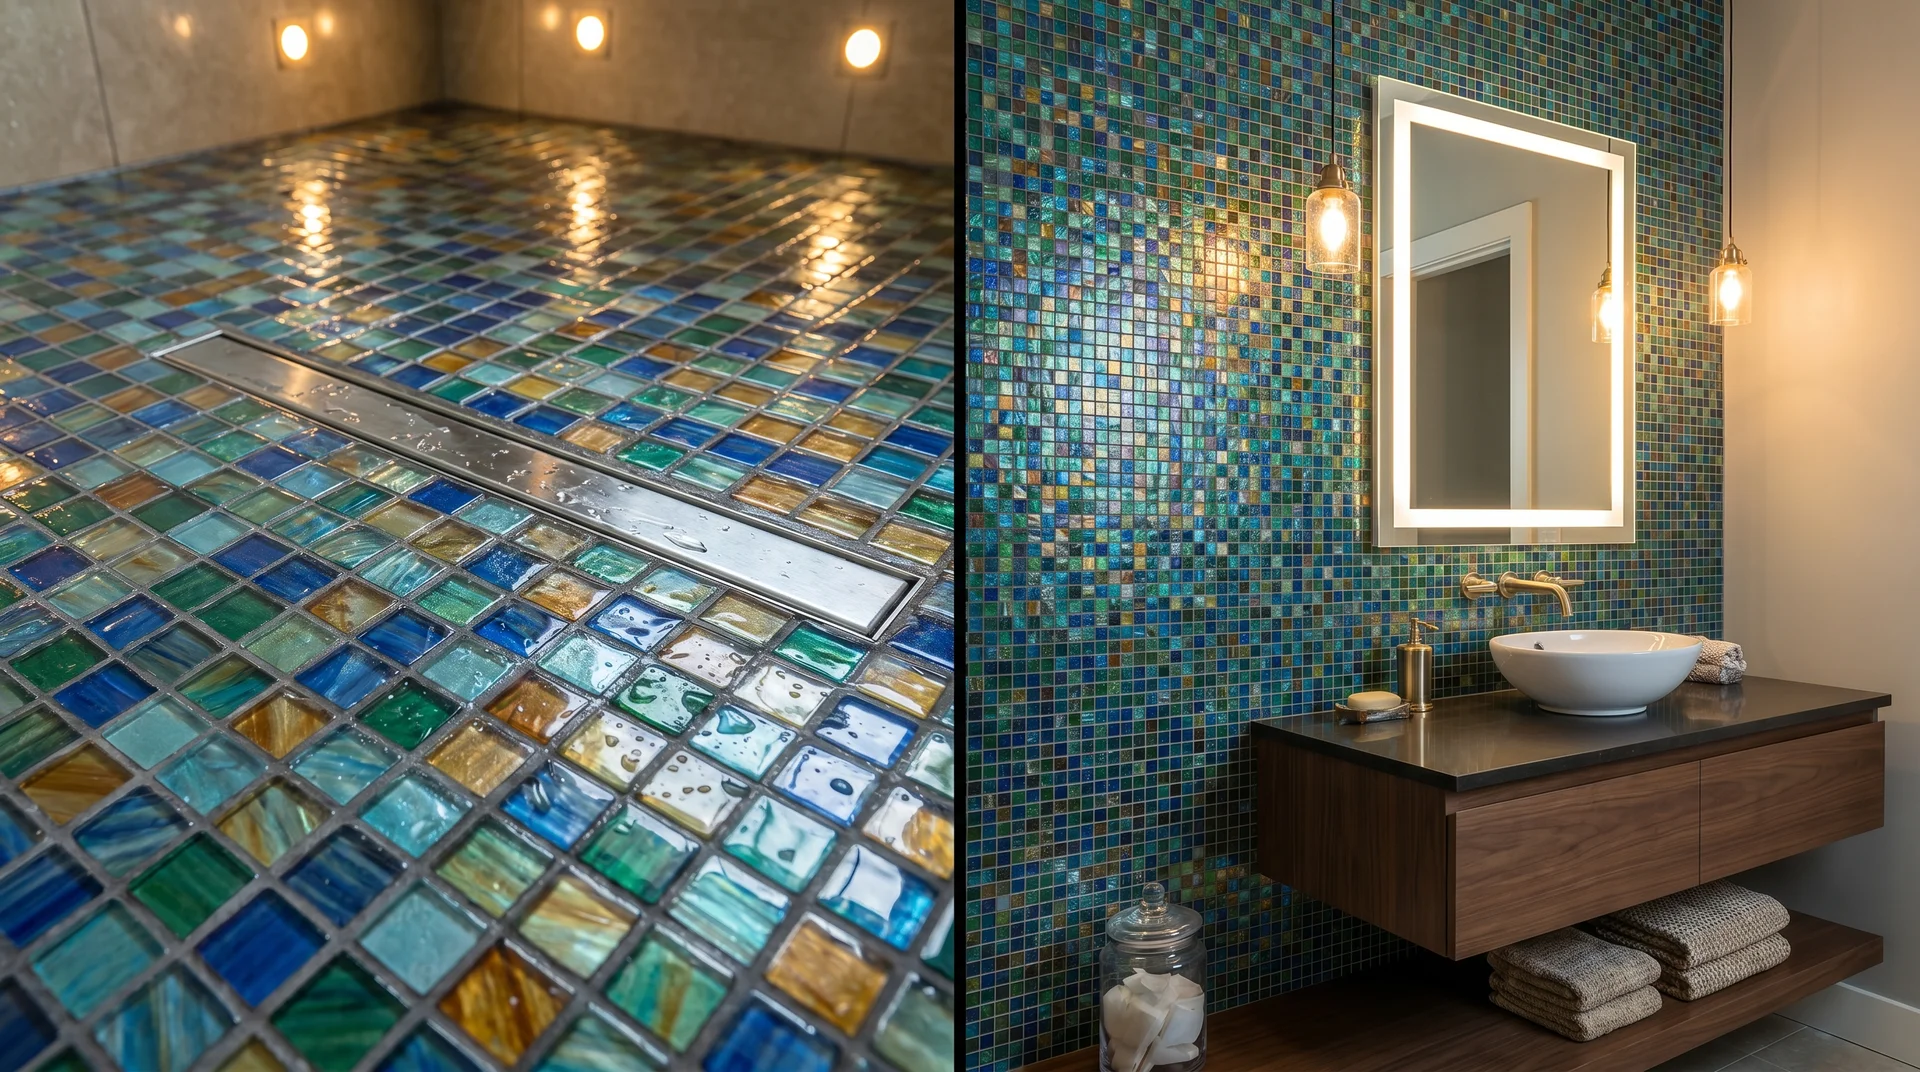
Small tiles arranged in a repeating pattern, this design has been used for thousands of years and still earns its place in modern homes. Mosaic tiles are made from small pieces of glass, stone, or ceramic assembled into a continuous surface. The smaller scale adds texture and visual detail that larger tiles simply cannot.
On floors, mosaic works best in compact wet areas. The higher number of grout lines improves grip underfoot, making it a practical choice for shower floors and bathroom floors. On walls, it creates a focused, detailed surface without overwhelming the room.
It works well in niches, feature walls, and backsplashes where the small scale can be appreciated up close.
Best for: Shower floors, bathroom walls, kitchen backsplashes, and any wet area where grip and visual detail both matter.
12. Hexagon
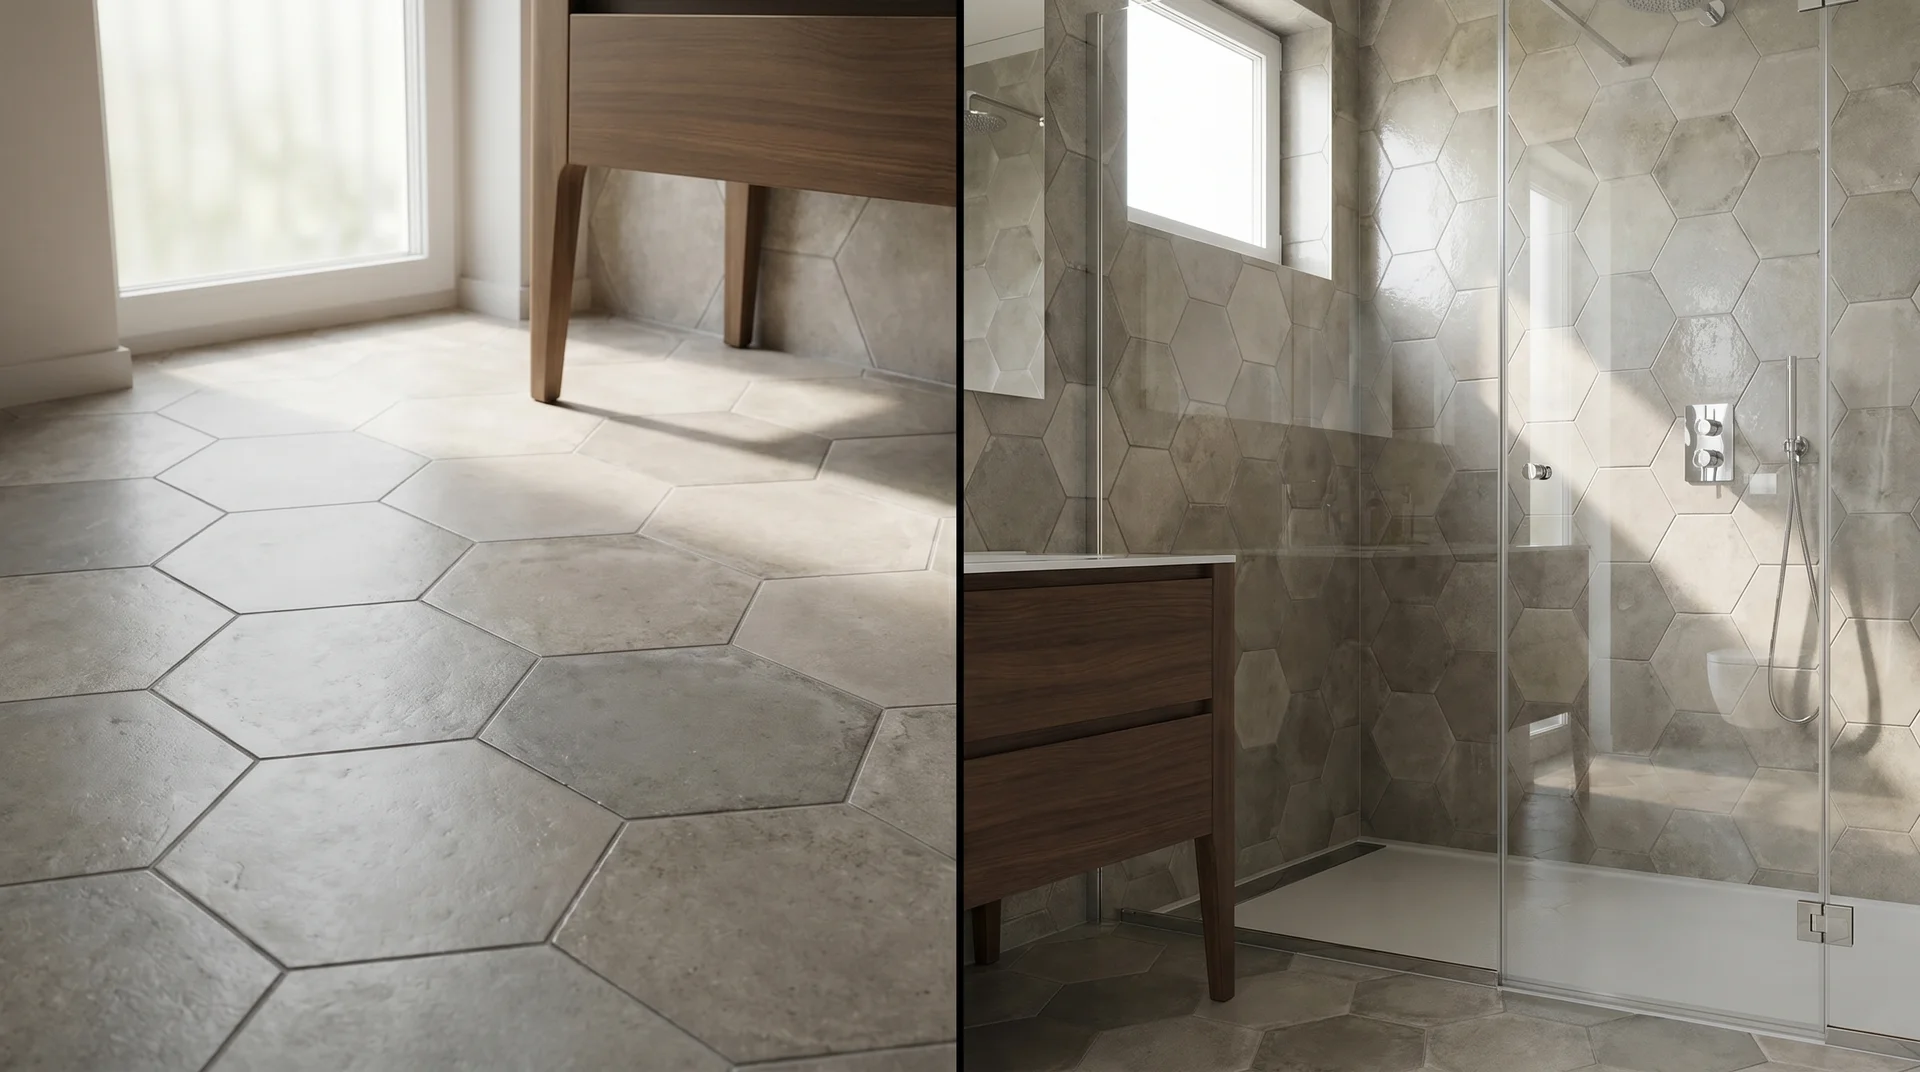
Six sides, one strong pattern. Hexagon tiles create a honeycomb layout that adds visual interest without needing bold color or complex shapes. The pattern repeats naturally across the surface, making it one of the most structured-looking layouts available.
On floors, it works well in bathrooms, entryways, and kitchens. The shape allows for creative color arrangements, a gradient, a contrasting center tile, or a simple single color, all of which look intentional in this layout. On walls, hexagon tiles add texture and depth to feature walls and backsplashes without pulling attention away from the rest of the room.
Available in sizes from small mosaic format up to large 10-inch tiles, the scale you choose changes the entire feel of the space.
Best for: Bathrooms, entryways, kitchen backsplashes, and feature walls where you want texture without a complex pattern.
13. Octagon and Dot
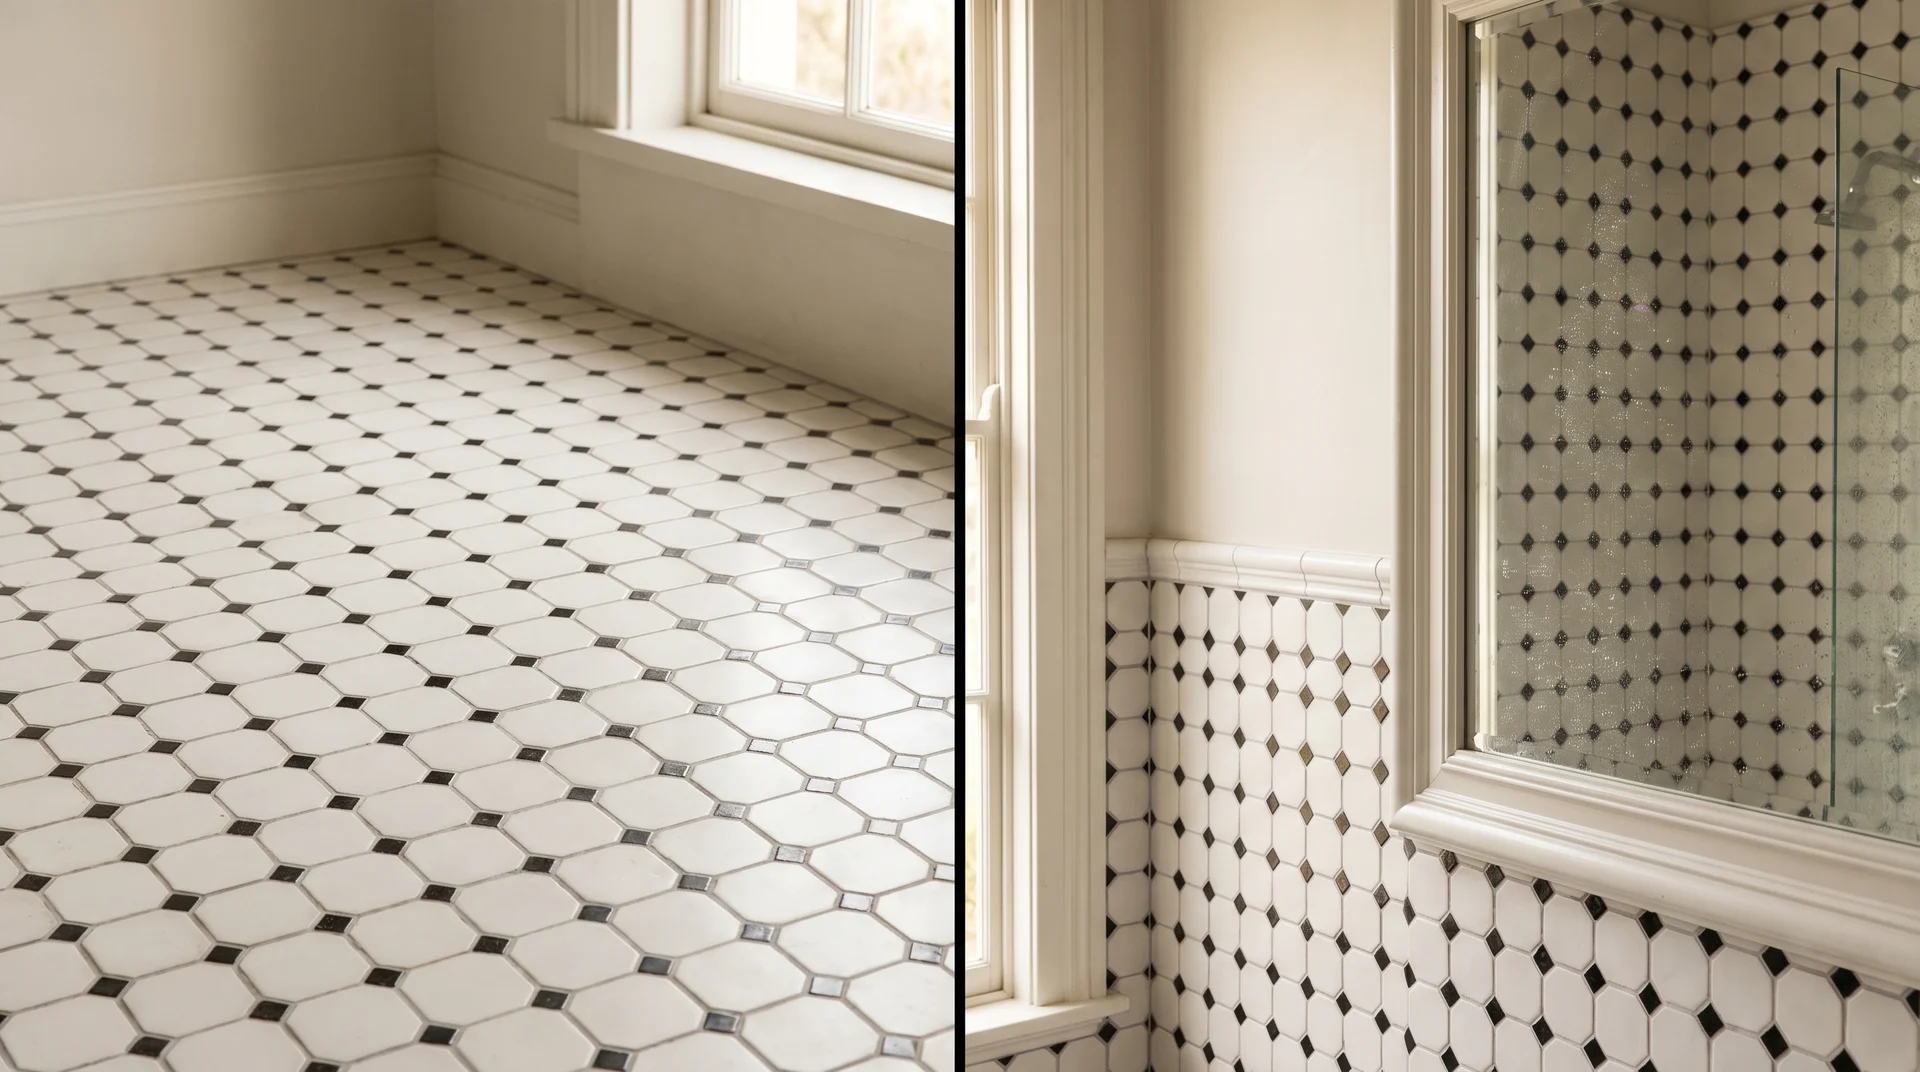
Two tile sizes, one classic result. Large octagonal tiles sit across the surface, with small square-dot tiles filling the joints between them. The contrast between the two sizes creates a repeating geometric pattern that feels both structured and classic.
On floors, this layout works well in bathrooms, entryways, and laundry rooms. The dot tile is often a contrasting color; black dots on white octagons are the most common combination, but matching tones keep the look subtle and modern. On walls, the pattern adds a traditional decorative touch to bathroom walls and shower surrounds without feeling too heavy.
The extra grout lines also improve grip in wet areas, making it a practical choice for bathroom floors.
Best for: Bathrooms, entryways, laundry rooms, and classic interiors that use two tile sizes together.
How to Choose the Right Tile Layout for Your Space
The same tile can look completely different depending on how you lay it.
1. By Room Size
Your room dimensions should be the first thing you check before picking any pattern.
| Room Size | Recommended Patterns |
|---|---|
| Small | Diagonal, Herringbone |
| Medium | Running Bond, Pinwheel |
| Large | Straight Lay, Modular |
These patterns work for both floors and walls. Match the scale of the pattern to the size of the surface, not just the room.
Pro tip: Always draw your room to scale before committing to a pattern. What looks good on paper can feel very different once you are standing in the actual space.
2. By Interior Style
The pattern on your floor should feel like a natural part of the room, not a separate decision.
| Interior Style | Recommended Patterns |
|---|---|
| Modern | Stack, Chevron, Straight Lay |
| Transitional | Herringbone, Running Bond |
| Traditional | Basketweave, Versailles, Brick |
If your room already has strong colors or textures, keep the tile layout simple. If your furniture and fittings are minimal, a bold floor pattern can carry the whole room.
3. By Budget
Knowing what each pattern costs to install helps you plan realistically from the start.
| Difficulty | Pattern | Extra Tile Needed |
|---|---|---|
| Easy | Straight Lay | 5 to 10% |
| Medium | Running Bond, Diagonal | 10 to 15% |
| Complex | Herringbone, Chevron | 15 to 20% |
Always get a labor quote before committing to a complex pattern. Labor costs vary widely depending on tile size and room shape.
Common Tile Layout Mistakes to Avoid
Even a well-chosen tile can fall flat if the layout is poorly planned. These common mistakes can affect the final look, durability, and overall finish of the space.
1. Ignoring Grout Line Width
Wide grout lines break up a pattern. Narrow lines keep it sharp. Decide on the grout width before installation begins, as it directly affects the overall look, spacing consistency, and long-term maintenance requirements.
2. Choosing Complex Patterns for Small Rooms
A herringbone in a very small bathroom can feel too busy. The pattern has no room to repeat properly. Simpler layouts almost always look better in tight spaces.
3. Not Ordering Enough Tile
Every pattern needs an extra tile for cuts. This applies to both floors and walls. Order 10-20% more than your total surface area, depending on the layout. A straight lay needs less extra.
A herringbone or chevron needs more, especially on walls where edge cuts happen more frequently.
Tile batches can vary in color from one production run to another. Order everything you need in one go to keep the color consistent across both surfaces.
4. Poor Starting Alignment
Starting the layout from the wrong point throws the whole pattern off. Always plan where the pattern begins before permanently fixing any tile.
Floor vs. Wall Tile Layouts: Key Differences
Below is a reference table to help compare tile layout patterns across different surfaces:
| Surface | Practical Needs | Best Pattern Choices | What to Consider |
|---|---|---|---|
| Floors | Foot traffic, moisture, and cleaning | Straight lay, modular, basketweave, running bond | More grout lines trap dirt, but smaller tiles grip better in wet areas |
| Shower Floors | Slip resistance, drainage | Mosaic, basketweave, small-format patterns | More grout lines improve grip underfoot |
| Walls | Mostly visual | Herringbone, chevron, stacked, running bond | More decorative freedom without durability concerns |
| Kitchen Backsplashes | Easy cleaning, visual interest | Herringbone, running bond, small stacked tile | Herringbone adds movement without floor-level maintenance issues |
| Large Floors | Proportion and balance | Large-format straight lay, modular, diagonal | Bigger tiles keep the layout balanced and less busy |
| Small Walls or Backsplashes | Scale-friendly patterns | Small herringbone, running bond, mosaic | Oversized patterns can feel too heavy in tight spaces |
Conclusion
The pattern you lay your tiles in shapes the entire feel of a room. A straight lay keeps things clean and cost-effective. Herringbone adds movement and character.
A diagonal layout makes a small room feel more open. Each one does something different, and that difference shows clearly once the floor is done.
The best tile layout is not always the most complex one. It is the one that fits your room size, matches your style, and works within your budget. Before you commit, dry-lay your tiles first. Check alignment with your room’s focal points.
Order more tile than you think you need. Your floor sets the tone for everything above it. Choose your tile pattern layout with that in mind, and the result will speak for itself.
Frequently Asked Questions
What Grout Color Works Best for Different Tile Patterns?
Matching grout softens the pattern and keeps the surface calm. Contrasting grout highlights every line and makes bold layouts like herringbone or checkerboard stand out more.
Does Tile Size Affect Which Layout Pattern I Should Use?
Yes. Large tiles suit straight lay and diagonal layouts, while small tiles work better in detailed patterns like basketweave or pinwheel. Rectangular tiles are best for herringbone and running bond.
Which Tile Pattern is Most Popular Right Now?
The straight lay is the most widely used pattern in homes today. Herringbone and chevron are the top trending choices for kitchen backsplashes and bathroom feature walls in 2026.