You stare up at the ceiling, roller in hand, and suddenly you’re second-guessing the whole plan. What if the texture just falls apart? What if the paint makes it look worse?
We all have been there. Painting a popcorn ceiling isn’t hard, but it’s the kind of job that goes sideways fast if you skip three things: checking whether your ceiling is safe to paint, determining whether it’s ever been painted, and choosing the right application method.
This post is built around those decisions first, steps second. Get through these sections in order, and you’ll know exactly what your ceiling needs before a single drop of paint comes near it.
Can You Paint a Popcorn Ceiling?
Yes, you can paint a popcorn ceiling as long as the texture is in good condition, dry, and securely attached to the surface.
The most effective approach is to use a thick-nap roller or a paint sprayer and apply light, even coats so the texture is not disturbed or weighed down.
Proper preparation, including checking for damage, testing for older ceiling safety concerns like asbestos, and protecting the room, is essential for a clean result.
When done carefully, painting can refresh the look of a popcorn ceiling without the need for removal.
Why Paint a Popcorn Ceiling?
Painting a popcorn ceiling is a cost-effective way to refresh an outdated or stained surface without removing the existing texture. It improves the look of the room while preserving the ceiling structure when done carefully.
- To refresh the overall appearance of the room, it helps modernize old, yellowed ceilings and instantly brightens the space.
- To cover stains, smoke marks, or discoloration: Paint hides common aging issues without requiring full replacement or scraping.
- To avoid the cost and mess of removal, it delivers a visual upgrade at a fraction of renovation expense.
- To extend the life of the existing ceiling texture, a proper coat of paint can protect and stabilize the surface for years.
Project Overview
- Working Time: 2 to 4 hours
- Total Time: 1 to 2 days (including drying time between coats)
- Skill Level: Beginner
- Estimated Cost: 100 to 150 dollars
- Yield: Approximately 500 square feet of ceiling coverage
How to Prep a Room for Painting a Popcorn Ceiling?

Prep for a popcorn ceiling job is more involved than a regular wall paint project, and skipping any of it will cost you time later. Here’s the order that actually makes sense.
Step 1: Cover the Walls and Floor
Prep the whole room before painting. Use drop cloths on the floor and plastic sheeting on the walls to catch splatter from the textured ceiling.
Step 2: Protect Fixtures and Fans
Remove ceiling fans and light fixtures if possible. If not, wrap them fully with plastic and tape the edges securely.
Step 3: Clean an Unpainted Ceiling Gently
Use a vacuum with a soft brush attachment on low suction. Avoid water, damp cloths, or liquid cleaners because the unpainted texture can loosen.
Step 4: Clean a Previously Painted Ceiling
Start with gentle vacuuming to remove dust. For grease or stains, use an oil-based primer instead of washing the surface.
Step 5: Avoid Moisture Before Painting
Do not scrub or wet-clean the ceiling. Moisture can soften old paint or damage popcorn texture before you even start painting.
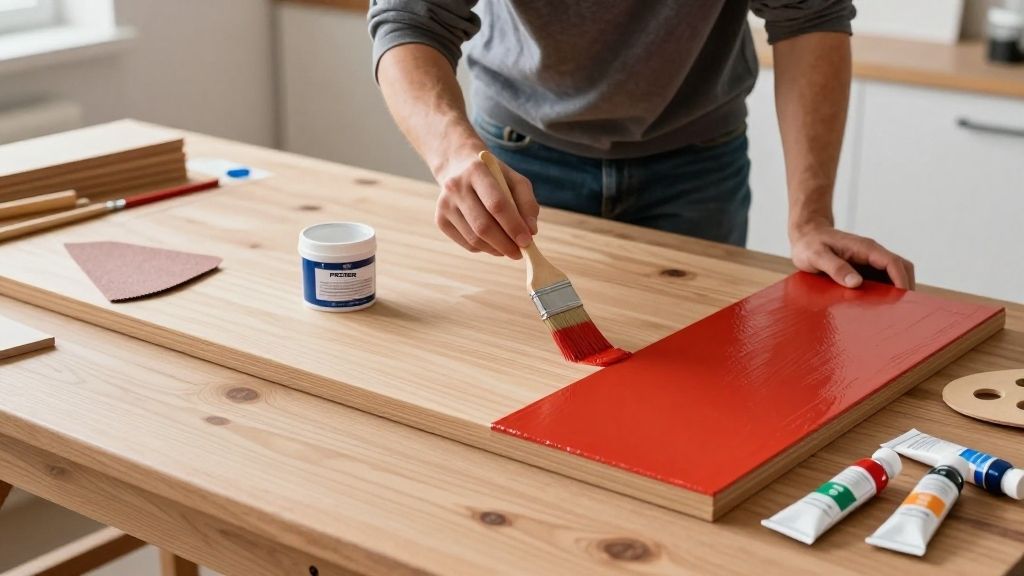
Tools You Need to Paint a Popcorn Ceiling
Painting a popcorn ceiling requires the right tools to avoid damaging the texture and ensure even coverage across the surface. Using proper equipment also reduces splatter and makes the job easier to control.
| Tool | Purpose |
|---|---|
| Thick-nap paint roller (3/4 inch or more) | Helps apply paint evenly over textured surfaces without flattening the popcorn texture |
| Extension pole | Allows you to paint the ceiling comfortably from the floor without constant ladder use |
| Angled brush (2–3 inches) | Used for cutting in edges where the ceiling meets walls and corners |
| Paint tray with liner | Holds paint for easy roller loading and faster cleanup |
| Painter’s tape | Protects walls, trim, and fixtures from accidental paint marks |
| Plastic sheeting | Covers walls, windows, and furniture to prevent splatter damage |
| Drop cloths | Protects flooring from paint drips and spills |
| Ladder or step stool | Helps reach edges and detail areas safely |
| Vacuum with soft brush attachment | Removes dust without disturbing the ceiling texture |
| Paint sprayer (optional) | Useful for large ceilings to achieve faster, even coverage |
| Safety gear (mask and goggles) | Protects against dust and paint particles during overhead work |
How to Paint a Popcorn Ceiling: Step-by-Step Guide
Now we get into it. Work through these steps in order, and the texture stays on the ceiling where it belongs.
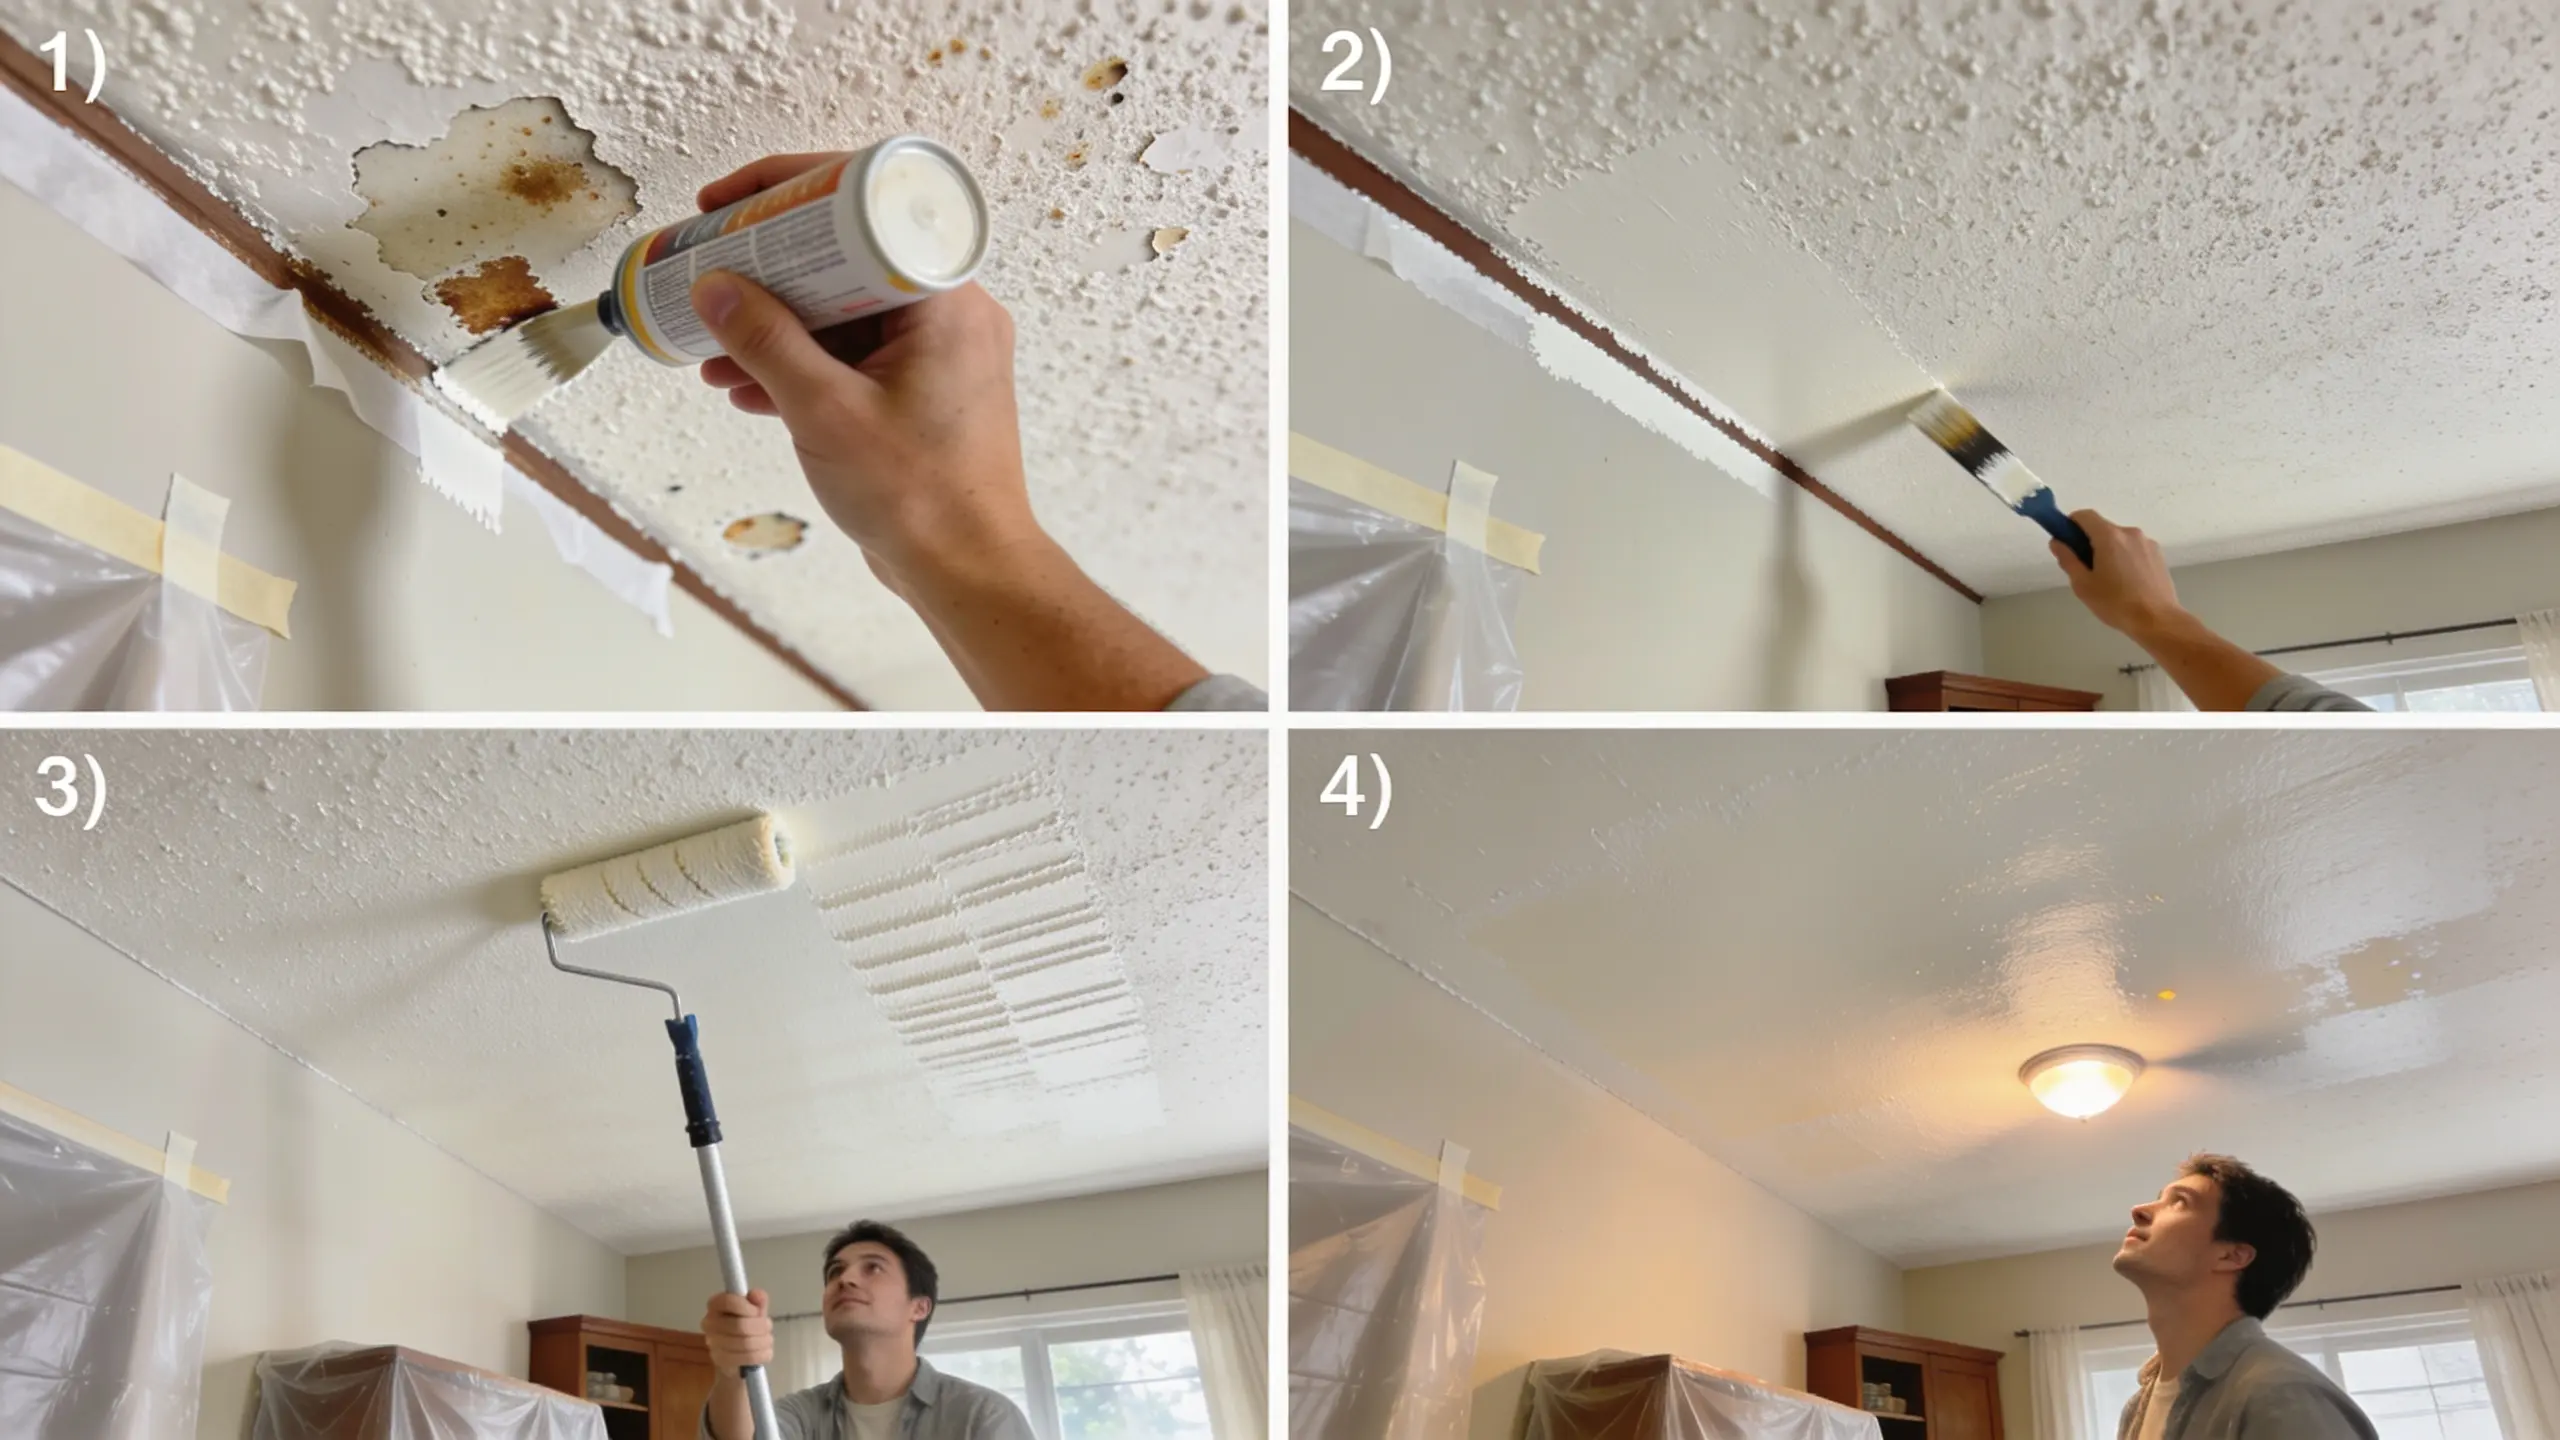
Step 1: Spot-Prime Stains and Repair Loose Texture
Handle stains and damaged areas first to ensure an even finish and proper paint adhesion across the ceiling.
- Fix the problem areas first before painting the whole ceiling
- Apply oil-based primer to stains with a brush and let it dry fully
- Repair damaged texture using spray from 12–14 inches away and let it dry
- Prime the entire ceiling only if it’s new or heavily stained; spot-prime
Step 2: Cut In Around Edges with a Brush
Create a clean edge around the ceiling perimeter to ensure a neat finish before using a roller.
- Cut in first by painting a 2–3 inch edge around the ceiling with an angled brush
- Work in small sections for better control and cleaner lines
- Optionally scrape a thin strip at the ceiling edge for a smoother finish
- Keep walls covered with plastic to protect from drips and splatter
Step 3: Rolling Technique for Popcorn Ceilings
Use a light, controlled rolling method to apply paint evenly without damaging the textured surface.
- Load the roller evenly and remove excess to avoid dripping or oversaturation
- Roll in one direction per coat, then switch direction for the second coat
- Avoid back-rolling to prevent pulling off the texture
- Work in small 3×3 sections and overlap slightly for even coverage
Step 4: Drying Time Between Coats
Allow enough time between coats so the surface sets properly and the next layer applies evenly without lifting or streaking.
- Use a low-angle work light to spot missed areas after the first coat
- Let the paint dry fully (2–4 hours) before applying the second coat
- Apply the second coat in the opposite direction from the first
- Remove tape and plastic within 24 hours to avoid peeling edges
Paint Sprayers and Rollers for Popcorn Ceilings
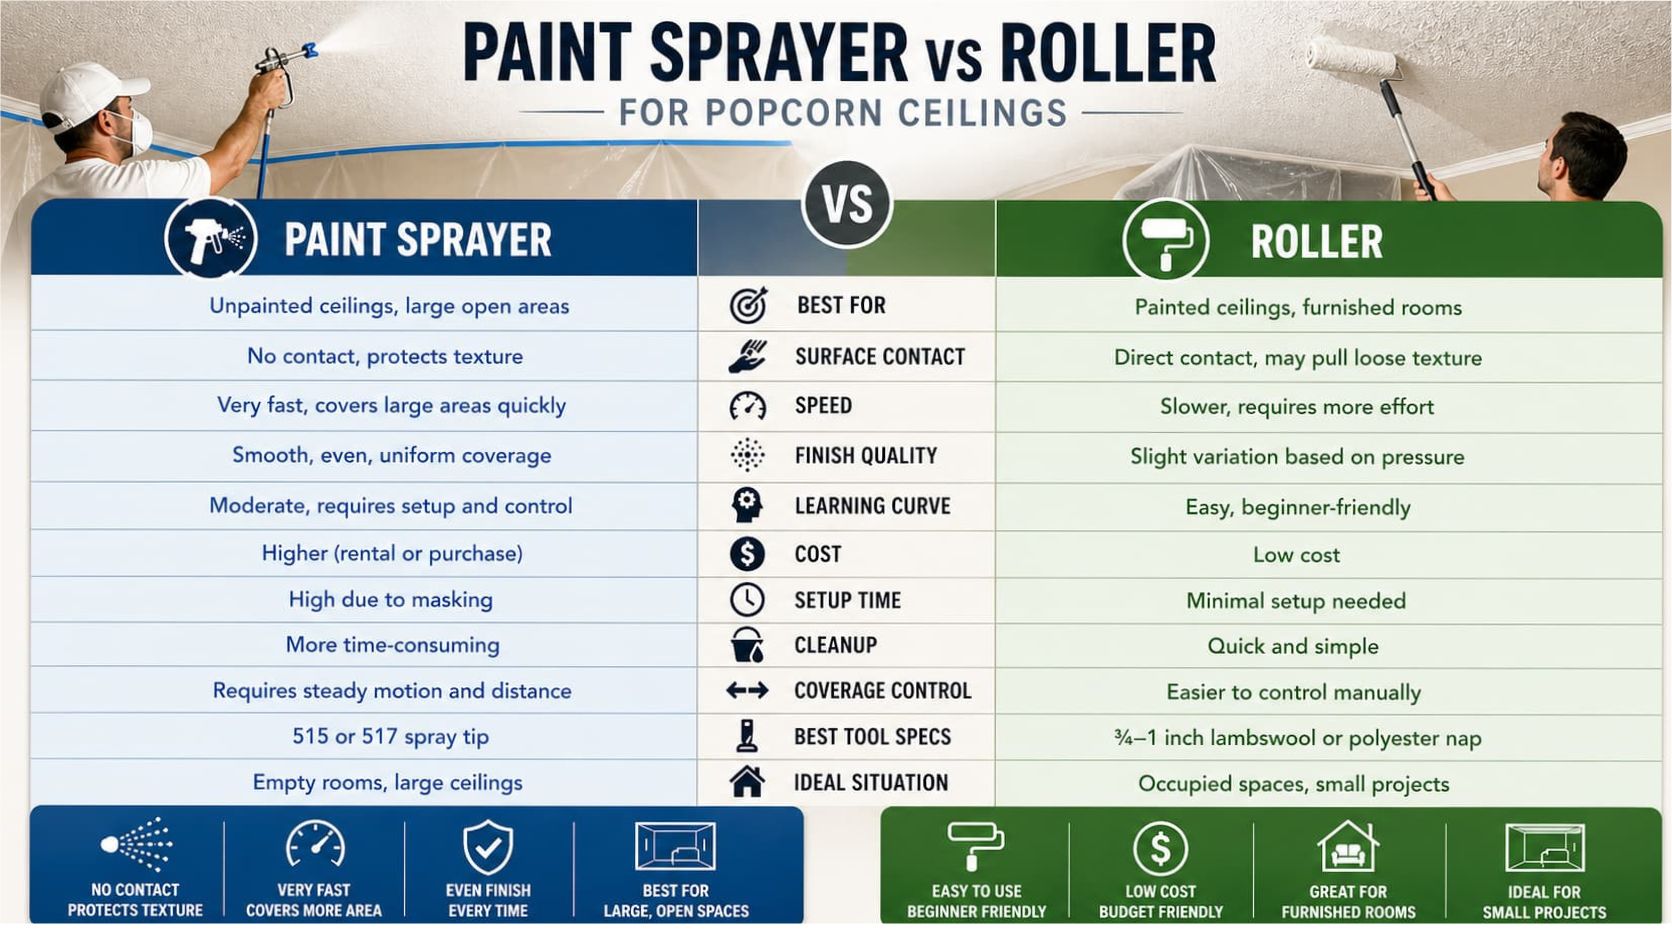
When painting a popcorn ceiling, choosing between a paint sprayer and a roller depends on the condition of your ceiling and the results you want.
Paint Sprayers: Sprayers are great for large ceilings or intricate areas, as they apply paint quickly and evenly. It’s perfect for smooth, undamaged popcorn textures, but it can be messy.
Rollers: A more controlled option, especially for ceilings with texture damage or delicate areas. Use a thick-nap roller to ensure even coverage without damaging the popcorn texture.
Both methods can work, but your ceiling’s condition will help determine the best choice.
Common Mistakes When Painting Popcorn Ceilings
Painting a popcorn ceiling looks simple, but small mistakes can quickly damage the texture or leave an uneven finish. Avoiding these issues is key to a clean, long-lasting result.
| Mistake | Why it happens | What goes wrong |
|---|---|---|
| Using too much paint on the roller | Trying to cover faster | Drips, sagging texture, uneven finish |
| Pressing the roller too hard | Lack of experience | Popcorn texture breaks or flattens |
| Skipping primer on stains | Assuming paint will cover everything | Stains bleed through after drying |
| Using the wrong roller type | Choosing short nap rollers | Poor coverage and patchy ceiling |
| Overworking the same area | Trying to fix immediately | Texture gets pulled off the ceiling |
| Not protecting the room properly | Rushing the prep stage | Paint splatter on walls and furniture |
| Painting too fast | Skipping section control | Uneven color and visible lap marks |
Should You Paint or Remove Your Popcorn Ceiling?
This question deserves an actual answer, not the usual “it depends on your situation” non-answer.
Paint if:
- The texture is in solid condition with no large failing sections
- Asbestos is either confirmed absent or confirmed present with intact texture (painting is a legitimate encapsulant)
- You’re not planning to sell the home in the next 12 months
- Your budget for this ceiling is under $200
- You’re looking for a weekend project, not a multi-week renovation
Remove if:
- You’re preparing the home for sale; smooth ceilings are consistently preferred by buyers and can help justify a higher asking price
- You’re already doing a full room gut renovation, and the timeline is flexible
- The texture has failed in multiple areas, and the repair list is longer than the painting list
- Asbestos tests come back negative (unpainted, no asbestos = best possible removal conditions)
Cover with New Drywall if:
- Asbestos is confirmed, and the texture is deteriorating
- The ceiling has extensive water damage in the drywall behind the texture
- You want a truly smooth ceiling finish
Painting a popcorn ceiling makes future removal harder, as it seals the surface. A good paint job typically lasts 5–10 years, depending on room conditions.
How Long Does a Painted Popcorn Ceiling Last?
A painted popcorn ceiling typically lasts 5 to 10 years when properly prepared and painted with the right materials, though its lifespan can vary depending on room conditions and maintenance.
In dry, low-traffic areas like bedrooms or living rooms, the finish tends to hold up longer, while kitchens and bathrooms may show wear sooner due to moisture, heat, and grease buildup.
The durability also depends on factors like paint quality, whether primer was used, and how carefully the paint was applied without overloading the texture.
Regular light dusting and good ventilation can help extend its appearance and keep it looking clean for years.
Conclusion
Painting a popcorn ceiling can feel challenging, but with the right approach, it becomes manageable and worth the effort.
Taking time to prep the room, protect surfaces, and use the correct tools makes a noticeable difference in the final result.
Whether you choose a roller or a sprayer, the key is to work carefully and avoid putting too much pressure on the texture.
Small details like proper cutting in, controlled rolling, and allowing enough drying time help achieve a clean, even finish.
It is also important to think ahead, as painting will make future removal more difficult. With patience and the right steps, you can refresh the ceiling and improve the overall look of the room for years to come.